

Skip to content

Updating visuals

If you see any images containing outdated UI, please bear with us.

We are updating all content as quickly as possible to mirror our new UI.

Installing WeWeb MCP

Connecting a client to WeWeb MCP takes two steps: add the server to your AI client, then sign in to WeWeb and authorize access. The server is available at:

https://ai-api.weweb.io/v1/mcp

New to MCP? Start with Intro to WeWeb MCP →.

Supported clients

The following clients are supported today:

ClientConnection method
ChatGPTAdd a custom connector with the server URL
Claude DesktopAdd a custom connector with the server URL, or edit the config file manually
Claude CodeSingle terminal command
CursorMCP config entry
VS CodeMCP config entry, or add through MCP settings
CodexAdd a Streamable HTTP server in settings, then click Authenticate
AntigravityAdd an entry to mcp_config.json

Connect your client

ChatGPT

Follow along in the guide above, or use these steps:

  1. Click your user profile.
  2. Click Settings.
  3. Click Connectors.
  4. Click Advanced settings.
  5. Toggle on developer mode.
  6. Click Create.
  7. Name it WeWeb.
  8. Copy the MCP URL from this page:
https://ai-api.weweb.io/v1/mcp
  1. Paste it into the Connection field in ChatGPT.
  2. Confirm you wish to create the app.
  3. When your browser opens, go to WeWeb to sign in.
  4. Click Authorize and approve access.
Claude Desktop

Follow along in the guide above, or use these steps:

  1. Click the + in the chat.
  2. Hover Connectors.
  3. Hover Add connector.
  4. Click Add custom connector.
  5. Name the connector WeWeb.
  6. Copy the MCP URL from this page:
https://ai-api.weweb.io/v1/mcp
  1. Paste the URL into the URL field in Claude.
  2. Click Add.
  3. When your browser opens, go to WeWeb to sign in.
  4. Click Authorize and approve access.

Manual setup

If you prefer to wire up the server by hand, open Claude Desktop's configuration file and register WeWeb there:

Follow along in the guide above, or use these steps:

  1. Copy the JSON block below.
  2. Click your user profile in the bottom left.
  3. Click Settings.
  4. Click Developer.
  5. Click Edit Config.
  6. Open the .json file in your code editor of choice.
  7. Inside the mcpServers object, paste the weweb-ai JSON you copied from above.
  8. Confirm your file matches the layout shown in the guide.
  9. Save the file (⌘ + S on Mac, Ctrl + S on Windows).
  • MacOS: ~/Library/Application Support/Claude/claude_desktop_config.json
  • Windows: %APPDATA%\Claude\claude_desktop_config.json
json
{
  "mcpServers": {
    "weweb-ai": {
      "command": "npx",
      "args": ["-y", "mcp-remote", "https://ai-api.weweb.io/v1/mcp"]
    }
  }
}

INFO

Already running other MCP servers? Place the "weweb-ai" block alongside them, inside the single mcpServers object. Keeping one mcpServers key is what keeps the file valid JSON.

Restart Claude Desktop, and on restart you will be prompted to authenticate with WeWeb.

Claude Code

Follow along in the guide above, or use these steps:

  1. Copy the command below.
  2. Paste the command into your terminal.
bash
claude mcp add --transport http WeWeb https://ai-api.weweb.io/v1/mcp

The first time you use a WeWeb tool, Claude Code prompts you to authenticate.

Cursor

Follow along in the guide above, or use these steps:

  1. Copy the JSON block below.
  2. Click the settings cog icon.
  3. Go to MCP.
  4. Click Add new global MCP server.
  5. Inside the mcpServers object, paste the weweb-ai JSON you copied from above.
  6. Confirm your file matches the layout shown in the guide.
  7. Save the file (⌘ + S on Mac, Ctrl + S on Windows).
  8. Restart Cursor, and on restart you will be prompted to authenticate with WeWeb.
json
{
  "mcpServers": {
    "weweb-ai": {
      "command": "npx",
      "args": ["-y", "mcp-remote", "https://ai-api.weweb.io/v1/mcp"]
    }
  }
}

INFO

Already running other MCP servers? Place the "weweb-ai" block alongside them, inside the single mcpServers object. Keeping one mcpServers key is what keeps the file valid JSON.

VS Code

Follow along with these steps to add WeWeb to your user-level MCP configuration:

  1. Open the Command Palette (⌘ + Shift + P on Mac, Ctrl + Shift + P on Windows).
  2. Run MCP: Open User Configuration.
  3. Copy the JSON block below.
  4. Inside the servers object, add the weweb-ai block alongside any other servers you already have.
  5. Save the file (⌘ + S on Mac, Ctrl + S on Windows).
  6. Restart VS Code, and on restart you will be prompted to authenticate with WeWeb.
json
{
  "servers": {
    "weweb-ai": {
      "type": "http",
      "url": "https://ai-api.weweb.io/v1/mcp"
    }
  }
}

INFO

Already running other MCP servers? Place the "weweb-ai" block alongside them, inside the single servers object. Keeping one servers key is what keeps the file valid JSON.

To add WeWeb to one project only, run MCP: Open Workspace Folder MCP Configuration in step 2 instead. This saves the server to .vscode/mcp.json in your workspace.

Codex

Follow along in the guide above, or use these steps:

  1. Open your profile menu in Codex and click Settings.
  2. Click Settings again to open Codex settings.
  3. Click MCP servers.
  4. Click Add server.
  5. Name the MCP WeWeb.
  6. Select Streamable HTTP.
  7. Copy the MCP URL from this page:
https://ai-api.weweb.io/v1/mcp
  1. Paste the URL into the URL field in Codex.
  2. Click Save.
  3. Click Authenticate, then sign in to WeWeb and approve access when prompted.
Antigravity

Follow along in the guide above, or use these steps:

  1. Click the ... menu in the Agent panel.
  2. Click MCP Servers.
  3. Click Manage MCP Servers.
  4. Click View raw config.
  5. Copy the JSON block below.
  6. In your mcp_config.json file, paste the weweb block inside the mcpServers object.
  7. Confirm your file matches the layout shown in the guide.
  8. Save the file (⌘ + S on Mac, Ctrl + S on Windows).
  9. Restart Antigravity, and on restart you will be prompted to authenticate with WeWeb.
  • MacOS and Linux: ~/.gemini/antigravity/mcp_config.json
  • Windows: %USERPROFILE%\.gemini\antigravity\mcp_config.json
json
{
  "mcpServers": {
    "weweb": {
      "command": "npx",
      "args": ["-y", "mcp-remote", "https://ai-api.weweb.io/v1/mcp"]
    }
  }
}

INFO

Already running other MCP servers? Place the "weweb" block alongside them, inside the single mcpServers object. Keeping one mcpServers key is what keeps the file valid JSON.

Authorize access

No matter which client you use, connecting to the WeWeb MCP server prompts you to sign in to WeWeb and authorize access. The first time you connect, or when your session expires, your client opens a browser window with a screen like this:
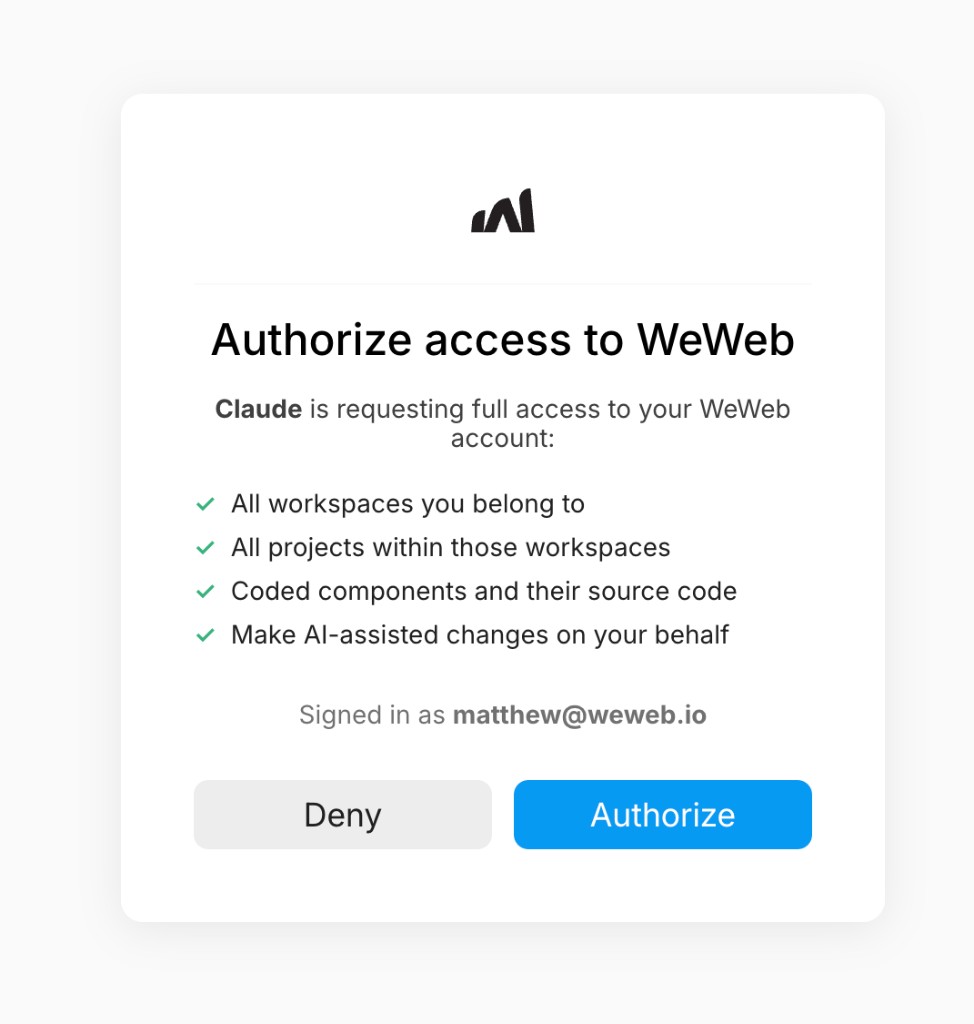
Authorize access to WeWeb screen showing requested permissions and Authorize button

Review what access is being requested, confirm you are signed in to the correct WeWeb account, then click Authorize. Until you approve, the agent cannot call WeWeb tools on your behalf.

Check the connection

Once your client is connected and authorized, ask the agent to list your workspaces and projects, then name the project you want to work on. If it comes back with your project list, your setup is working and you can start building.

CONTINUE LEARNING

Your client can now call WeWeb tools. Each tool is a single action the agent can run, such as creating a page or adding a table.

See all available tools →