

Appearance
Stripe as a data source for tables
Besides using Stripe actions in workflows, you can use Stripe as a data source for tables in WeWeb. A table linked to Stripe loads records from the Stripe resource you choose (Customers, Products, Prices, Invoices, Subscriptions, Checkout Sessions, or Payments/Payment Intents). You configure a view (filters and pagination). That view can be bound to table components (e.g. Data Grid) or fetched from the interface with the Table View: Fetch action.
Add a Stripe table
In WeWeb, open the
Data & APItab. TheTablessubtab opens by default.Click
Add Table, then choose Stripe inSelect a data source.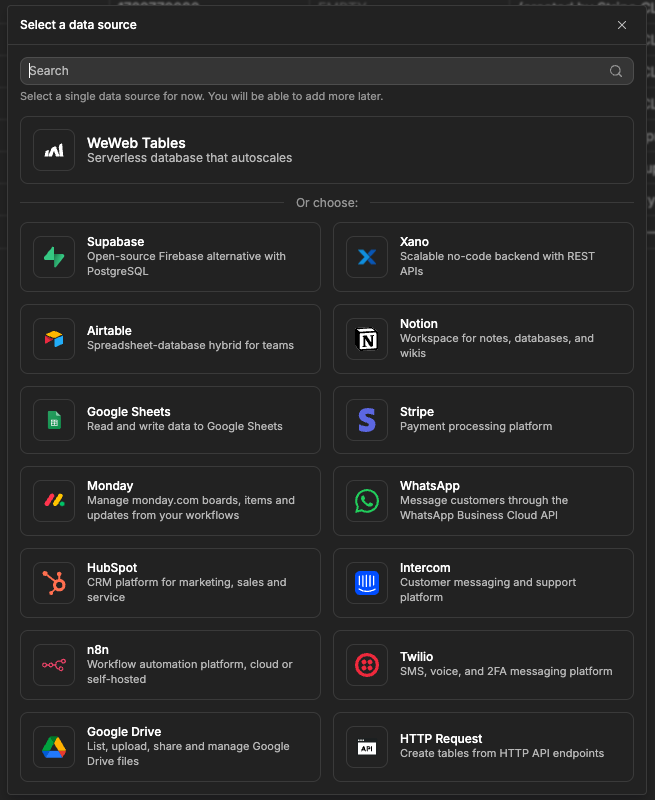
In
Setup Stripe, select your StripeConnection.Choose the
Resourceyou want to use:- Customers — Stripe customers.
- Prices — Stripe prices (one-time or recurring).
- Invoices — Stripe invoices.
- Subscriptions — Stripe subscriptions.
- Checkout Sessions — Stripe Checkout sessions.
- Products — Stripe products (catalog).
- Payments — Payment Intents.
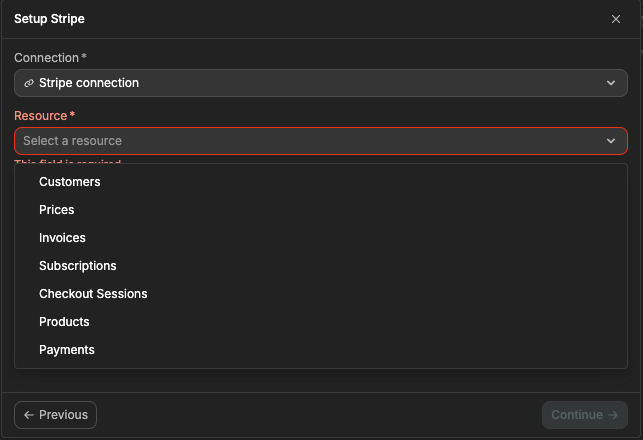
Give the table a
Name, then clickContinue. The table is now available and its columns match the Stripe API response for that resource (e.g.id,object,name,descriptionfor Products).
Configure a view
A view defines how records are loaded: which filters apply, and how many records come back at a time. Open the view and you get three tabs: Parameters for the values you want to pass in from your app, Pagination for how many records load at once, and Configuration for the filters. Stripe views use Stripe’s list API for the resource you picked, so the Configuration tab offers the filters Stripe supports for that resource. Use this for “show me the first N products” or “customers by email.”
NEED A FREE-FORM QUERY?
The Configuration tab offers the filters Stripe supports for the resource, so there is no query field to write an expression in. When you need that kind of filtering (for example, finding subscriptions by metadata), use a search action in a workflow instead: Search Products, Search Prices, Search Subscriptions, or Search Payment Intents. See the Actions reference.
Filters by resource
The filters you see depend on the resource. The most common ones are at the top of Configuration; the rest sit under Advanced Filters, listed after “advanced” below.
Products — Active (Active / Archived, empty lists both), Shippable (Shippable / Not Shippable), URL, Product IDs; advanced: Created (timestamp range).
Prices — Active, Currency, Product (ID), Type (one_time / recurring); advanced: Created, Recurring (object).
Customers — Email (exact match); advanced: Created (timestamp range).
Invoices — Customer (ID), Status (draft / open / paid / uncollectible / void), Subscription (ID); advanced: Created, Due Date (timestamp range).
Subscriptions — Customer (ID), Price (ID), Status (active, past_due, unpaid, canceled, incomplete, incomplete_expired, trialing, all or ended); advanced: Collection Method, Created, Current Period Start/End (timestamp ranges).
Checkout Sessions — Customer (ID), Status (open / complete / expired); advanced: Payment Intent (ID), Subscription (ID), Payment Link (ID), Created (timestamp range).
Payments (Payment Intents) — Customer (ID); advanced: Created (timestamp range).
Pagination
Pagination lives in its own Pagination tab, next to Configuration, so it works the same way whichever resource you picked. Rows per page sets how many records come back in one load: 10 when you leave it empty, 100 at most. The 20, 50 and 100 buttons next to the field fill it in for you. Stripe pages with a cursor rather than page numbers, which has one practical consequence.
LOAD MORE ONLY
Stripe views page with the Load more action, not with the numbered pagination component. Numbered pages need a total count and numeric offsets, which Stripe’s cursor pagination does not provide, so the numbered paginator renders everything as a single page.
Load more also raises an error once every record has been loaded, and that stops the workflow at this step. Wrap it in a Try/Catch and treat the catch branch as the signal that you have reached the end of the list.
When the view is loaded (e.g. by a table component or Table View: Fetch), the backend calls the Stripe list API with these options and returns the records. The table’s columns match the Stripe object shape (e.g. Products have id, name, description, active, created, metadata, etc.).
Use the table in the interface
- Bind to a component — In the binding menu, under Table Views, select the view you configured. Bind it to a Data Grid, repeating group, or list so the component displays the Stripe records. Data loads when the view is fetched (e.g. on page load or when you call Table View: Fetch).
- Table View: Fetch — In an interface workflow, add the Table View: Fetch action, choose your Stripe table view, and pass any parameters the view expects (e.g. for dynamic filters). Use the result to update a variable or refresh the bound data.
- Pagination — Add the
Load moreaction to fetch the next batch of records, as described above. Numbered pagination does not work with a Stripe view.
Columns per resource
Each Stripe table type has fixed columns that match the Stripe API:
- Products — id, object, active, created, default_price, description, images, livemode, metadata, name, and others.
- Prices — id, object, active, currency, product, unit_amount, recurring, type, and others.
- Customers — id, object, address, email, name, phone, metadata, and others.
- Invoices — id, object, amount_due, amount_paid, customer, status, subscription, and others.
- Subscriptions — id, object, customer, status, items, and others. The current period start and end now live on each item (
items.data[]), not as top-level columns. - Checkout Sessions — id, object, customer, status, amount_total, currency, payment_status, and others.
- Payments — id, object, amount, currency, customer, status, and others (Payment Intents).
You can bind any of these columns in your layout. For full field lists, see the Stripe API reference for each object (e.g. Product, Price, Customer, Invoice, Subscription, PaymentIntent).
For the general pattern of tables, views, and fetching data, see Working with data and Table View: Fetch.