Appearance
Rich Text Input
The Rich Text Input provides a versatile editor for creating and editing formatted text content. It supports headings, lists, tables, links, mentions, and extensive formatting options. You can use it as an editor for content creation or in read-only mode for displaying rich text.
Features
- Rich Formatting: Bold, italic, underline, strikethrough, and text colors
- Text Structure: Headings (H1-H6), paragraphs, lists, and blockquotes
- Advanced Elements: Tables, links, images, and code blocks
- Mention System: Tag users or entities with customizable mention lists
- Multiple Output Formats: HTML or Markdown output
- Custom Styling: Style each element type independently
- Custom Menu: Build your own editing toolbar
- Form Integration: Works seamlessly with form validation
- Read-Only Mode: Display formatted content without editing capabilities
Getting Started
Using AI
The quickest way to set up a rich text input is by using AI:
Ask AI to add the rich text input with specific requirements:
- "Add a rich text editor for blog post content"
- "Create a rich text input with mentions enabled for user tagging"
- "Add a minimal rich text editor with only basic formatting"
Continue refining by asking for specific features:
- "Enable mentions with user data from my users collection"
- "Add table support to the rich text editor"
- "Style the headings to match my design system"
Manual Setup
- Add a Rich Text Input element from the
Addpanel - Configure basic settings:
- Set initial content in the
Init valueproperty - Choose output format (HTML or Markdown)
- Enable or disable editing mode
- Set initial content in the
- Configure mentions (optional):
- Enable
Mentionstoggle - Bind
Mentions Listto your user data - Map ID and Label properties
- Enable
- Customize the toolbar:
- Show/hide specific formatting options
- Enable custom menu for complete control
- Style different text elements:
- Configure heading styles (H1-H6)
- Style paragraphs, links, and mentions
- Customize table and code block appearance
Working With Content
Content Creation
The rich text editor provides an intuitive interface for content creation:
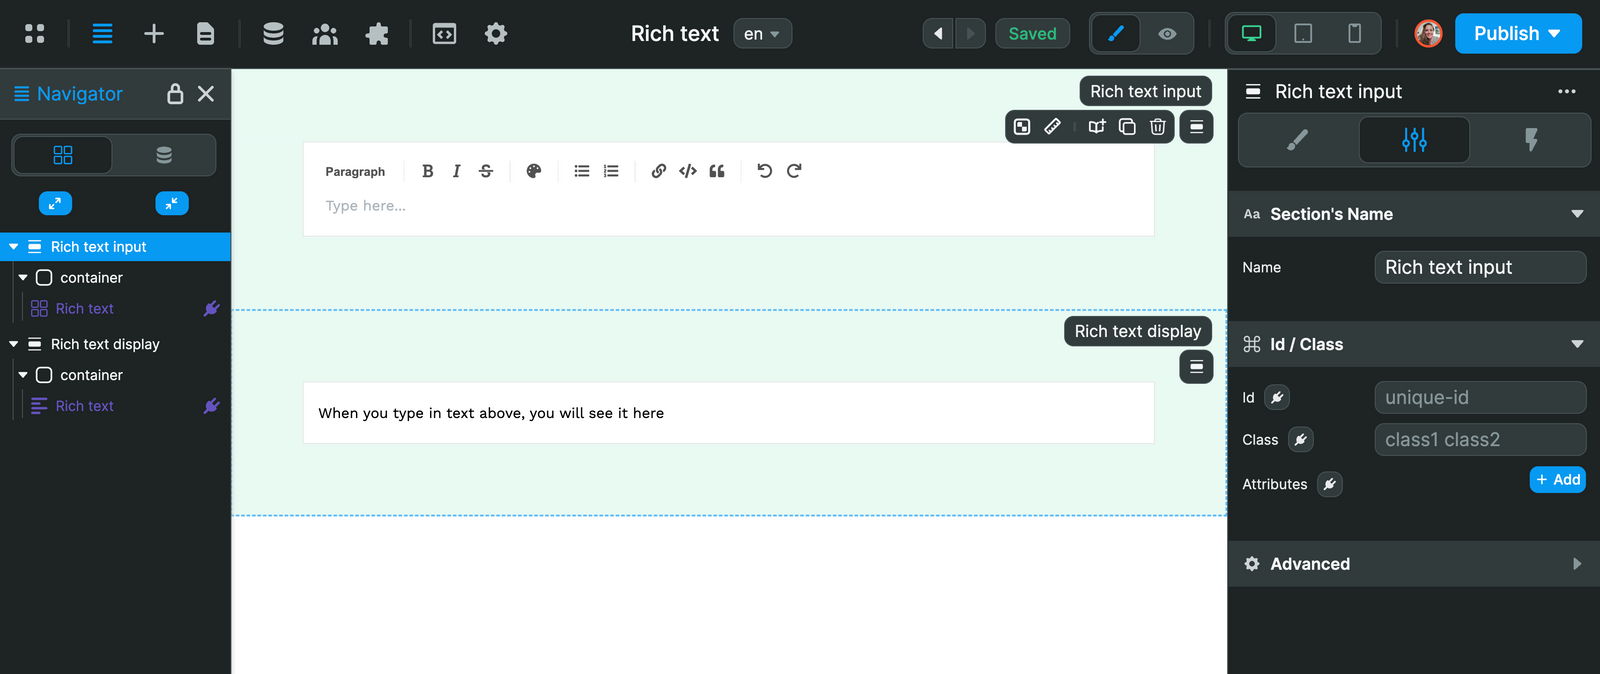
Users can:
- Type and format text with the toolbar
- Use keyboard shortcuts for common formatting
- Insert tables, links, and other elements
- Tag users with the mention system
Markdown Support
The editor supports markdown input, allowing users to type markdown syntax that gets converted to rich formatting:
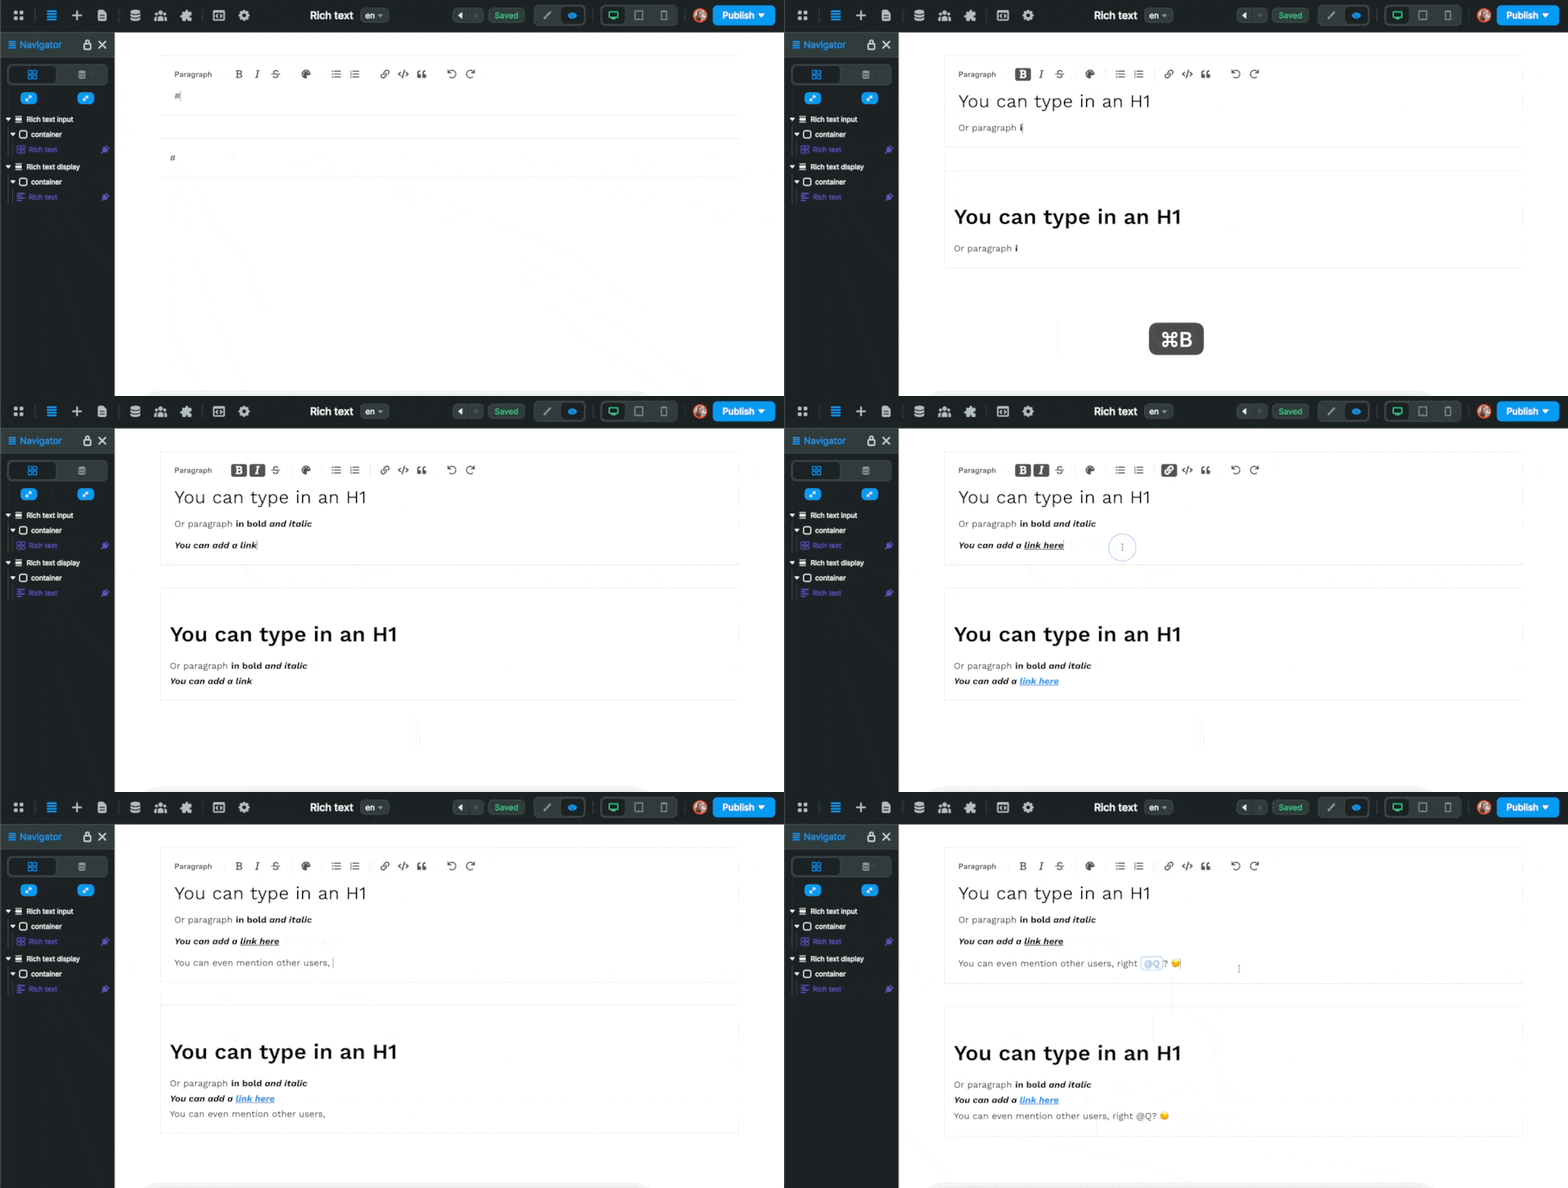
Output Formats
Choose between two output formats:
- HTML: Structured HTML output perfect for web display
- Markdown: Clean markdown format for storage or processing
Math Support
The rich text editor supports LaTeX mathematical expressions for both inline and block math:
Inline Math: Use for mathematical expressions within text, like variables or simple formulas. For example, you can write about the famous equation E=mc² or mention that the area of a circle is πr².
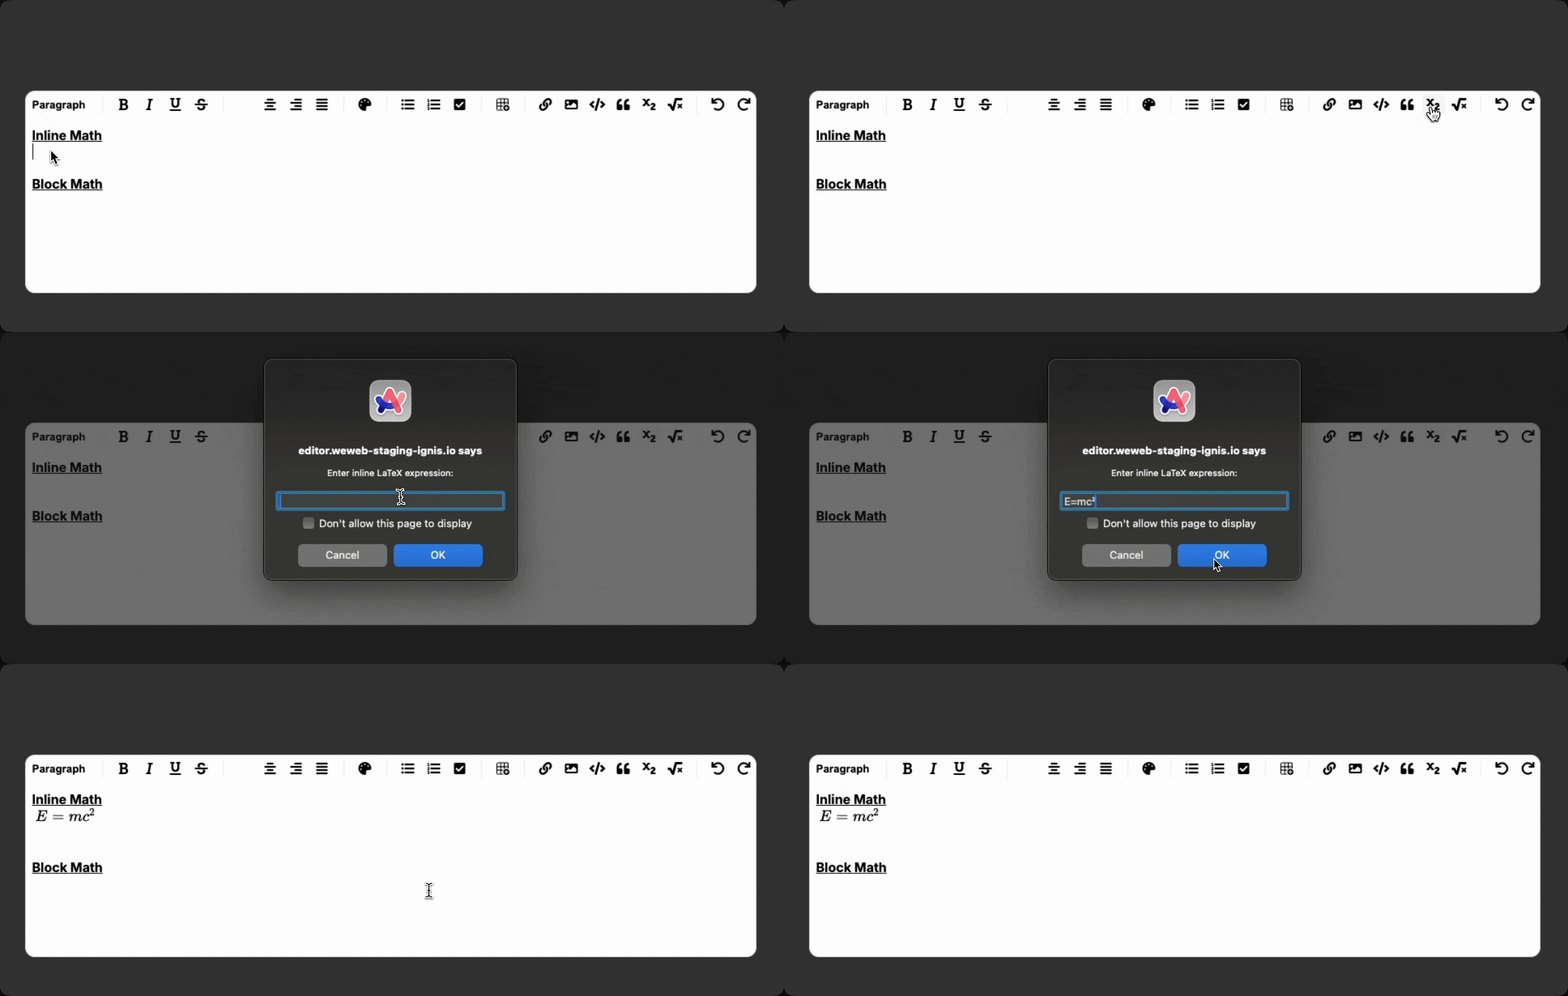
Block Math: Use for complex equations or formulas that need to be displayed prominently. Perfect for mathematical proofs, complex formulas, or scientific equations:
∫₀^∞ e^(-x²) dx = √π/2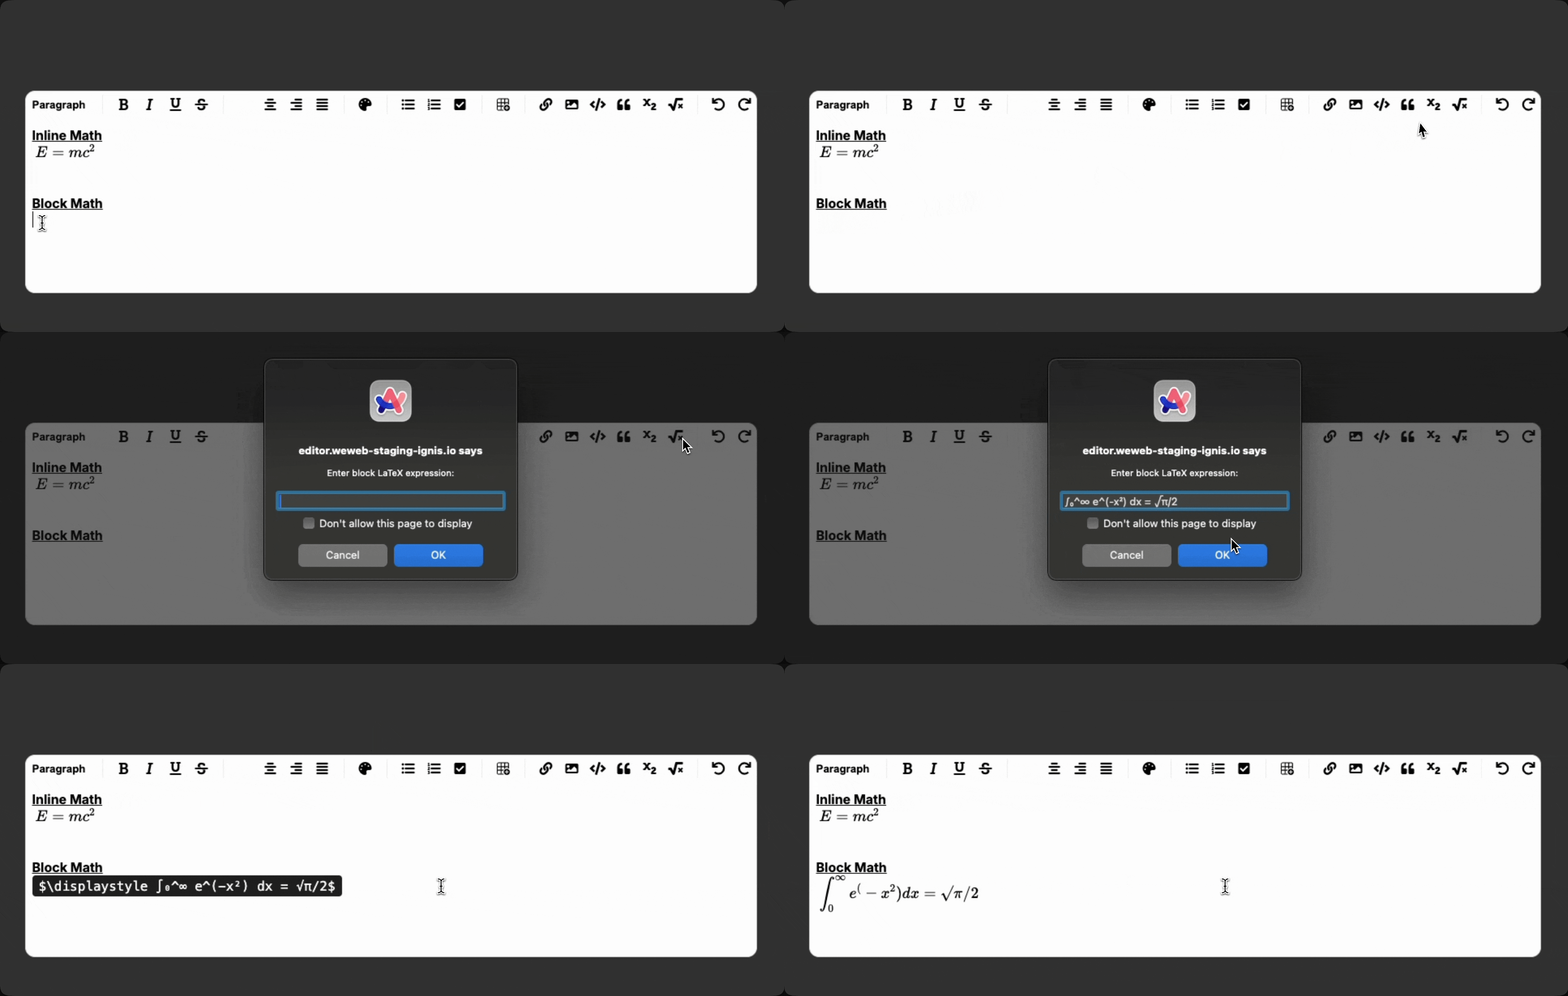
You can insert math using:
- The toolbar buttons (when enabled)
- Component actions:
Insert Inline MathandInsert Block Math
Math Rendering
Math expressions are rendered using LaTeX syntax. Common examples include:
- Fractions:
\frac{a}{b} - Superscripts:
x^2 - Subscripts:
x_1 - Greek letters:
\alpha,\beta,\pi - Integrals:
\int_a^b f(x) dx
Mentions System
Enable user tagging and mentions within the rich text content:
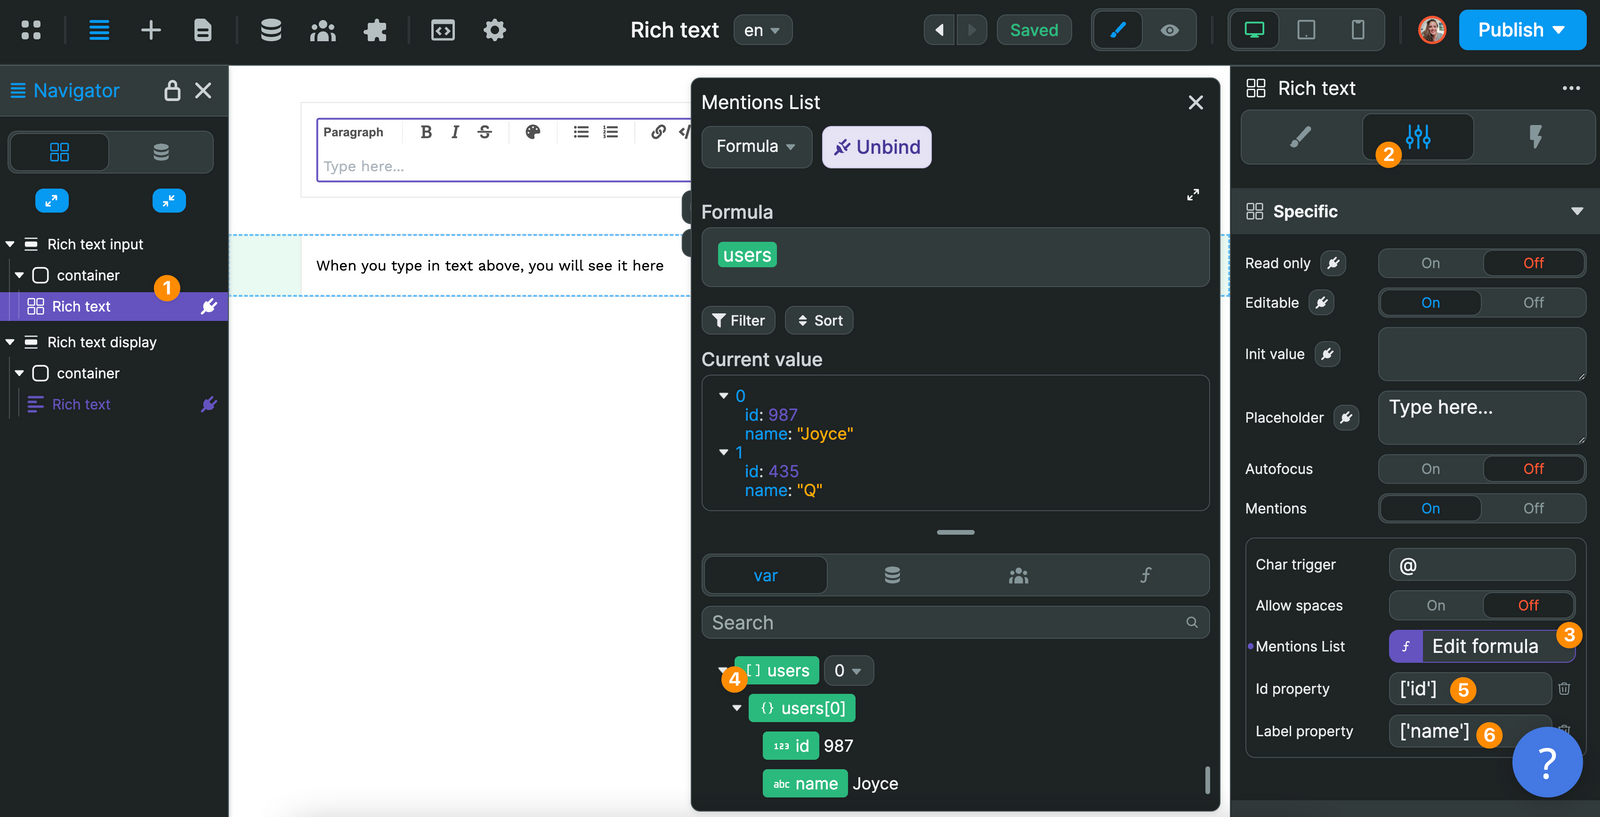
Setting Up Mentions
- Enable the
Mentionstoggle in settings - Bind
Mentions Listto your user data collection - Map the ID and Label properties to the correct fields in your data
- Configure mention settings:
- Char trigger: Character that triggers mentions (default: @)
- Allow spaces: Whether mention searches can include spaces
- Numbers of suggestion: How many suggestions to show
Custom Menu
Create your own editing toolbar with complete design control:
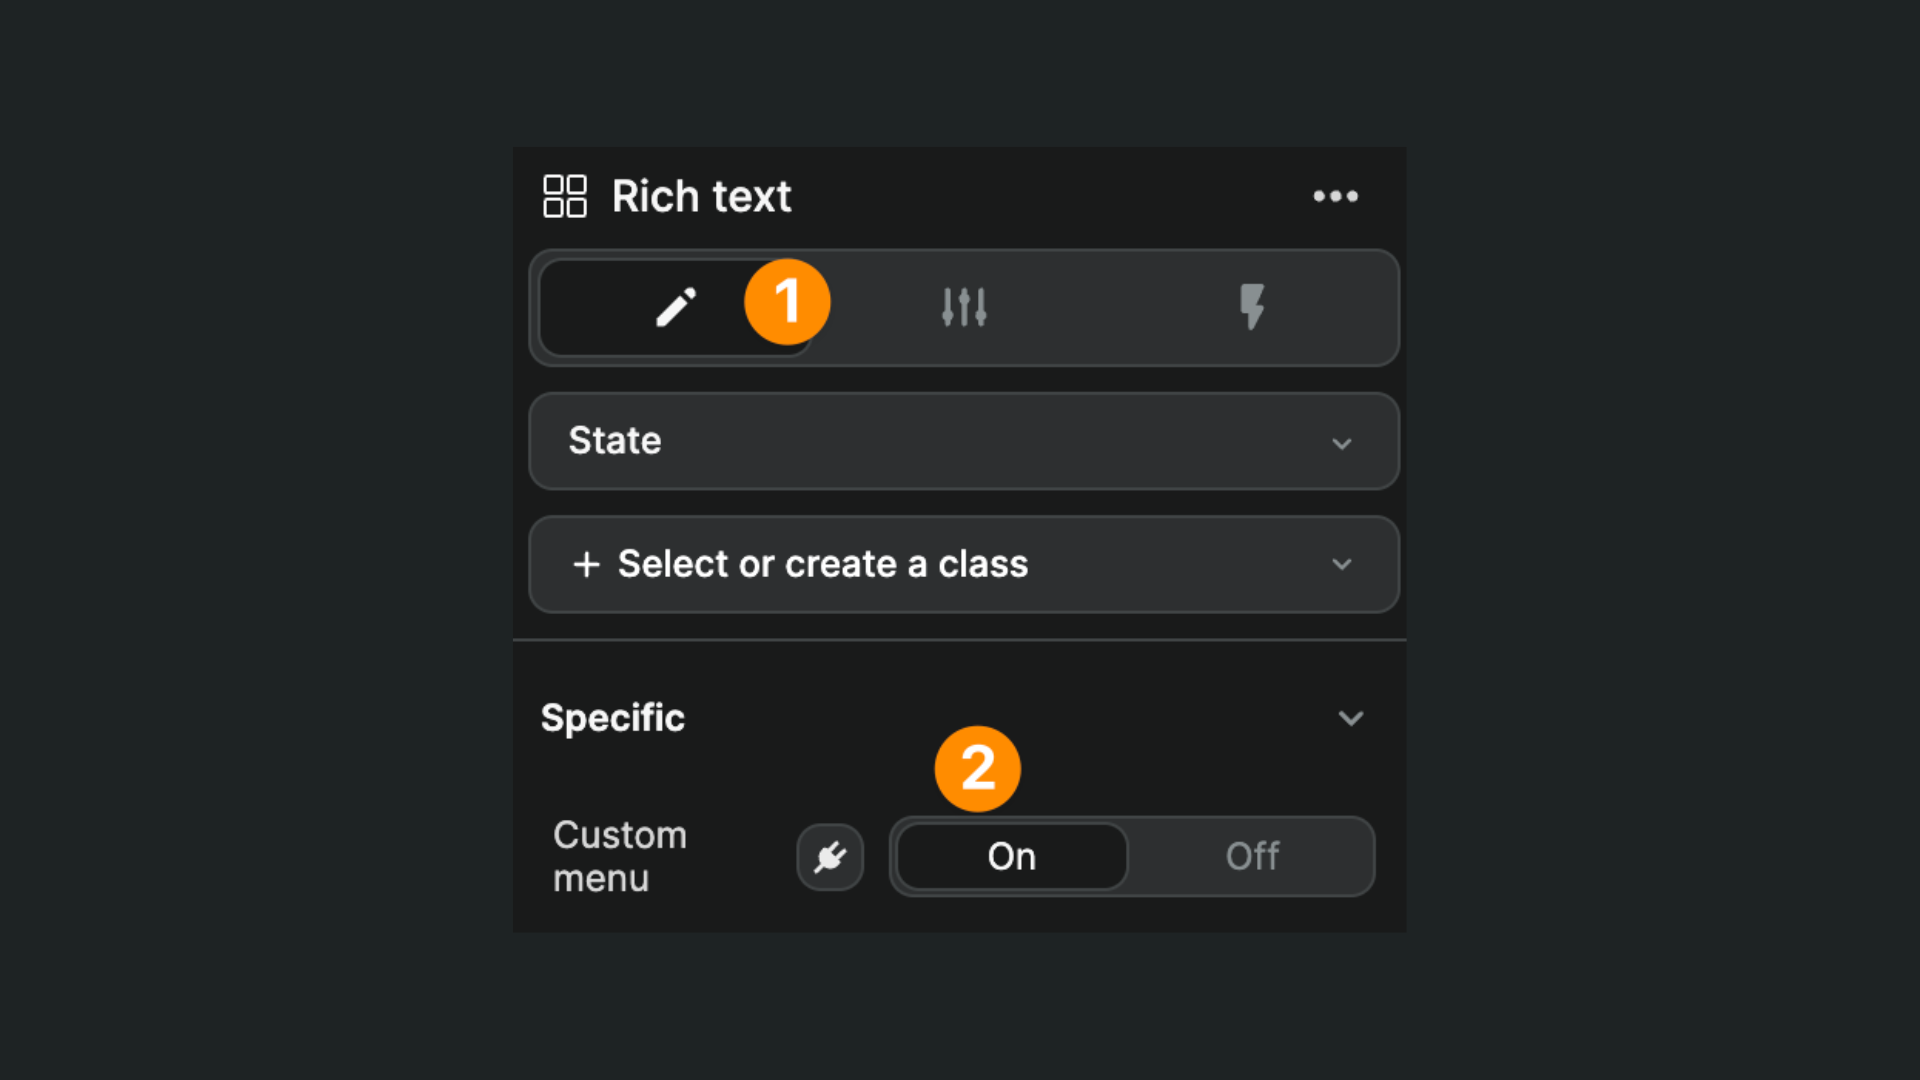
Enabling Custom Menu
- Toggle on
Custom menuin the design settings - Design your custom toolbar in the custom menu container
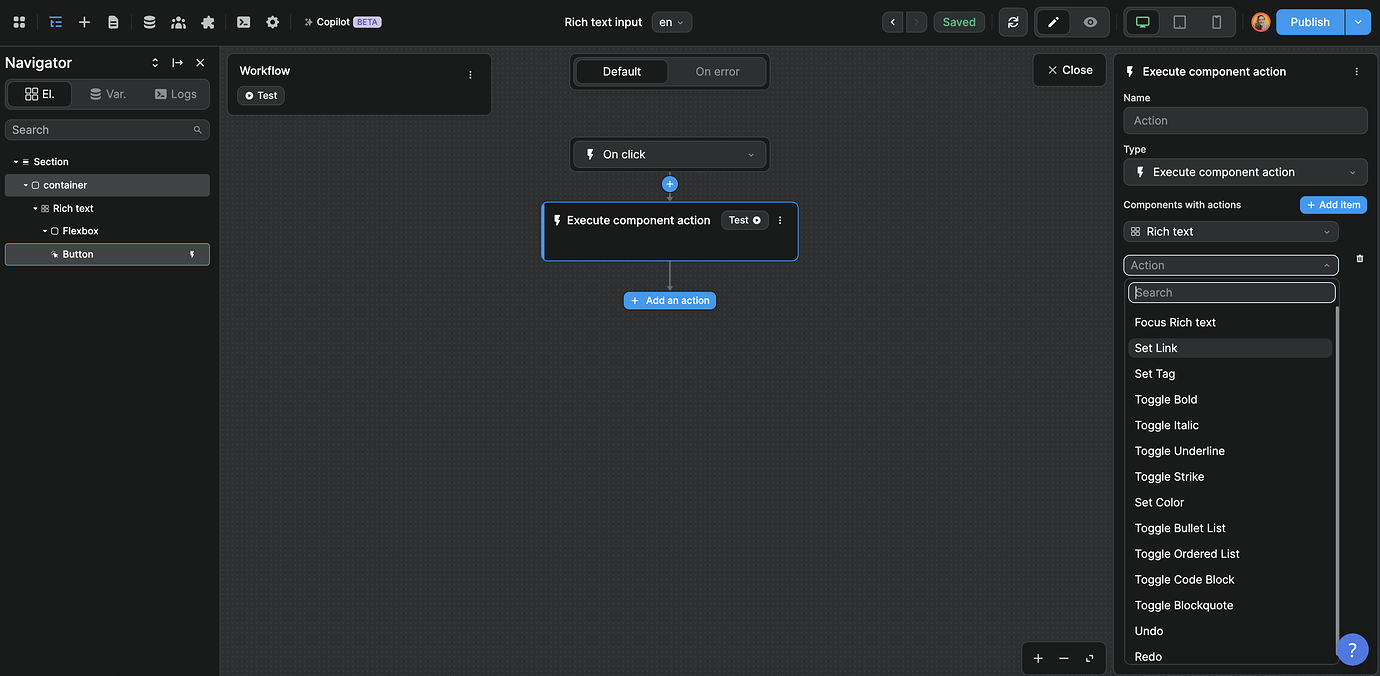
- Add buttons and connect them to rich text actions

Available Actions
Use the Execute component action workflow action to trigger formatting:

Saving Content
Create workflows to save rich text content to your backend:
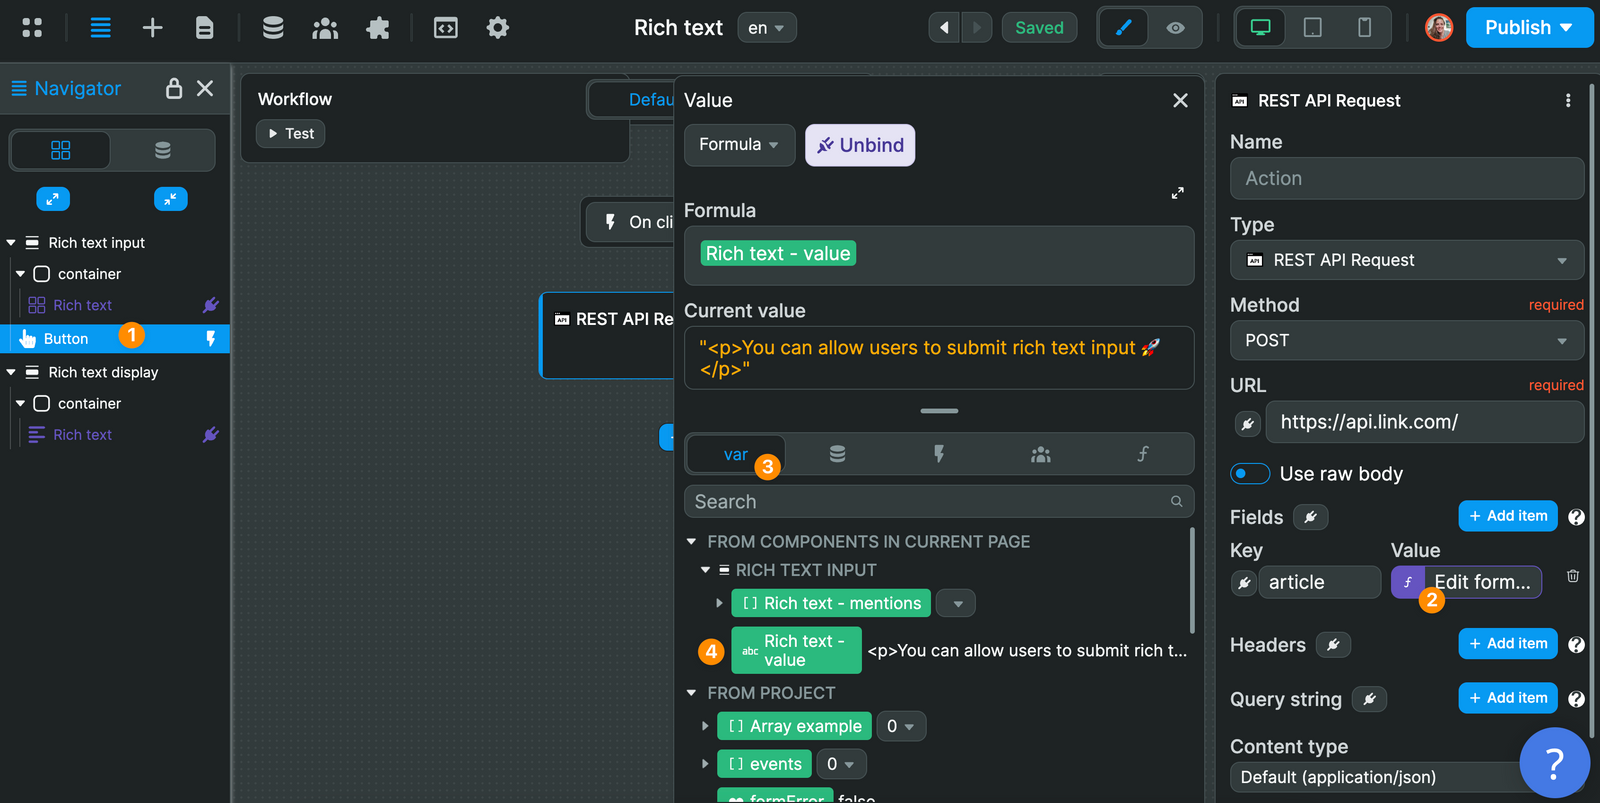
Use the Rich text - value variable to access the formatted content and send it to your database or API.
Forking
While the Rich Text Input offers extensive customization options, you can fork it for specialized requirements like custom formatting options or integration with specific editors.
If you are unsure how to fork an element, learn more in the dedicated documentation.
Properties Reference
Settings
| Property | Options/Type | Description |
|---|---|---|
Read only | boolean | Whether the editor is read-only |
Editable | boolean | Whether the editor allows editing |
Init value | text | Initial content for the editor |
Output | html markdown | Format of the output content |
Placeholder | text | Placeholder text when editor is empty |
Autofocus | boolean | Whether to focus the editor on page load |
Debounce | boolean | Enable debounced change events |
Delay | length in ms | Debounce delay (1-5000ms) |
Mention Settings
| Property | Options/Type | Description |
|---|---|---|
Mentions | boolean | Enable mention functionality |
Mentions List | array | Collection of users/items for mentions |
Id property | path | Field to use as mention ID |
Label property | path | Field to use as mention display label |
Char trigger | text | Character that triggers mentions (default: @) |
Allow spaces | boolean | Whether mentions can include spaces |
Numbers of suggestion | number | Maximum mention suggestions to show |
Menu Configuration
| Property | Options/Type | Description |
|---|---|---|
Hide menu | boolean | Hide the default formatting menu |
Wrap menu | boolean | Allow menu to wrap to multiple lines |
Custom menu | boolean | Use custom menu instead of default |
Toolbar Options
When not using custom menu, control which tools are available:
| Property | Options/Type | Description |
|---|---|---|
Text type | Show Hide | Show/hide heading and paragraph options |
Bold | Show Hide | Show/hide bold formatting |
Italic | Show Hide | Show/hide italic formatting |
Underline | Show Hide | Show/hide underline formatting |
Strike | Show Hide | Show/hide strikethrough formatting |
Text color | Show Hide | Show/hide text color picker |
Bullet list | Show Hide | Show/hide bullet list option |
Ordered list | Show Hide | Show/hide numbered list option |
Check list | Show Hide | Show/hide task list option |
Link | Show Hide | Show/hide link insertion |
Image | Show Hide | Show/hide image insertion |
Code block | Show Hide | Show/hide code block option |
Quote | Show Hide | Show/hide blockquote option |
Table | Show Hide | Show/hide table insertion |
Inline math | Show Hide | Show/hide inline math (LaTeX) |
Block math | Show Hide | Show/hide block math (LaTeX) |
Undo | Show Hide | Show/hide undo button |
Redo | Show Hide | Show/hide redo button |
Styling
Menu
| Property | Description |
|---|---|
| Menu color | Color of the default formatting menu |
Text Elements
Each text element can be styled independently:
Headings (H1-H6)
| Property | Description |
|---|---|
| Font Size | Size of the heading text |
| Font Family | Font family for headings |
| Font Weight | Weight/boldness of heading text |
| Text Align | Alignment of heading text |
| Color | Color of heading text |
| Line Height | Line spacing for headings |
| Margin Top | Top margin for headings |
| Margin Bottom | Bottom margin for headings |
Paragraphs (P)
| Property | Description |
|---|---|
| Font Size | Size of paragraph text |
| Font Family | Font family for paragraphs |
| Font Weight | Weight of paragraph text |
| Text Align | Alignment of paragraph text |
| Color | Color of paragraph text |
| Line Height | Line spacing for paragraphs |
| Margin Top | Top margin for paragraphs |
| Margin Bottom | Bottom margin for paragraphs |
Links (A)
| Property | Description |
|---|---|
| Font Size | Size of link text |
| Font Family | Font family for links |
| Color | Color of link text |
| Underline | Whether links are underlined |
Mentions
| Property | Description |
|---|---|
| Font Size | Size of mention text |
| Font Family | Font family for mentions |
| Font Weight | Weight of mention text |
| Color | Color of mention text |
| Border | Border width for mention badges |
| Border Radius | Roundness of mention badges |
Blockquotes
| Property | Description |
|---|---|
| Text Color | Color of blockquote text |
| Blockquote Color | Color of blockquote border |
| Margin Top | Top margin for blockquotes |
| Margin Bottom | Bottom margin for blockquotes |
Code Blocks
| Property | Description |
|---|---|
| Font Size | Size of code text |
| Text Color | Color of code text |
| Blockquote Color | Background color of code blocks |
| Border Radius | Roundness of code block corners |
| Padding X | Horizontal padding inside code blocks |
| Padding Y | Vertical padding inside code blocks |
Images
| Property | Description |
|---|---|
| Max Width | Maximum width of images |
| Max Height | Maximum height of images |
| Inline | Whether images display inline with text |
Checkboxes
| Property | Description |
|---|---|
| Accent Color | Color of checkbox elements |
Tables
| Property | Description |
|---|---|
| Border Color | Color of table borders |
| Border Width | Width of table borders |
| Header Background Color | Background color of table headers |
| Header Text Color | Text color of table headers |
| Pair Row Background Color | Background color of even rows |
| Impair Row Background Color | Background color of odd rows |
| Cell Text Color | Text color of table cells |
| Cell Padding Y | Vertical padding in table cells |
| Cell Padding X | Horizontal padding in table cells |
Slots
| Slot | Description |
|---|---|
| Custom Menu Element | Container for custom menu when Custom menu is enabled |
Component Actions
| Action | Description | Parameters |
|---|---|---|
| Focus Rich text | Focus the editor | None |
| Set Link | Add a link to selected text | URL (Text) |
| Set Image | Insert an image | Source (Text), Alt (Text), Title (Text) |
| Set Tag | Change text tag | Tag (select: p, h1, h2, h3, h4, h5, h6) |
| Toggle Bold | Toggle bold formatting | None |
| Toggle Italic | Toggle italic formatting | None |
| Toggle Underline | Toggle underline formatting | None |
| Toggle Strike | Toggle strikethrough formatting | None |
| Set Text Align | Set text alignment | Alignment (select: left, center, right, justify) |
| Set Color | Set text color | Color (color) |
| Toggle Bullet List | Toggle bullet list | None |
| Toggle Ordered List | Toggle numbered list | None |
| Toggle Check List | Toggle task list | None |
| Toggle Code Block | Toggle code block | None |
| Toggle Blockquote | Toggle blockquote | None |
| Insert Inline Math | Insert inline LaTeX | Inline LaTeX Expression (Text) |
| Insert Block Math | Insert block LaTeX | Block LaTeX Expression (Text) |
| Undo | Undo last action | None |
| Redo | Redo last action | None |
| Insert Table | Insert a table | None |
| Insert Row | Insert table row | Position (select: before, after) |
| Insert Column | Insert table column | Position (select: before, after) |
| Delete Row | Delete table row | None |
| Delete Column | Delete table column | None |
| Delete Table | Delete entire table | None |
Event Triggers
| Event | Description | Payload |
|---|---|---|
| On change | Triggered when content changes | { value: string } |
| On init value change | Triggered when initial value changes | { value: string } |
| On mention click | Triggered when a mention is clicked | { mention: { id: string, label: string } } |
| On focus | Triggered when editor receives focus | { value: string } |
| On blur | Triggered when editor loses focus | { value: string } |
Example Event Payloads
On change
javascript
{
  value: "<p>Hello <strong>world</strong>!</p>"
}
On mention click
javascript
{
  mention: {
    id: "user123",
    label: "John Smith"
  }
}
On focus/blur
javascript
{
  value: "<p>Current editor content</p>"
}
Exposed Variables
The rich text input exposes the following variables for use in your application:
| Variable | Type | Description |
|---|---|---|
value | string | Current HTML or Markdown content of the editor |
mentions | array | List of mentions found in the content |
states | object | Current formatting states of the editor |
Example Variable Values
value
javascript
"<p>Hello <strong>world</strong>! Check out this <a href='https://example.com'>link</a>.</p>"mentions
javascript
[
  {
    id: "user123",
    label: "John Smith"
  },
  {
    id: "user456",
    label: "Jane Doe"
  }
]
states
javascript
{
  textType: "paragraph",
  textColor: "#000000",
  bold: false,
  italic: true,
  underline: false,
  strike: false,
  bulletList: false,
  orderedList: false,
  checkList: false,
  link: false,
  codeBlock: false,
  blockquote: false,
  textAlign: "left",
  table: false
}
Variable Usage
Use the value variable to save content to your backend, the mentions array for notification systems, and the states object to create custom toolbar indicators.

