

Appearance
reCAPTCHA
The reCAPTCHA element adds Google's "I'm not a robot" checkbox to your page. It helps you block spam and bots on your forms: a contact form, a sign-up form, or a comment form.
When a user ticks the box, Google gives the element a code. Your app then sends that code to Google from an API Endpoint, and Google confirms whether the user passed the test. The checkbox alone doesn't protect your form: always check the code in your backend.
Getting started
- Create a reCAPTCHA v2 key in Google. See how to create your key →
- Add the
reCAPTCHA v2element to your form fromAdd Element, then paste your site key. See how to set up the element → - Create an API Endpoint that sends the code to Google. See how to check the code →
- Call this API Endpoint when the form is submitted. See how to call it from your form →
USING AI
You can also ask AI to add a reCAPTCHA to a form. Give it your site key and tell it which form to protect. For example: "Add a reCAPTCHA to the contact form with my site key, and check it with Google in an API Endpoint before saving the message".
Create your reCAPTCHA key
To integrate reCAPTCHA, you must first generate a key through your Google account. This can be accomplished by visiting the Google reCAPTCHA Admin.
- Choose
Challenge (v2), then"I'm not a robot" Checkbox. The element only works with this type of key. - Ensure that you configure the following domains:
weweb.io- for testing within the editor- Your specific domain name
- Copy the two keys Google gives you:
- The site key, which you paste in the element
- The secret key, which you keep in your backend
TRY IT WITH GOOGLE'S TEST KEYS
Google provides test keys that work on any domain and always accept the code. Use the site key 6LeIxAcTAAAAAJcZVRqyHh71UMIEGNQ_MXjiZKhI and the secret key 6LeIxAcTAAAAAGG-vFI1TnRWxMZNFuojJ4WifJWe to build and test your form. The checkbox then shows a red warning: replace them with your own keys before you publish. Learn more about Google's test keys →
Add the reCAPTCHA to a form
- Add the
reCAPTCHA v2element inside yourForm Container, above the submit button. You'll find it inAdd Element>Forms>Inputs. - Open the settings of the element and paste your site key in
Site Key reCaptcha v2.
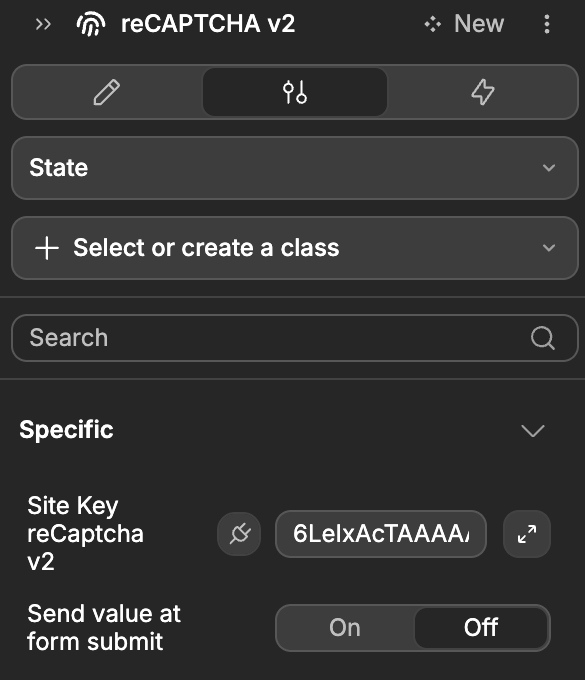
Until you paste a key, the element shows a grey placeholder in the editor, and nothing on your published app.
To change the look of the checkbox, open the Style tab of the element:
Theme:LightorDarkSize:Normal, orCompactfor narrow spaces
What the element sends to the form
Inside a Form Container, the element adds its value to the data of the form, under the name of the element. With the default name, you'll find it in formData > reCAPTCHA v2:
javascript
{
  "validate": true,
  "code": "03AFcWeA5..."
}validate:trueonce the user ticked the boxcode: the code to send to Google. It expires after two minutes: the element then setsvalidateback tofalseandcodetonull, and the user ticks the box again
validate only tells you the user ticked the box in their browser. Anyone can change it, so don't use it to accept a form: check the code with Google.
Check the code in an API Endpoint
Google only confirms a code when you send it with your secret key. The secret key must never reach the browser, so this check happens in an API Endpoint.
First, add your secret key to your project as a Secure environment variable, for example RECAPTCHA_SECRET_KEY. Learn how to add an environment variable →
Then create the API Endpoint:
- In the
Data & APItab, create an API Endpoint, for exampleVerify reCAPTCHA, and add atokenparameter - Add an
HTTP Requestaction - Set
MethodtoPOST - Set
URLtohttps://www.google.com/recaptcha/api/siteverify - In
Data>Query Parameters, add two properties:secret, bound to yourRECAPTCHA_SECRET_KEYenvironment variableresponse, bound to thetokenparameter
- Add a
Send Responseaction that returns the result of theHTTP Request
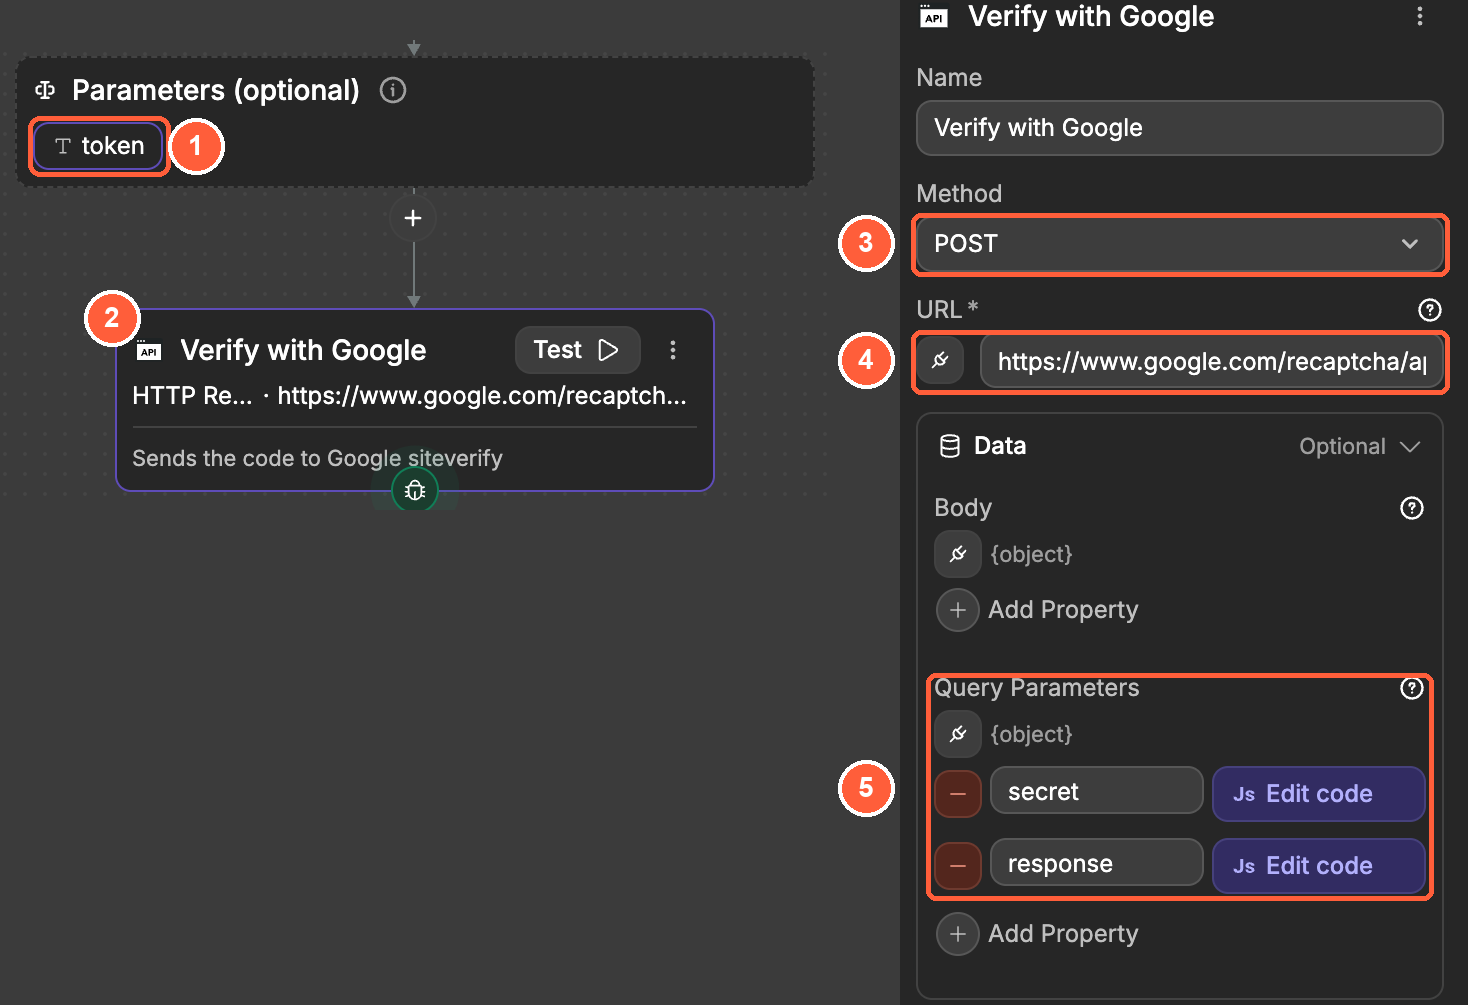
Google answers with success set to true when the code is valid:
json
{
  "success": true,
  "challenge_ts": "2026-11-04T15:39:02Z",
  "hostname": "yourdomain.com"
}
When the code is wrong, expired or already used, success is false and error-codes tells you why, for example ["timeout-or-duplicate"]. A code can only be checked once.
Learn more about the HTTP Request action →
SAVE THE FORM IN THE SAME API ENDPOINT
In this example, the API Endpoint only checks the code. To be sure nobody skips the check, save the form in the same API Endpoint: add a True/False split on success after the HTTP Request, and save the data only on the true branch.
Check the code when the form is submitted
- Select your
Form Containerand add a workflowOn submit - Add the action of your API Endpoint. You'll find it in
From Data & API>API - Bind its
tokenparameter to the code of the reCAPTCHA:formData>reCAPTCHA v2>code - Use the response of the API Endpoint to show a success or an error message
Learn more about calling API Endpoints from the interface →
Example use cases
- Contact form: block spam messages before they reach your inbox
- Sign-up form: stop bots from creating fake accounts
- Comment or review form: keep automated posts out of your app
- Newsletter form: avoid fake email addresses in your mailing list
Best practices
Do:
- Check every code with Google in an API Endpoint
- Store the secret key in a
Secureenvironment variable - Add every domain your app runs on in the Google reCAPTCHA admin console
- Use Google's test keys while you build, and your own keys before you publish
Don't:
- Accept a form only because
validateistrue - Put the secret key in the interface or in a
Publicenvironment variable - Check the same code twice: Google refuses it the second time
Forking
While the reCAPTCHA element offers the settings most forms need, there may be cases where you need functionality beyond what's natively available. In these situations, you can fork the element and modify it to meet your specific requirements.
If you are unsure how to fork an element, you can learn more in the dedicated documentation.
Forking example: reset the checkbox
One reason to fork the reCAPTCHA element would be to clear the checkbox after a form is sent, so the user can send another message. To do so, you could fork the element, then edit it with AI and pass in the following prompt:
Add a Reset action that clears the reCAPTCHA checkbox and sets the value back to validate false and code nullProperties reference
Settings
| Property | Options/Type | Description |
|---|---|---|
| Site Key reCaptcha v2 | text | The site key of your reCAPTCHA v2 key, from the Google reCAPTCHA admin console |
Styling
| Property | Description |
|---|---|
| Theme | The colors of the checkbox: Light or Dark. Default: Light |
| Size | The size of the checkbox: Normal or Compact. Default: Normal |
Event triggers
| Event | Description | Payload |
|---|---|---|
| Change | Triggered when the user ticks the box, and when the code expires | value: the value of the element |
Example event payloads
Change
When the user ticks the box:
javascript
{
  "value": {
    "validate": true,
    "code": "03AFcWeA5..."
  }
}
When the code expires:
javascript
{
  "value": {
    "validate": false,
    "code": null
  }
}
Exposed variables
| Variable | Type | Description |
|---|---|---|
| value | object | validate: true once the user ticked the box. code: the code to send to Google, or null |
Example variable values
value, before the user ticks the box:
javascript
{
  "validate": false,
  "code": null
}
Component actions
This element does not have any component actions.
Frequently asked questions
Why does the checkbox show an error about the domain?
The domain of the page isn't in the list of your key. Open the Google reCAPTCHA admin console, select your key, and add the domain, for example weweb.io for the editor or your own domain for your published app.
Why doesn't the checkbox show on my published app?
Site Key reCaptcha v2 is empty, or it holds a key that isn't a reCAPTCHA v2 "I'm not a robot" key. Create a key of this type and paste its site key.
Can I use reCAPTCHA v3 or the invisible reCAPTCHA?
No. The element only works with reCAPTCHA v2 "I'm not a robot" keys. For another type, you can fork the element.
Why does Google answer timeout-or-duplicate?
The code expired, after two minutes, or it was already checked once. Ask the user to tick the box again, then send the new code.
CONTINUE LEARNING
The reCAPTCHA works inside a form container. Learn how to validate and submit your forms.