

Appearance
Managing roles
Roles help you control what permissions a user has. This allows you to prevent unauthorized access to things such as table views, API Endpoints, and pages in the interface.
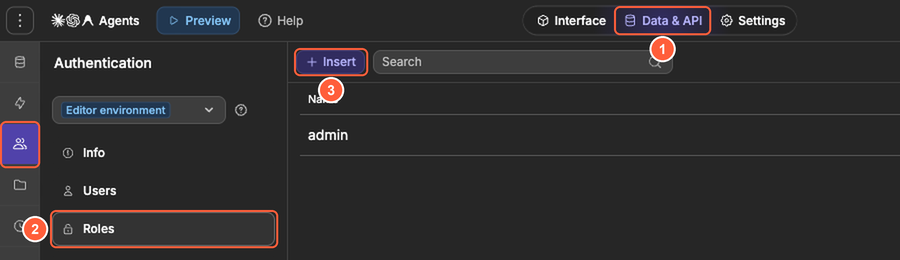
To access the roles of your application, visit the Roles tab in the Authentication subtab of Data & API (see Creating roles below).
Understanding roles
Roles are labels you assign to users to control what they can access in your app. They work as a permission system that lets you build different experiences for different types of users.
How roles work
When you create a role, you can then:
- Assign it to users in the
Userstab of theAuthenticationsubtab inData & API - Restrict access to table views based on roles
- Restrict access to API Endpoints based on roles
- Show or hide interface elements based on the user's roles
- Protect entire pages so only users with specific roles can access them
Roles are enforced automatically by WeWeb when you configure access restrictions. If a user doesn't have the required role, they'll be blocked from accessing that resource.
Creating roles
- Open the
Data & APItab, then open theAuthenticationsubtab - In the
Authenticationpanel, open theRolestab - Click
Insertto create a new role - In
Create a Role, enter a clear, descriptiveName(for example,user,manager,admin) - Click
Insert
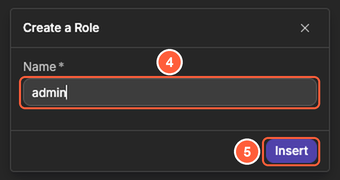
Keep role names simple, lowercase, and consistent throughout your app. Avoid spaces or special characters.
ROLE NAMING BEST PRACTICES
- Use lowercase for consistency (e.g.,
adminnotAdmin) - Be descriptive but concise (e.g.,
content_editornotuser_who_can_edit_content) - Match your app's domain (e.g.,
teacher,studentfor an education app) - Avoid changing role names after launch (as it will likely mean you need to update many parts of logic that use old names)
Assigning roles to users
Once you've created roles, you can assign them to users:
- Go to the
Userstab in theAuthenticationsubtab ofData & API - Click the pencil icon next to the user's checkbox to open
Update User - In the
rolesfield, add or remove roles as needed, then clickSave - Changes take effect once the user refreshes the page
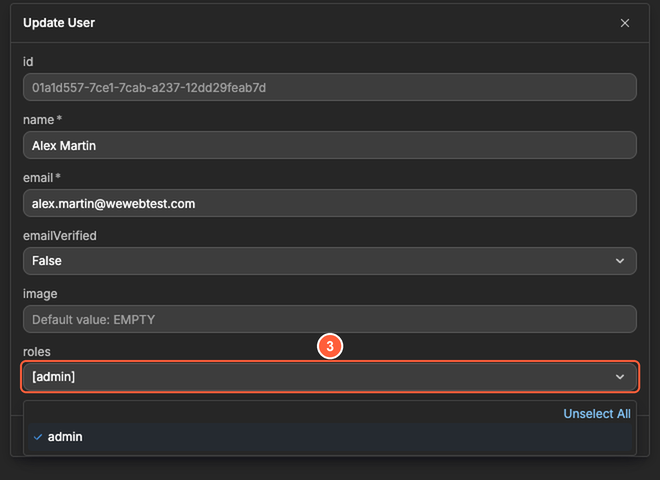
Users can have multiple roles at the same time. For example, a user could have both user and premium roles.
TESTING WITH ROLES
Create multiple test users with different role combinations to verify your access controls work correctly. For example:
- Test user with no roles (basic authenticated user)
- Test user with
adminrole - Test user with
premiumrole
Where roles are enforced
Roles are automatically enforced in multiple places throughout your WeWeb app:
Table views
When you create a view on a table, you can restrict access based on roles:
- Go to the
Data & APItab, then open theTablessubtab, then select the table that contains your view. - Open the view (it shows as a tab at the top of the table).
- In the view header, click the access button (it usually shows
PublicorAuthenticated). - Choose one of:
Public— Anyone can retrieve data from this view (no sign in required).Authenticated— Only signed-in users can retrieve data.
- If you chose
Authenticated, you can also restrict by role:- Choose
Match anyorMatch all. - Select one or more roles (for example
admin).
- Choose
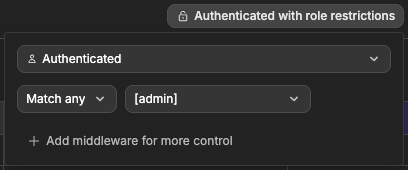
For example, you might create an "Admin users view" that only users with the admin role can access, while having a separate "Public users view" that anyone can read.
API Endpoints
When you create an API Endpoint, you can restrict who can call it:
- Open your API Endpoint from the
API Endpointssection in theBackend Workflowssubtab ofData & API - Click the access button at the top of the API Endpoint (it shows
PublicorAuth, followed by+Roleswhen roles are required) to open theSecuritypanel - Choose one of:
Public— Anyone can call this API Endpoint (use only for non-sensitive operations)Authenticated— Only signed-in users can call it
- If you chose
Authenticated, you can also restrict by role: chooseMatch anyorMatch all, then select one or more roles
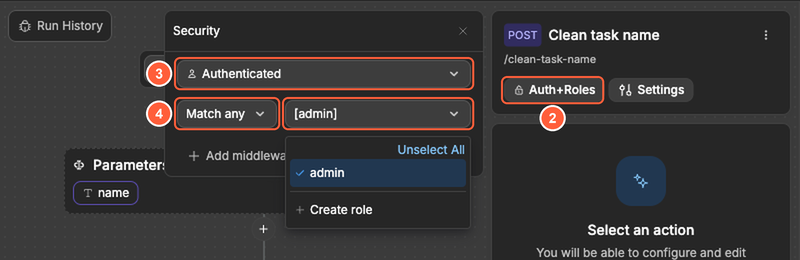
Learn more about securing your API Endpoints: Securing API Endpoints →
Pages
You can protect entire pages so only users with specific roles can access them:
- Go to
Interfaceand select a page - Open the page settings
- Open
Private access - Set
Who can access this pagetoAuthenticated users - In
Roles who can access this page, choose the roles allowed to access the page
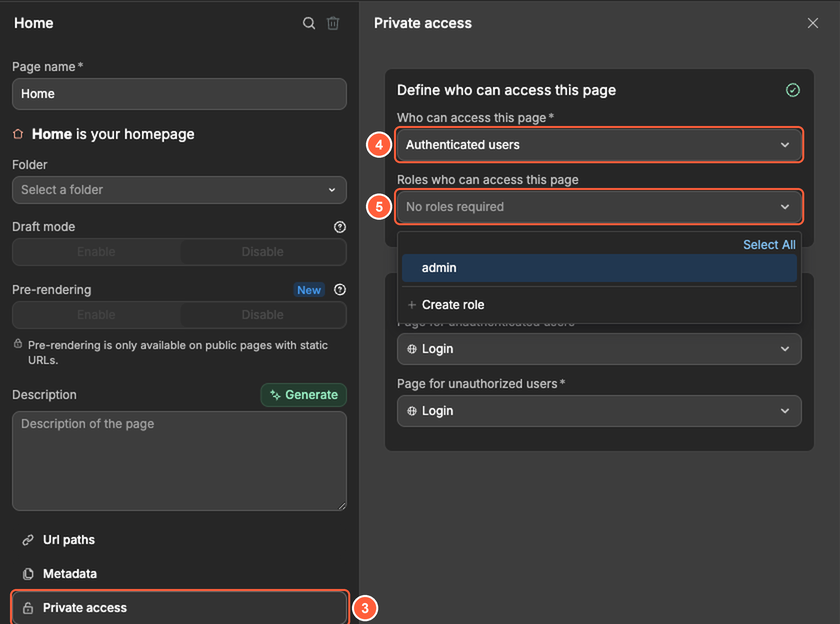
When a user without the required roles tries to access a protected page, they'll be redirected to the Page for unauthorized users set in Define default redirections.
Interface elements
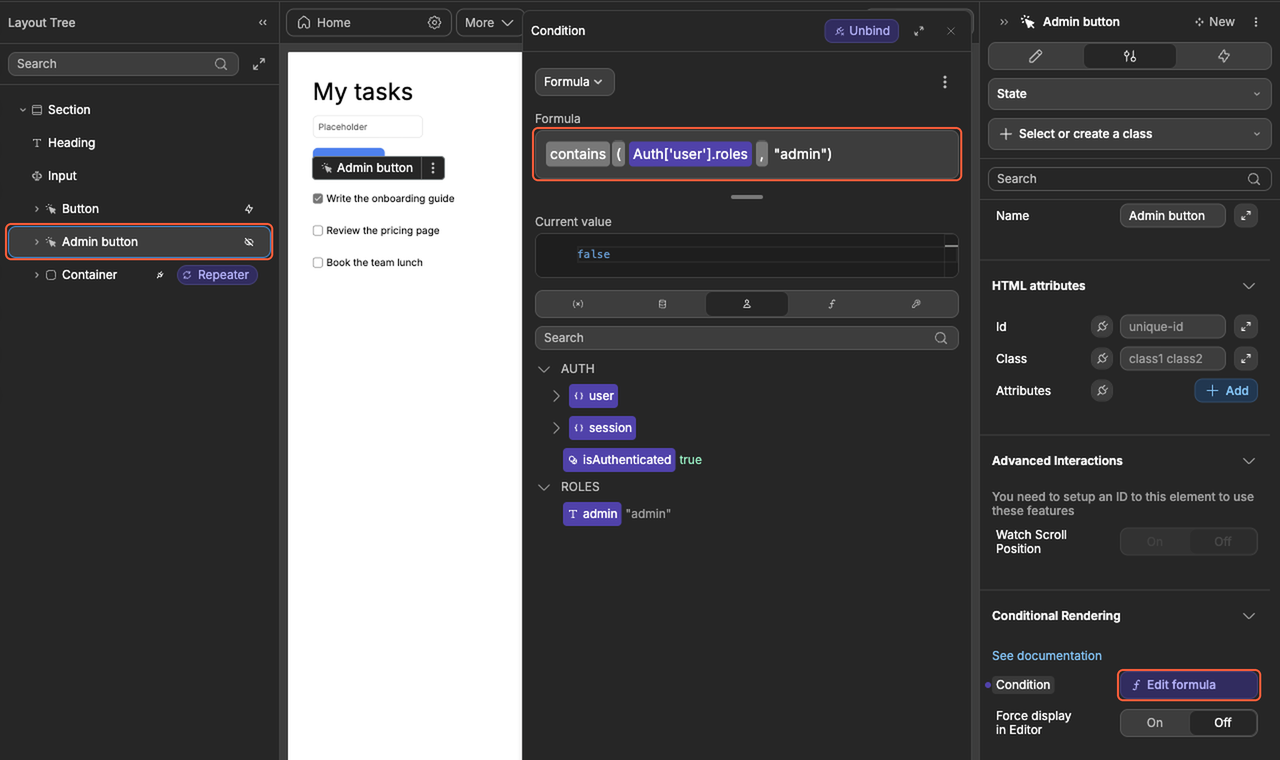
You can also show or hide elements in your interface based on the current user's roles using conditional visibility or workflow conditions with the auth data available in the binding window.
For example, to show an Admin button only to admins, select the button, open its settings, and bind the Condition of Conditional Rendering to a formula like contains(auth.user.roles, "admin"). The button is then hidden for users who don't have the admin role:
Checking roles in workflows
In your workflows and bindings, you can access the current user's roles via the auth data:
auth.user.roles— Array of role names assigned to the current user- You can use this in conditions to show/hide elements or branch your workflow logic
The ROLES section of the binding window lists the names of the roles you created:
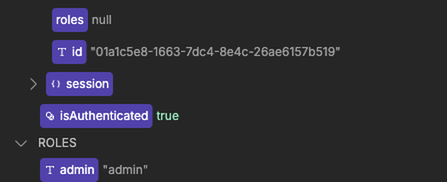
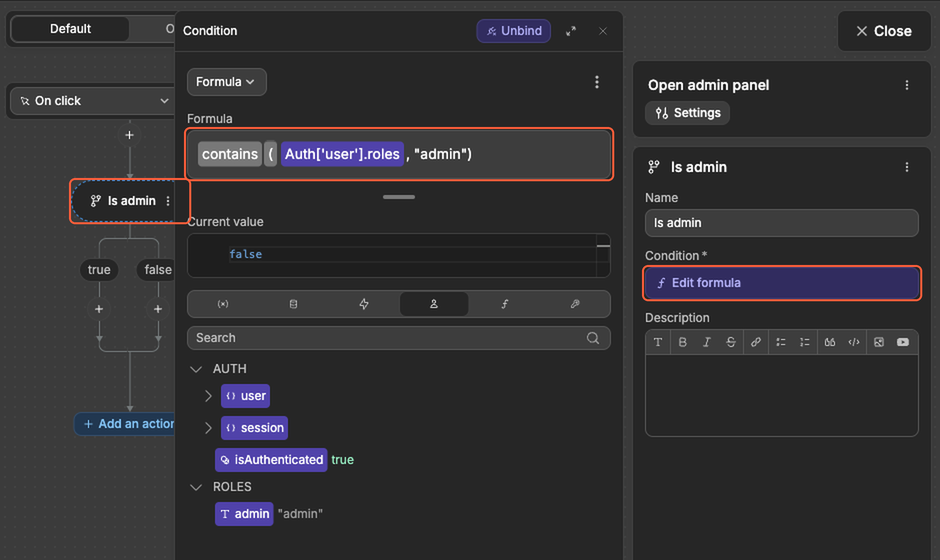
For example, you might show an "Admin Panel" button only if auth.user.roles contains the admin role.
In a workflow, add a True/False split action (in Interface → Flow (Logic)) and bind its Condition to the same formula. The actions under true only run for users with the admin role:
INTERFACE CHECKS ARE NOT SECURE
Using role data in the interface (to show/hide elements or control navigation) improves user experience but does not provide security. Anyone with technical knowledge can bypass interface restrictions by manipulating the browser or directly calling your API Endpoints.
Always enforce security in your backend:
- Restrict table views with the
Accesssetting - Secure API Endpoints with the
Securitypanel (public/authenticated/role-based restrictions) - Use Middleware workflows for custom permission logic
Think of interface role checks as a convenience for users, not a security measure. Real security happens on the backend where users cannot bypass it.