

Appearance
WeWeb Storage
WeWeb Storage is the built-in storage option. It is the simplest way to store files for your app without creating an external storage account.
Setup
- Go to the
Data & APItab, then open theStoragesubtab. - Select
WeWeb Storage. WeWeb sets it up right away. - If your project doesn't have a backend yet, WeWeb first asks where to host it: choose a
Location, then clickContinue.
Switch environments
Storage is environment-specific. If you upload a file while Editor is selected, you will only see it while Editor is selected.
To switch environments, use the environment selector at the top of the Storage panel (next to the section title).
Upload files from your app
To upload from your app (instead of uploading manually in the Storage panel), you typically do it in two parts:
- An API endpoint that receives a file and uploads it to WeWeb Storage
- An interface workflow that sends the selected file to that API
You can also let the browser send the file straight to storage, with a signed URL. See how to upload with a signed URL →
Step 1 — Create an upload API endpoint
- Go to the
Data & APItab, then open theBackend Workflowssubtab and go toAPI Endpoints. - Create a new API endpoint using the template
Upload a File (WeWeb Storage). - In the workflow, in
Upload file, choose whether files should beprivateorpublic. - Set the
Path(where the file will be stored). - In the API settings, review the
Authrules to control who can upload.
If you add your own parameters to the endpoint, you can use two file-related types:
File— the actual file sent from the interface (use this for uploads)File Metadata— file details only (name,size,type,lastModified), without the file content
KEEP FILES ORGANIZED
Use folders like uploads/ or users/ to keep things organized.
Step 2 — Add a file input in the interface
- In the
Interfacebuilder, add aFile Uploadelement (single file). - Optional: Add a button like “Upload”.
Step 3 — Call the upload API from an interface workflow
- Create an interface workflow (for example on button click or form submit).
- Add an action to call your upload API endpoint.
- Map the API parameter
fileto yourFile Uploadelement’s value. - Run the workflow and confirm the response returns the uploaded file details.
Other option: upload directly with a signed URL
Instead of sending the file through your API endpoint, the browser can send it straight to storage. Your API endpoint only creates a short-lived upload link, called a signed URL, and the File Upload element shows the progress of the upload.
The quickest way to set it up is a workflow template on the File Upload element:
- Select your
File Uploadelement, open itsWorkflowstab, and clickNew. - Choose
Storage, thenUpload a File. If your users send several files at once, chooseUpload Multiple Files. - Check that
File sourceis yourFile Uploadelement, and set theDestination folder, for exampleuploads. - Click
Continue.
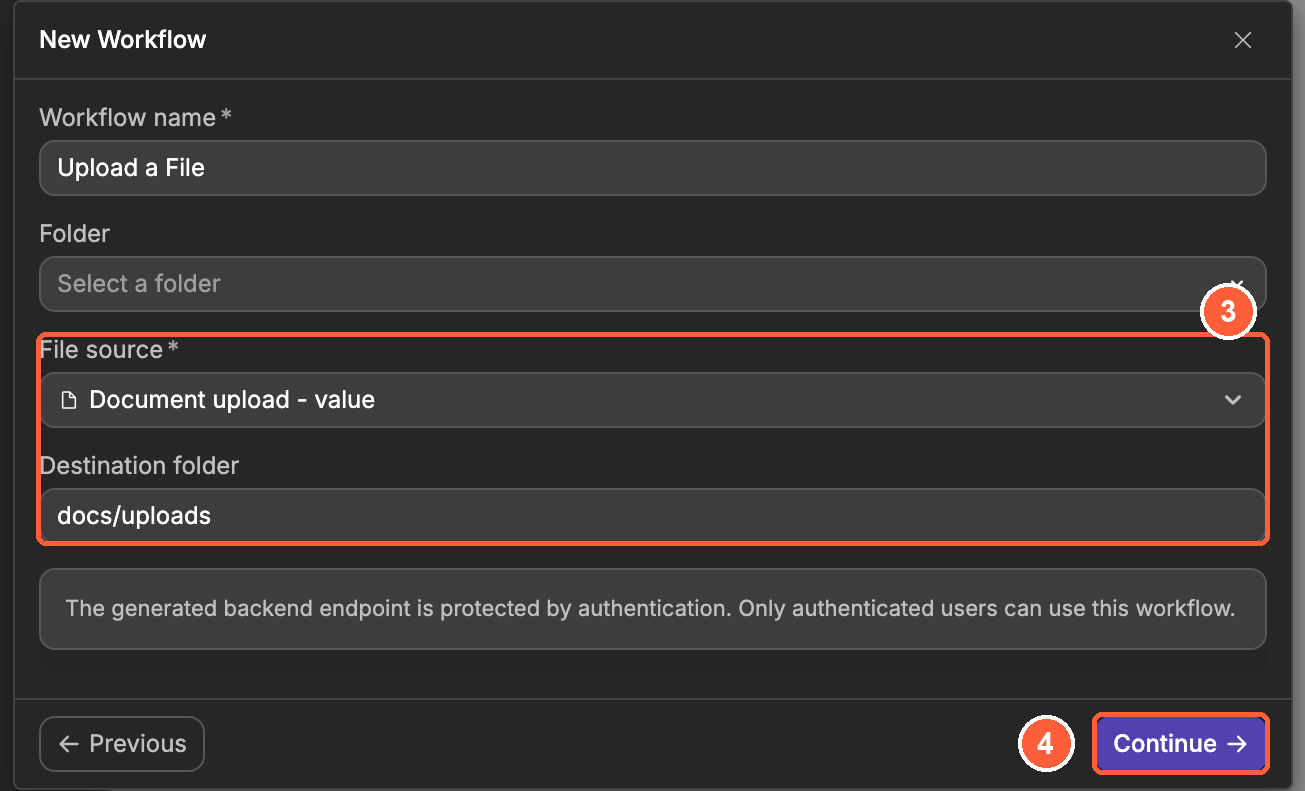
WeWeb creates two things for you:
- An
On changeworkflow on the element, with two actions: a call to theGet Signed Upload URLAPI endpoint, thenUpload file to signed URL, which sends the selected file to the URL the endpoint returned. - The
Get Signed Upload URLAPI endpoint, in theStoragefolder of your API endpoints. It uses theGet file signed upload urlaction to create a private upload link that expires after 60 seconds.
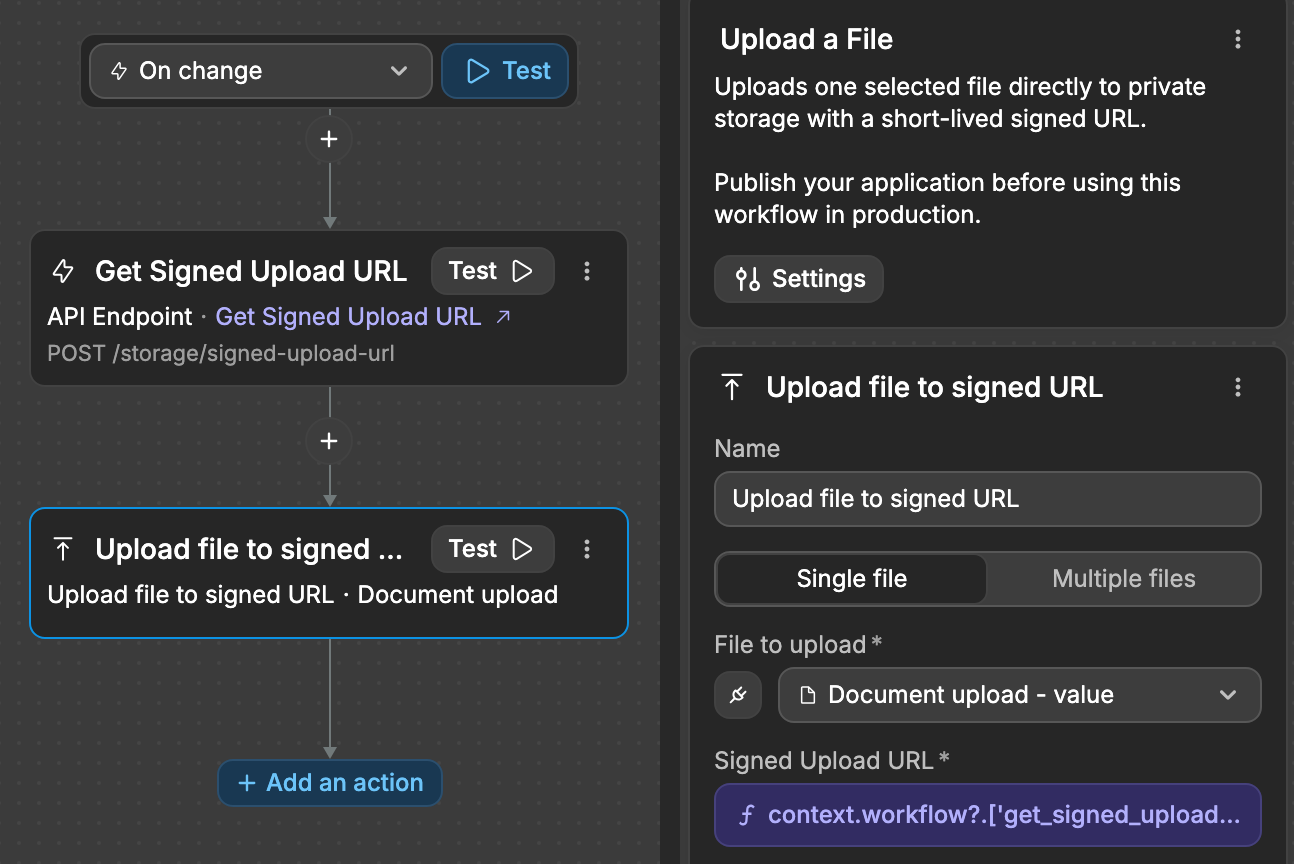
The endpoint only accepts signed-in users, so the templates need authentication in your project. Publish your app before you use the workflow in production.
The Upload file to signed URL action has two modes:
Single file— setFile to uploadto yourFile Uploadelement, andSigned Upload URLto the URL returned by your endpointMultiple files— setFile(s) to upload, and inSigned Upload URLs, pair each file name with its upload URL
What to save after upload (recommended)
After the upload succeeds, WeWeb returns information about the file you just uploaded.
If you do not save that information somewhere, you will not have an easy way to find that same file again later (for example when the user comes back tomorrow).
Save at least one of these:
- The file
pathin storage - For public files, the file
url
What this means in practice:
- If you uploaded a profile photo, save the
path(andurlif it is public) on the user record in your table. - If you uploaded a document (invoice, contract, resume), save the
pathon the related record in your table (for example the invoice record).
Then, when you need the file later:
- For public files, you can reuse the saved
urldirectly in your UI. - For private files, reuse the saved
pathto generate a new signed download URL when the user wants to view or download the file.
WHAT TO STORE (QUICK RULE)
Always store the file path. Only store a file url when the file is public.
Use files in your app
How you use a file depends on whether it is public or private.
Use public files
Public files can be used directly in your UI.
Examples:
- Display an image by binding an
Imageelement’s source to the file URL - Add a link or button that opens the file URL in the browser
When you open a public file URL, WeWeb serves it with the correct file type so images, PDFs, and other viewable files display in the browser instead of downloading unexpectedly.
Use private files
Private files should be accessed through your app.
Recommended approach:
- Create an API endpoint using the template
Get Signed Download URL (WeWeb Storage). - In your interface workflow, call that API and pass the file
path. - Use the returned URL to download or display the file.
SIGNED URLS EXPIRE
Signed download URLs should be short-lived. If the user opens the file much later, generate a new URL.
Using public vs private files
- Use
Publicfor files you want to share with anyone who has the link (for example images on a marketing page). - Use
Privatefor files that should only be accessible through your app (for example user documents).
Link files to table records
You can store a file reference on a table record using a Link to Files column. When you create the column, choose File Access as Public or Private to link to the matching storage table.
For public files, views can also include a read-only url field so you can bind directly to the file URL without building it yourself in a formula.
Create folders
You can organize your files with folders.
- In the
Data & APItab, open theStoragesubtab, then open thePublicorPrivatetab. - Click
New folder. - Name the folder.
- Upload at least one file into the folder.
If you create a folder but do not upload a file, the folder will not be saved.
Test it
- In the
Data & APItab, open theStoragesubtab, then open thePublicorPrivatetab. - Upload a small file.
- Confirm it appears in the list.
Common pitfalls
I don’t see my files
Make sure the environment selector at the top is set to the same environment where you uploaded the file.