Appearance
Kanban
In this article, we will show you how to:
- Add the Kanban Element to your project,
- Display data in the Kanban Element,
- Create a new card,
- Update your records when a card is moved.
Add the Kanban to a Project
When you drag-and-drop the Kanban Element on the Canvas, you will be asked if you want to import Variables:

Should you?
Well, it depends if you'd like to see the Kanban with fake data to help you understand how it works.
If you don't, then you can disable the option.
If you do, the Kanban will include 3 mock data Variables:
- Selected item
- Show details
- Fake items

The "isDragging" Component Variable will be created regardless because it is required to drag-and-drop cards between columns.
Display Data in the Kanban
Once you have the Kanban on the page, you'll probably want to display and sort data in the Kanban.
Step 1: bind the Kanban element to a list of items
If you chose the include Variables options when you added the Element, you can look at the data that is bound in the Variables:

In the example below, we bound the items to one of our Table views:

Step 2: Explain which field in the list of items corresponds to the columns in your Kanban
In the example below, our items are "Stacked by" the public status defined in the "Public Statusx" column of our database:

Step 3: Map the Stack Values to the Values in the Database
In the example below, the values in our database are:
- Under Review
- Planned
- In Progress
But on the page, we want to display the tickets that are under review as "Backlog" so the "Under Review" value is given the "Backlog" label:
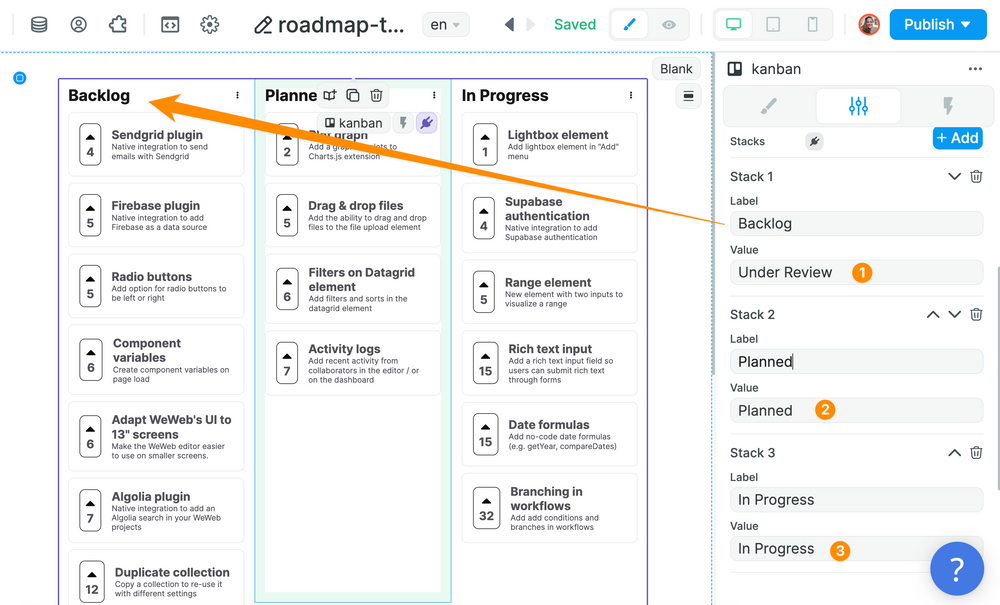
To recap:
- You will need as many stacks as you want columns in your Kanban
- The labels you give the stacks are what will appear at the top of each column on the page
- The values you give the stacks must match the field values you selected as "Stacked by" in step 2. These are case sensitive.
🔥 Pro Tip 🔥
You can enable the option to display uncategorized cards with the "Uncategorized stack" property.

Create New Cards
Notice that when you enable the "Uncategorized stack" property, there is an "Add card" button.
To allow users to create new cards, you could trigger a Workflow when they click on the Button.
In the example below, when a user clicks on the "Add card" button, we change the value of a "displayNewCard" Variable to "true":

When that Variable is "true", we display a Popup Form:

When the user submits the Form, we create a new record in Airtable:

Note that in the example above, we set the public status to "Under Review" by default because we want new cards to be reviewed first.
Update Records in the Kanban
Now let's say you want to update a record when a user drags a card to another column.
Step 1: create a Workflow on the Kanban Element
Make sure to trigger the Workflow "On item moved":

Step 2: update the record in your database
In the example below, we are updating a record in Airtable, in the Table view we used to display items in the Kanban:

In order to update the correct record, we need to tell Airtable which object, i.e. which row in our base we want to update.
In order to do that, we need to send Airtable the "id" of the record to update.
In the example below, we used a "getKeyValue" formula that gets the value of the key "id" of the item that was moved:

Then, we told Airtable that the new value for "Public Statusx" was the value of the stack where the card was moved:

WARNING
Note that for now the "Current value" is not displayed when we bind our record id and the public status info. In the future, we will improve the display so you can preview the data with the last item moved.