

Appearance
Intro to pages
A page is the distinct screen that appears when visitors go to a specific web address (URL) on your web app. Each page shows different information and features, like how a "Contact" page displays contact details while an "About" page shows company information.
Create a page
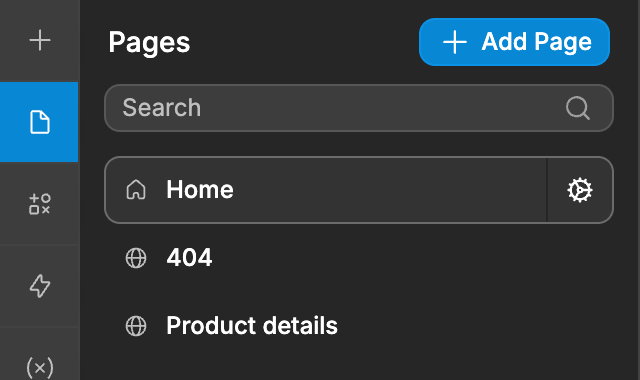
To create a new page in WeWeb:
- Click on the
Pagesicon in theInterfacetab on the left side of the editor - Click on the
Add Pagebutton at the top of thePagespanel - Enter a name for your page
- Choose whether to copy content from an existing page or start with an empty page
- Configure the page's default URL path
- If copying from another page, decide which sections should be linked across pages
- Click
Createto create the page
TIP
Linked sections are referred to as Reusable Sections in WeWeb. They are useful to improve the user experience and page loading time of your web application.
Learn more about using multi-page sections in WeWeb.
Page name
The name of your page. This is what you'll see in the Pages panel when you open the pages list in the Interface tab.
To update a page name:
- Open the
Pagespanel in theInterfacetab - Click the cog next to the page you want to rename
- Update the
Page namefield - The name will be automatically saved
Page folder
Organize your pages into folders to keep your project structured. You can assign pages to folders and create new folders as needed.
To add a page to a folder:
- Open the
Pagespanel in theInterfacetab - Click the cog next to the page you want to organize
- Select or type a folder name in the
Folderfield - The page will be moved to that folder in the pages list
Draft mode
Pages with draft mode Enable won't be included when you publish your WeWeb app. This is useful when you're working on a page that isn't ready for production yet.
Pages in draft mode are indicated by a warning color in the Pages panel.
To enable draft mode for a page:
- Open the
Pagespanel in theInterfacetab - Click the cog next to the page you want to set as draft
- Toggle
Draft modetoEnable
WARNING
Changing a page's Draft mode setting only takes effect after you (re)publish the app.
For example, if the app was published when Page A had draft mode set to Disable, changing the draft mode of Page A to Enable in the WeWeb Editor won't remove the page from production until you publish the app again.
Note: You cannot enable draft mode on your homepage.
Pre-rendering
With Pre-rendering set to Enable, WeWeb serves a pre-built version of the page, so it loads faster and search engines read it more easily. It is on by default for new public pages.
Pre-rendering is only available on public pages with static URLs. On a dynamic page (a page with a variable in its path) or a private page, the setting is locked.
Description
A short description of what the page does. It helps you and your team find your way in a large project, and it gives WeWeb AI context about the page. Click Generate to have it written for you.
URL paths
Configure the URL path for your page to control what appears in the browser's address bar when users visit the page.
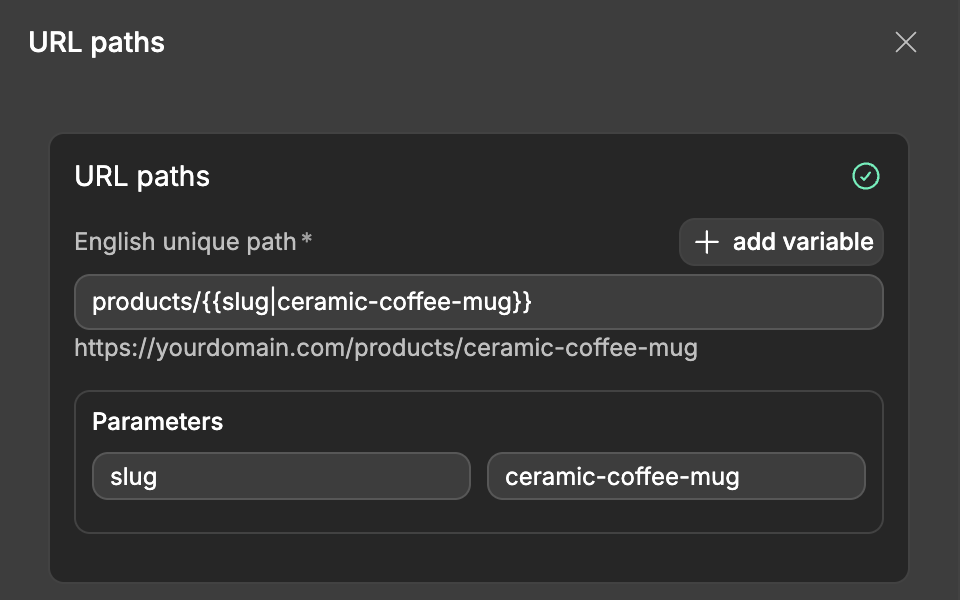
To configure URL paths:
- Open the
Pagespanel in theInterfacetab - Click the cog next to the page you want to configure
- Click on
Url pathsin the menu - Set the default path for your page
- Use
+ add variableto insert path variables into the path - Review the URL preview below the path field and check the
Parameterssection to confirm each variable and its default value
Adding path variables
You can add variables to your path to create dynamic pages. Path variables are defined using the syntax {{variableName|defaultValue}}.
For example, a path like products/{{product_id|123}} creates a dynamic product detail page where product_id can change based on which product the user is viewing.
You can access path variables anywhere in your page through the data explorer under From path in current page. Open the binding menu, go to the Page tab (usually the first tab, with the icon), and expand From path in current page to bind a path variable in a formula or element property.
TIP
Path variables are essential for creating detail pages for your table views. For example, if you have a table view of products, you can create a page with the path products/{{product_id|123}} and use the product_id variable to fetch and display the specific product details.
Learn more about dynamic collection pages and configuring URL parameters.
Dynamic pages
A dynamic page is a single page template that shows a different record depending on its URL. It is how you build detail pages, like a product page, a blog post or a user profile.
The usual setup uses a path variable and a table view:
- Give the page a path with a variable, for example
products/{{slug|ceramic-coffee-mug}} - In the
Data & APItab, create a view of your table with a parameter (for exampleslug), and a filter that only returns the row whereslugis equal to that parameter - Back on the page, add a page workflow with the
On page loadtrigger and theTable View: Fetchaction, and bind the view parameter to your path variable: in thePagetab of the binding panel (usually the first tab, with the icon), openFrom path in current pageand selectslug - Bind the elements of the page (title, image, price) to the first row returned by the view
- On the page that lists your records, link each item to the dynamic page and pass its slug in the path
Because the page reads the record from its URL, it shows the right data even when someone opens the link directly, refreshes the page, or shares it.
CHOOSING AN ID OR A SLUG
You can use the record ID or a slug (a readable text identifier, like oak-cutting-board) as the path variable. A slug gives cleaner URLs, but make it unique in your table so each URL points to one record.
Learn how to build a dynamic page step by step →
Page workflows
Page workflows allow you to run actions when specific events occur on a page, such as when the page loads, when a user scrolls, or when a key is pressed.
Workflows are now managed in a dedicated Workflows tab in the Interface section, not in the page settings.
To create or edit page workflows:
- In the left panel of the
Interfacetab, open theWorkflowstab - In the
Workflowspanel, select thePage Triggerstab - Choose which page you want to add workflows to (the page you're on is selected by default)
- Click
Newto open the workflow creation popup - Pick a trigger (for example, on page load, on page scroll, etc.) or start from one of the templates
- Add actions to your workflow
Page workflow triggers include:
- On app load
- On page load
- On page unload
- On page scroll
- On page resize
- On keydown
- On keyup
Common use cases for page workflows:
- Fetching a table view when the page loads, like on a dynamic page
- Reacting to a user scrolling up or down the page
- Checking for a purchase completion after a page loads
- Manipulating table view data before displaying it on the page
- Triggering analytics events when users interact with the page
TIP
For more information about creating and managing workflows, see the Workflows documentation.
Custom code
Add custom code to specific pages for tracking scripts, custom styling, or specialized functionality that only applies to that page.
To add custom code to a page:
- Open the
Pagespanel in theInterfacetab - Click the cog next to the page where you want to add custom code
- Click on
Custom scriptsin the menu - Choose where to inject your code:
- Page header — Code is loaded before the page renders (useful for custom CSS or JavaScript, but may affect SEO performance)
- Page body — Code is loaded after the page renders (ideal for tracking scripts, doesn't impact SEO)
Page-level custom code only runs on your published app, not in the editor preview. When you add JavaScript, wrap it in <script> tags.
TIP
Custom code added at the page level only applies to that specific page.
To add custom code across your entire app, open the Settings tab → Interface Settings → Advanced → Custom scripts.
WARNING
When you add custom CSS to a page or project, do not include <head> or <body> tags. WeWeb handles those tags automatically.
Languages
Configure which languages are available on a specific page and control how language-specific URLs are structured.
To configure page languages:
- Open the
Pagespanel in theInterfacetab - Click the cog next to the page you want to configure
- Click on
Languagesin the menu
The Languages panel has two areas:
Page languages— choose which project languages are enabled on the current pageProject languages— add languages to your project, set the default language, and decide whether to include the default language slug in URL paths
In the Languages panel, you can:
- Add languages to your project
- Define the default language of your project
- Decide if you want to add the default language slug to the URL path of the current page
- Decide which languages should be enabled on the current page
- Toggle between active languages to preview the page content in different languages
Working with multiple languages
When you have multiple languages enabled on a page:
- Text elements on the page will prompt you to provide content in each language
- Selected text elements show a field for each enabled language (for example,
Text - en,Text - es) - Use the language selector in the canvas header to switch between languages in the editor
- The appropriate text will be displayed based on the user's language selection
Duplicate a page
Duplicate a page when you want to create a new page with similar content and structure to an existing one.
To duplicate a page:
- Open the
Pagespanel in theInterfacetab - Click the cog next to the page you want to duplicate
- Click on
Duplicate {page name}in the menu - Configure the new page name and URL path
- Choose which sections should be linked
- Click
Createto create the duplicate
The duplicate page panel provides the same options as creating a new page, with all content pre-filled from the page you're duplicating.
Make a page the homepage
Set any page as your app's homepage. The homepage is the page that users see when they visit the root URL of your app.
To make a page the homepage:
- Open the
Pagespanel in theInterfacetab - Click the cog next to the page you want to set as the homepage
- Click on
Make {page name} your home pagein the menu - Confirm the change
Remove a page
Delete pages that are no longer needed in your app.
To delete a page:
- Open the
Pagespanel in theInterfacetab - Click the cog next to the page you want to delete
- Click the trash icon at the top of the page settings panel
- Enter the page name to confirm deletion
- Click
Delete page
WARNING
You cannot delete your homepage. If you want to delete the current homepage, first set another page as the homepage, then delete the original one.
Be careful when deleting pages, as any links pointing to that page will be broken.
Collection pages in older projects
Older projects can still have static collection pages, built on collections. New projects use tables, views and dynamic pages instead. If your project still uses collections, you'll find the Add static collection page option next to the Add Page button.