Appearance
XANO authentication
USE THE CURRENT XANO GUIDE
This page describes an older Xano Auth plugin flow.
For current projects using the Authentication subtab in Data & API, use Xano (Authentication System) →.
Xano pre-requisites
In order to set up Xano authentication in your WeWeb project, there are three prerequisites:
- You already have an account with Xano ✅
- You have a user table in your Xano database with at least two fields: login and password ✅
- You have the three authentication API endpoints in Xano ✅
Some Xano templates include a user table and the three authentication API endpoints.
However, if you don't have both in your Xano workspace, you'll need to set them up manually.
Here's how.
User table in Xano
Your user table should include at least two fields:
- One field where you store the login, for example, a string field with a name or an email field with an email address, and
- One field of field type
passwordwhere you store the encrypted password.

TIP
Choose the field type password when creating your user table in Xano to ensure that the user input is encrypted when the user first creates an account with your web-app. Hashing passwords is best practice and will ensure that you can use Xano’s authentication API points.
Authentication endpoints
For Xano authentication to work, you need three API endpoints:
- Signup
- Login
- Me

If you’re using a Xano template that includes authentication, you’ll find these endpoints in the API sub-menu.
Otherwise, you’ll need to create these three endpoints yourself by going to API > Add API Endpoint > Authentication
Plugin configuration
To add the Xano Auth plugin in WeWeb, go to Plugins > Authentication:
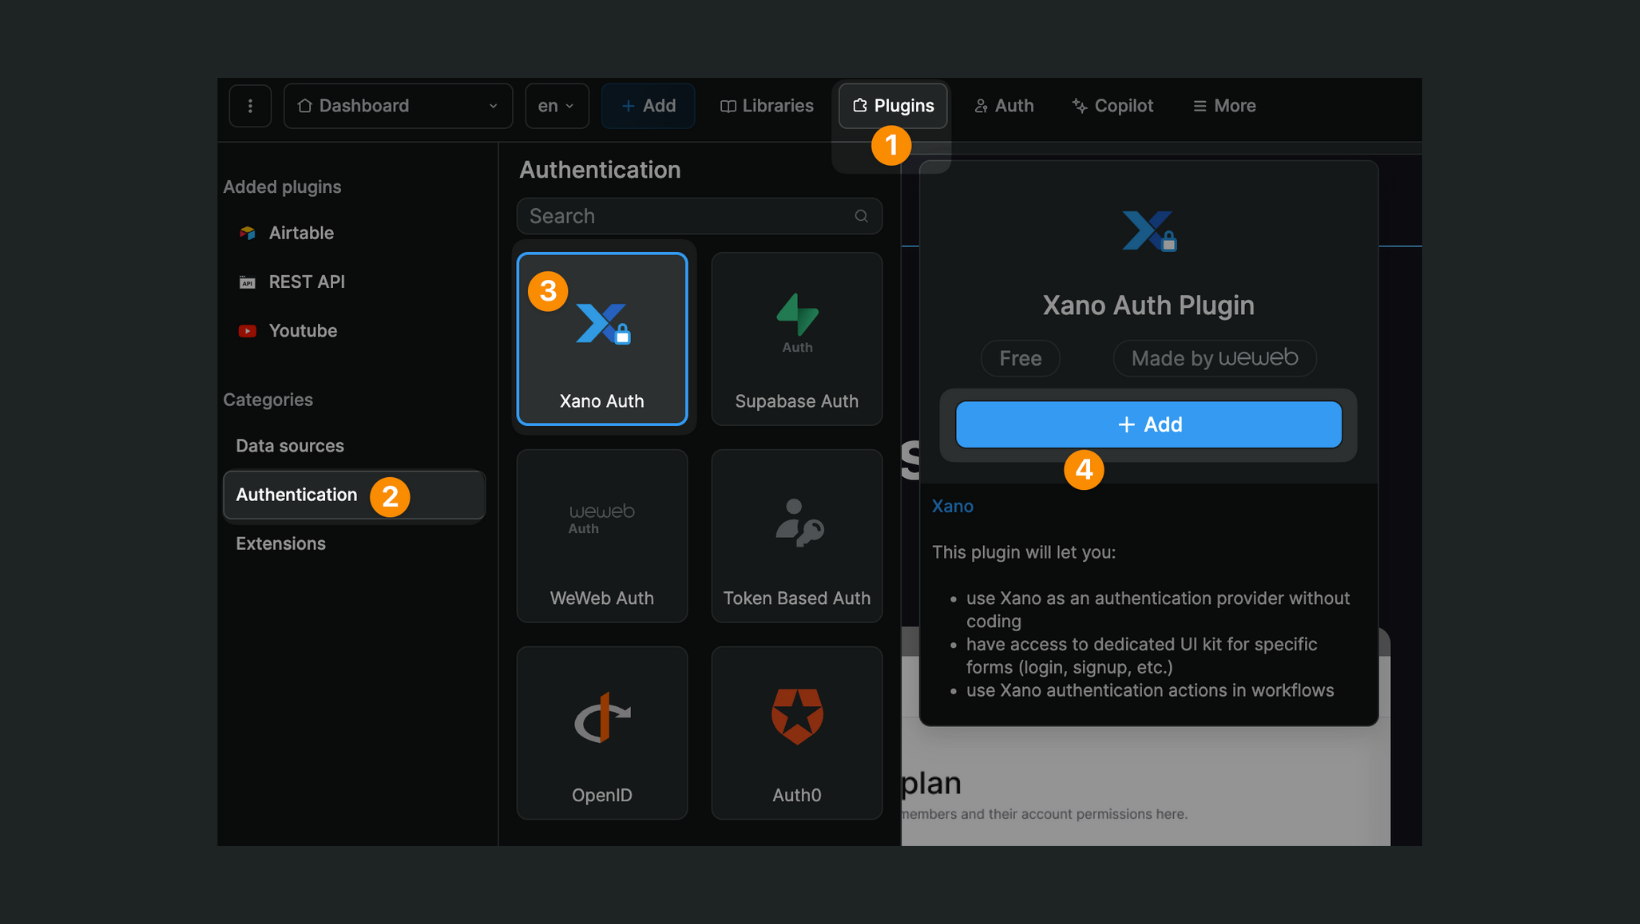
You will be invited to provide the following information:
- A Xano access token
- What Xano instance and workspace you want to work with,
- Your Xano custom domain if you have one,
- The
me,login, andsignupendpoints from your Xano project, and - What 3rd-party providers you want to work with (assuming you have any activated in the Xano workspace you selected)
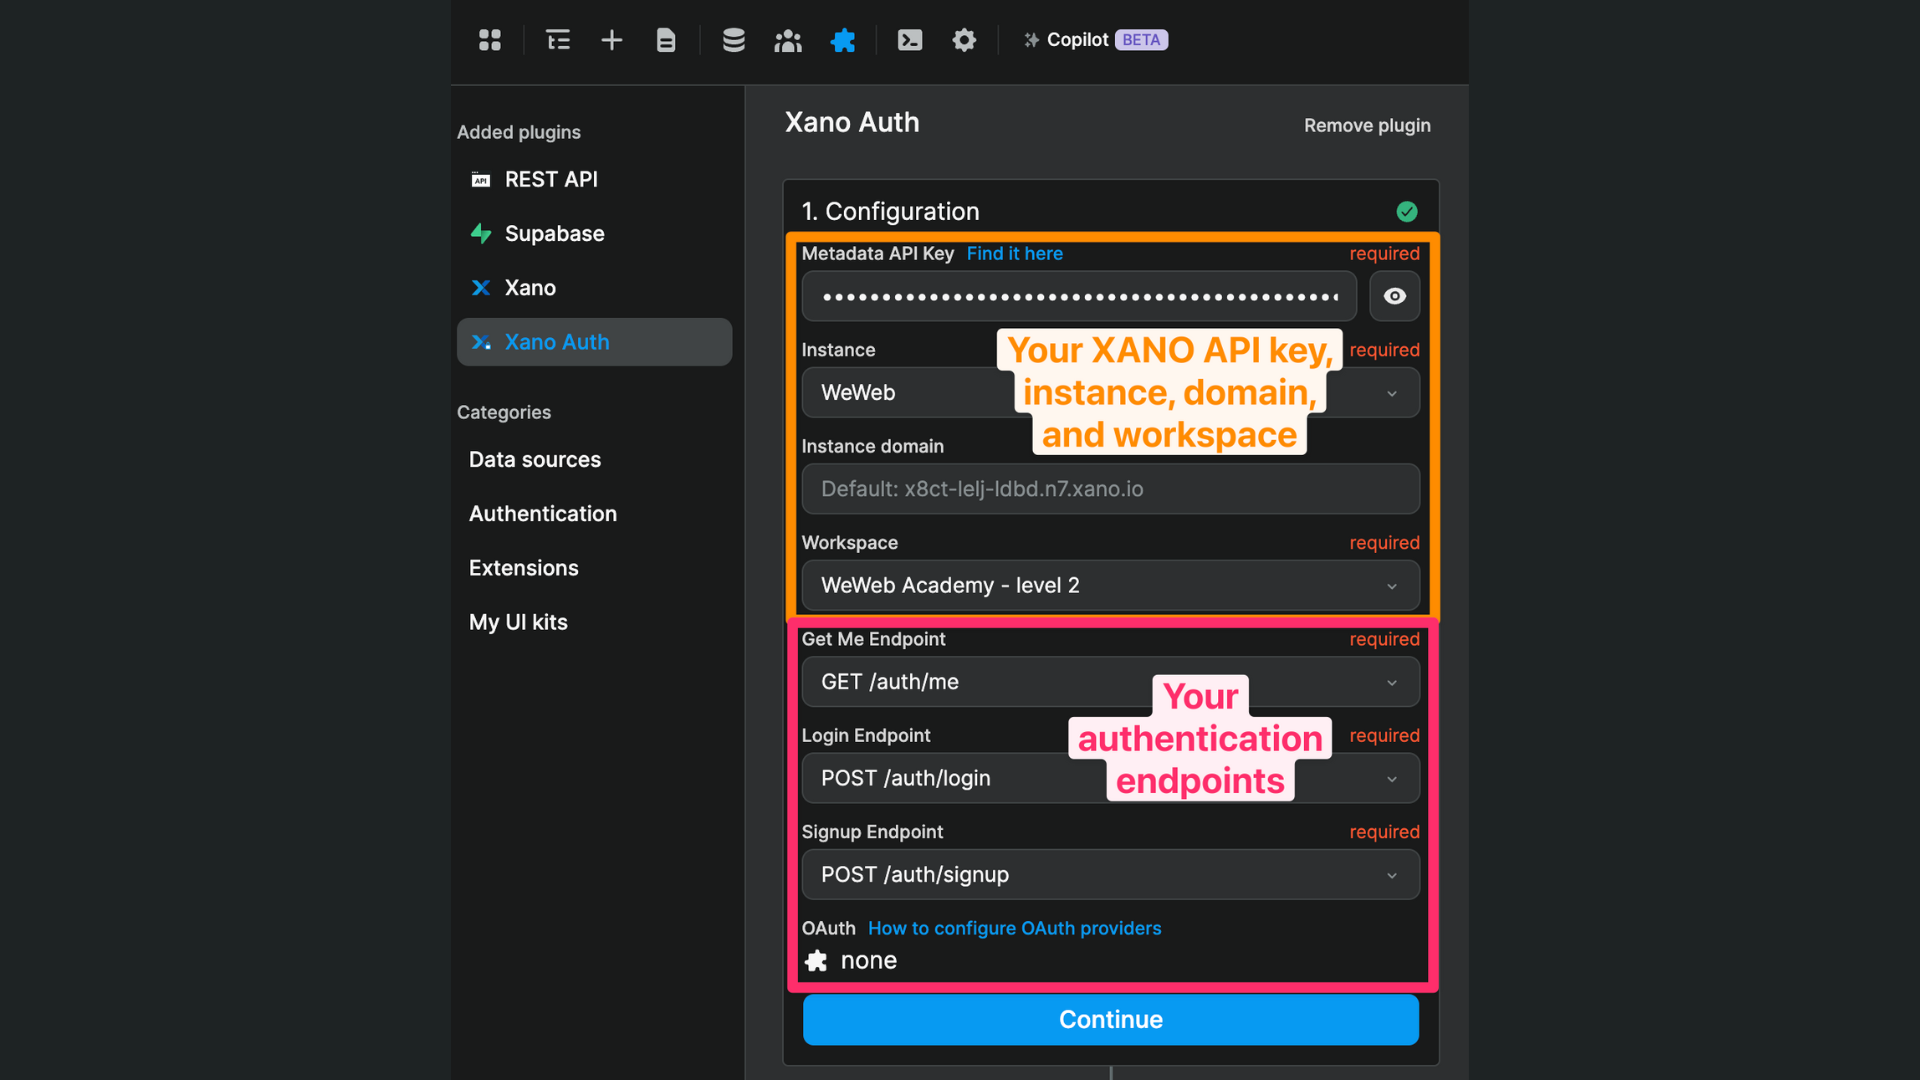
WARNING
The Metadata API Key field expects the value of the Xano personal access token.
Make sure to paste the access token itself, NOT the key ID of the access token:
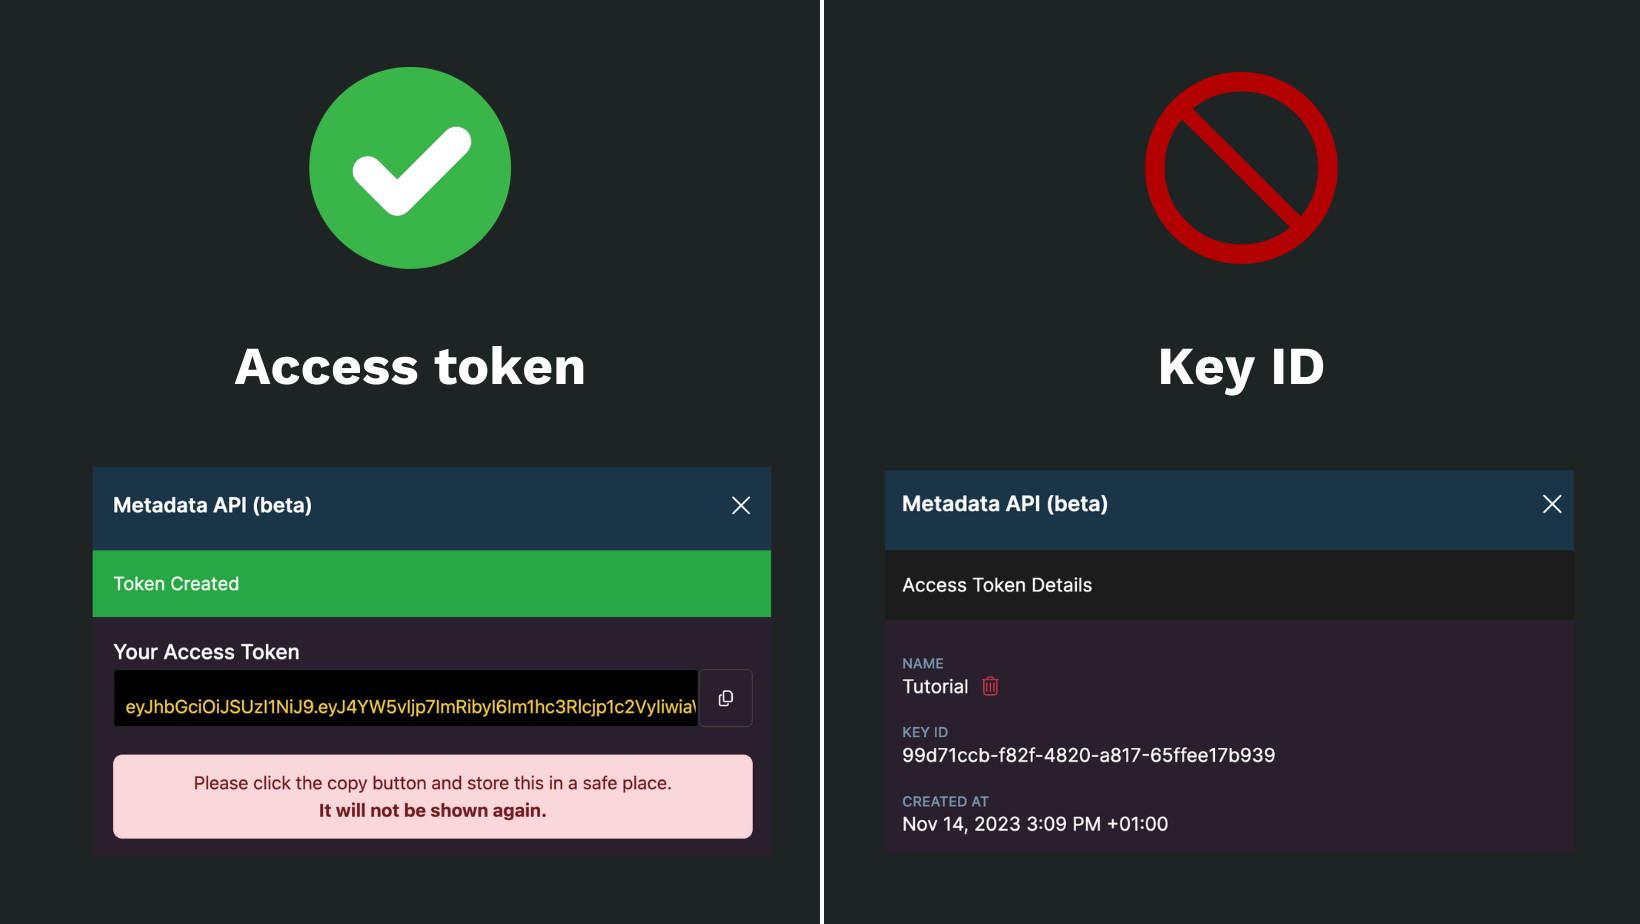
Note: you will only be able to view the access token once, when you first create it. Make sure to copy/paste it there and then or you might have to create a new access token down the line.
Data source & branching (optional)
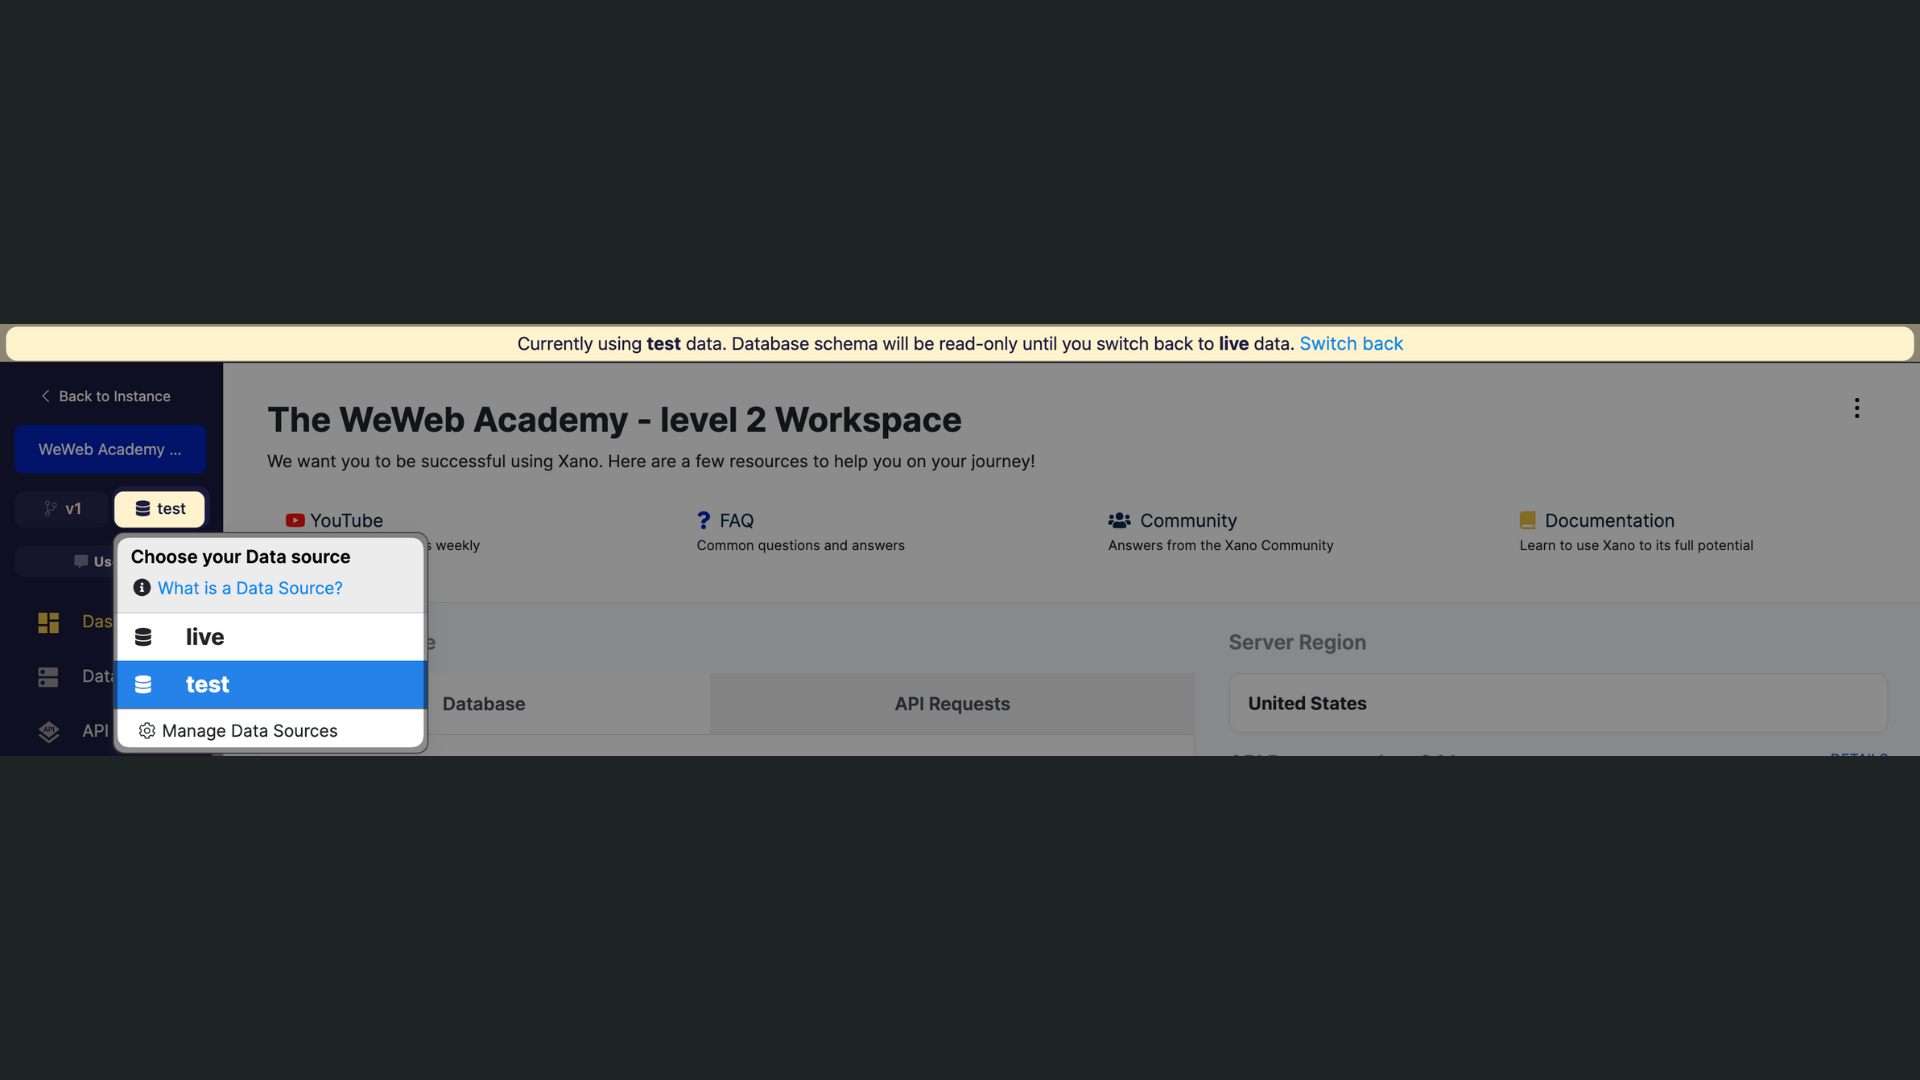
Depending on your Xano plan, you may have the option to support multiple data sources and branches.
For example, you could have a live data source and a test data source:
In WeWeb, you could decide to work with different data sources depending on whether you're working:
- Inside the WeWeb editor,
- On the app published in the WeWeb staging environment, or
- On the published app in production.
In the example below, we chose to work with the data from the test data source inside the WeWeb editor, and on the app in staging:
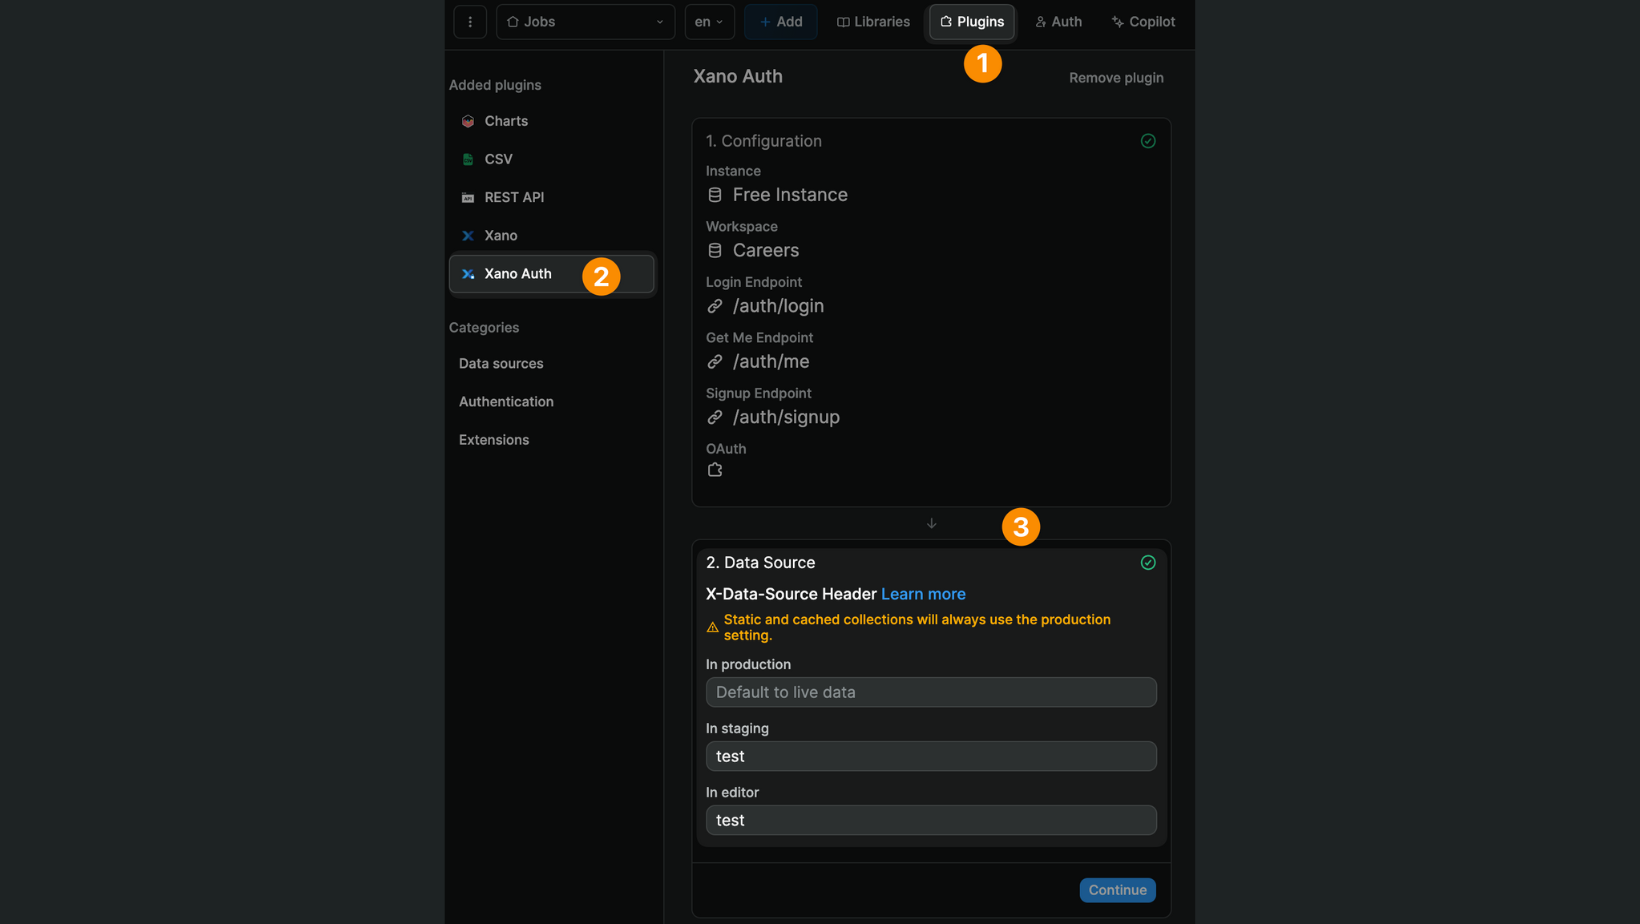
As a result, when working in the WeWeb editor or viewing the app published in staging, the data that is displayed will be the data from the test data source in Xano. We will not be able to see or work with the data in the live data source.
WARNING
As per Xano's user documentation, "it's important to note that a test data source will have exactly the same data schema and structure as your live environment. You cannot change, edit, or delete the schema or database tables in your test data source environment. The test environment allows you to use different data or records so that you can perform tests in your API without affecting your live data."
The same logic applies if you want to work with different Xano branches. In the example below, we will test the Xano v2 branch in the WeWeb editor and the app we publish on the staging environment but the Xano v1 branch will still be live in our app in production:
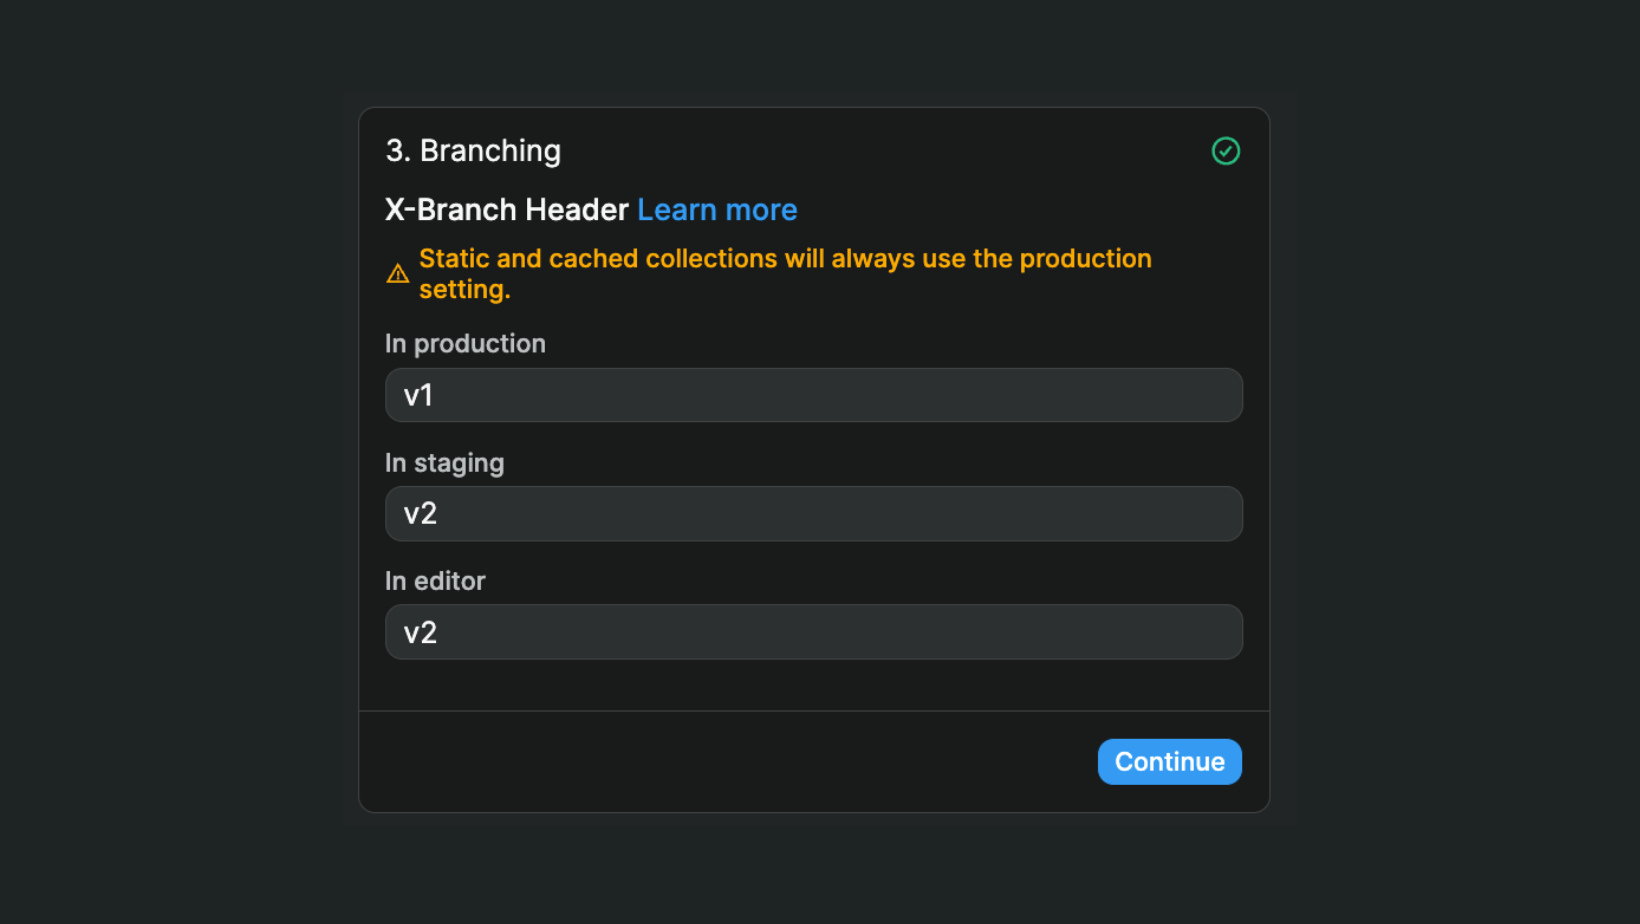
When we're ready, we can decide to make the v2 branch live in Xano and update the Xano data source plugin in WeWeb.
WARNING
When working with workflows in WeWeb, we will list all the fields that are available in the LIVE Xano branch, even if you have chosen an EDITING Xano branch for the WeWeb Editor in the Xano data source plugin configuration.
To avoid confusion, we recommend that all your Xano branches include the same fields.
Global headers (optional)
If you need to add custom global headers to a Xano call, you can configure these:
- In the Xano data source plugin,
- In the Xano Auth plugin,
- At collection level, or
- At action level when making a request in a workflow.
Define redirections
Here, you should choose a PUBLIC page where users who are not signed in can be redirected.
In the example below, we chose to redirect unauthenticated users to a login page but it could be any page as long as it's a public page:

WARNING
Make sure you redirect unauthenticated users to a public page. If you redirect unauthenticated users to a page that is only accessible to authenticated users, you'll be creating an infinite loop and your app will crash.
User role configuration
PRE-REQUISITE IN XANO
In order to gate content in WeWeb based on user roles and permissions, you first need to have information about roles in your Xano database and that information needs to be accessible to WeWeb via API.
For example, you could create a role column in your user table in Xano and make it available in the me endpoint so that, when a user logs in to your app, you fetch their role at the same time:
Assuming you have information about a user's role in Xano and that information is available in the me endpoint, you can tell the Xano Auth plugin in WeWeb where to find that information.
In the example below, we see that the user returned by the me endpoint in Xano provides a single role in a single text in the role column:

So we tell the Xano Auth plugin in WeWeb that it can find the role of our user in a text column named role:
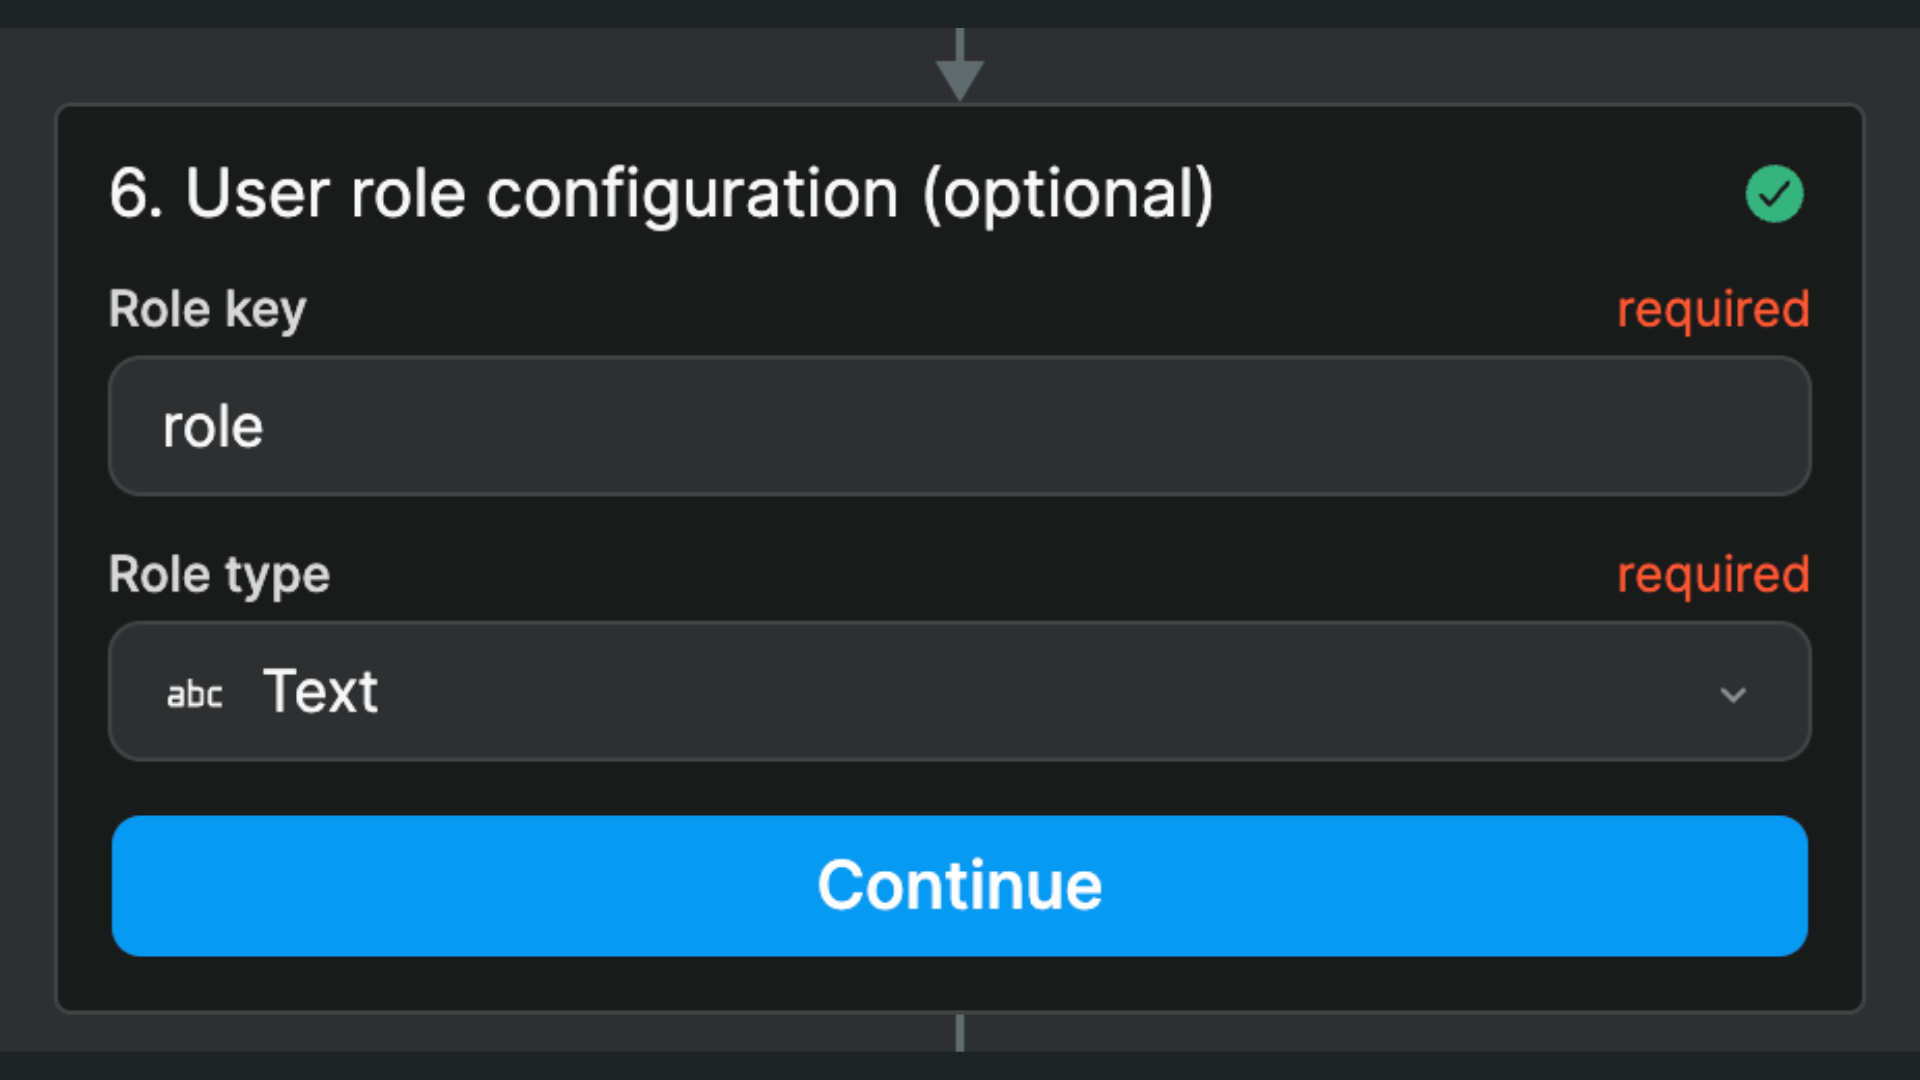
WARNING
The Role key is case sensitive. If the column name in your backend is Roles, you should type this in exactly: roles won't work.
The Role type must match the data type where you store user role(s) in your backend. In the example above, it's a single Text in a column named role but other common use cases could be a List of texts named roles or a List of objects named users.
Signup and login flows
When you add the Xano Auth plugin to a WeWeb project, you will get access to a new Xano Auth category of UI elements in the Add menu:
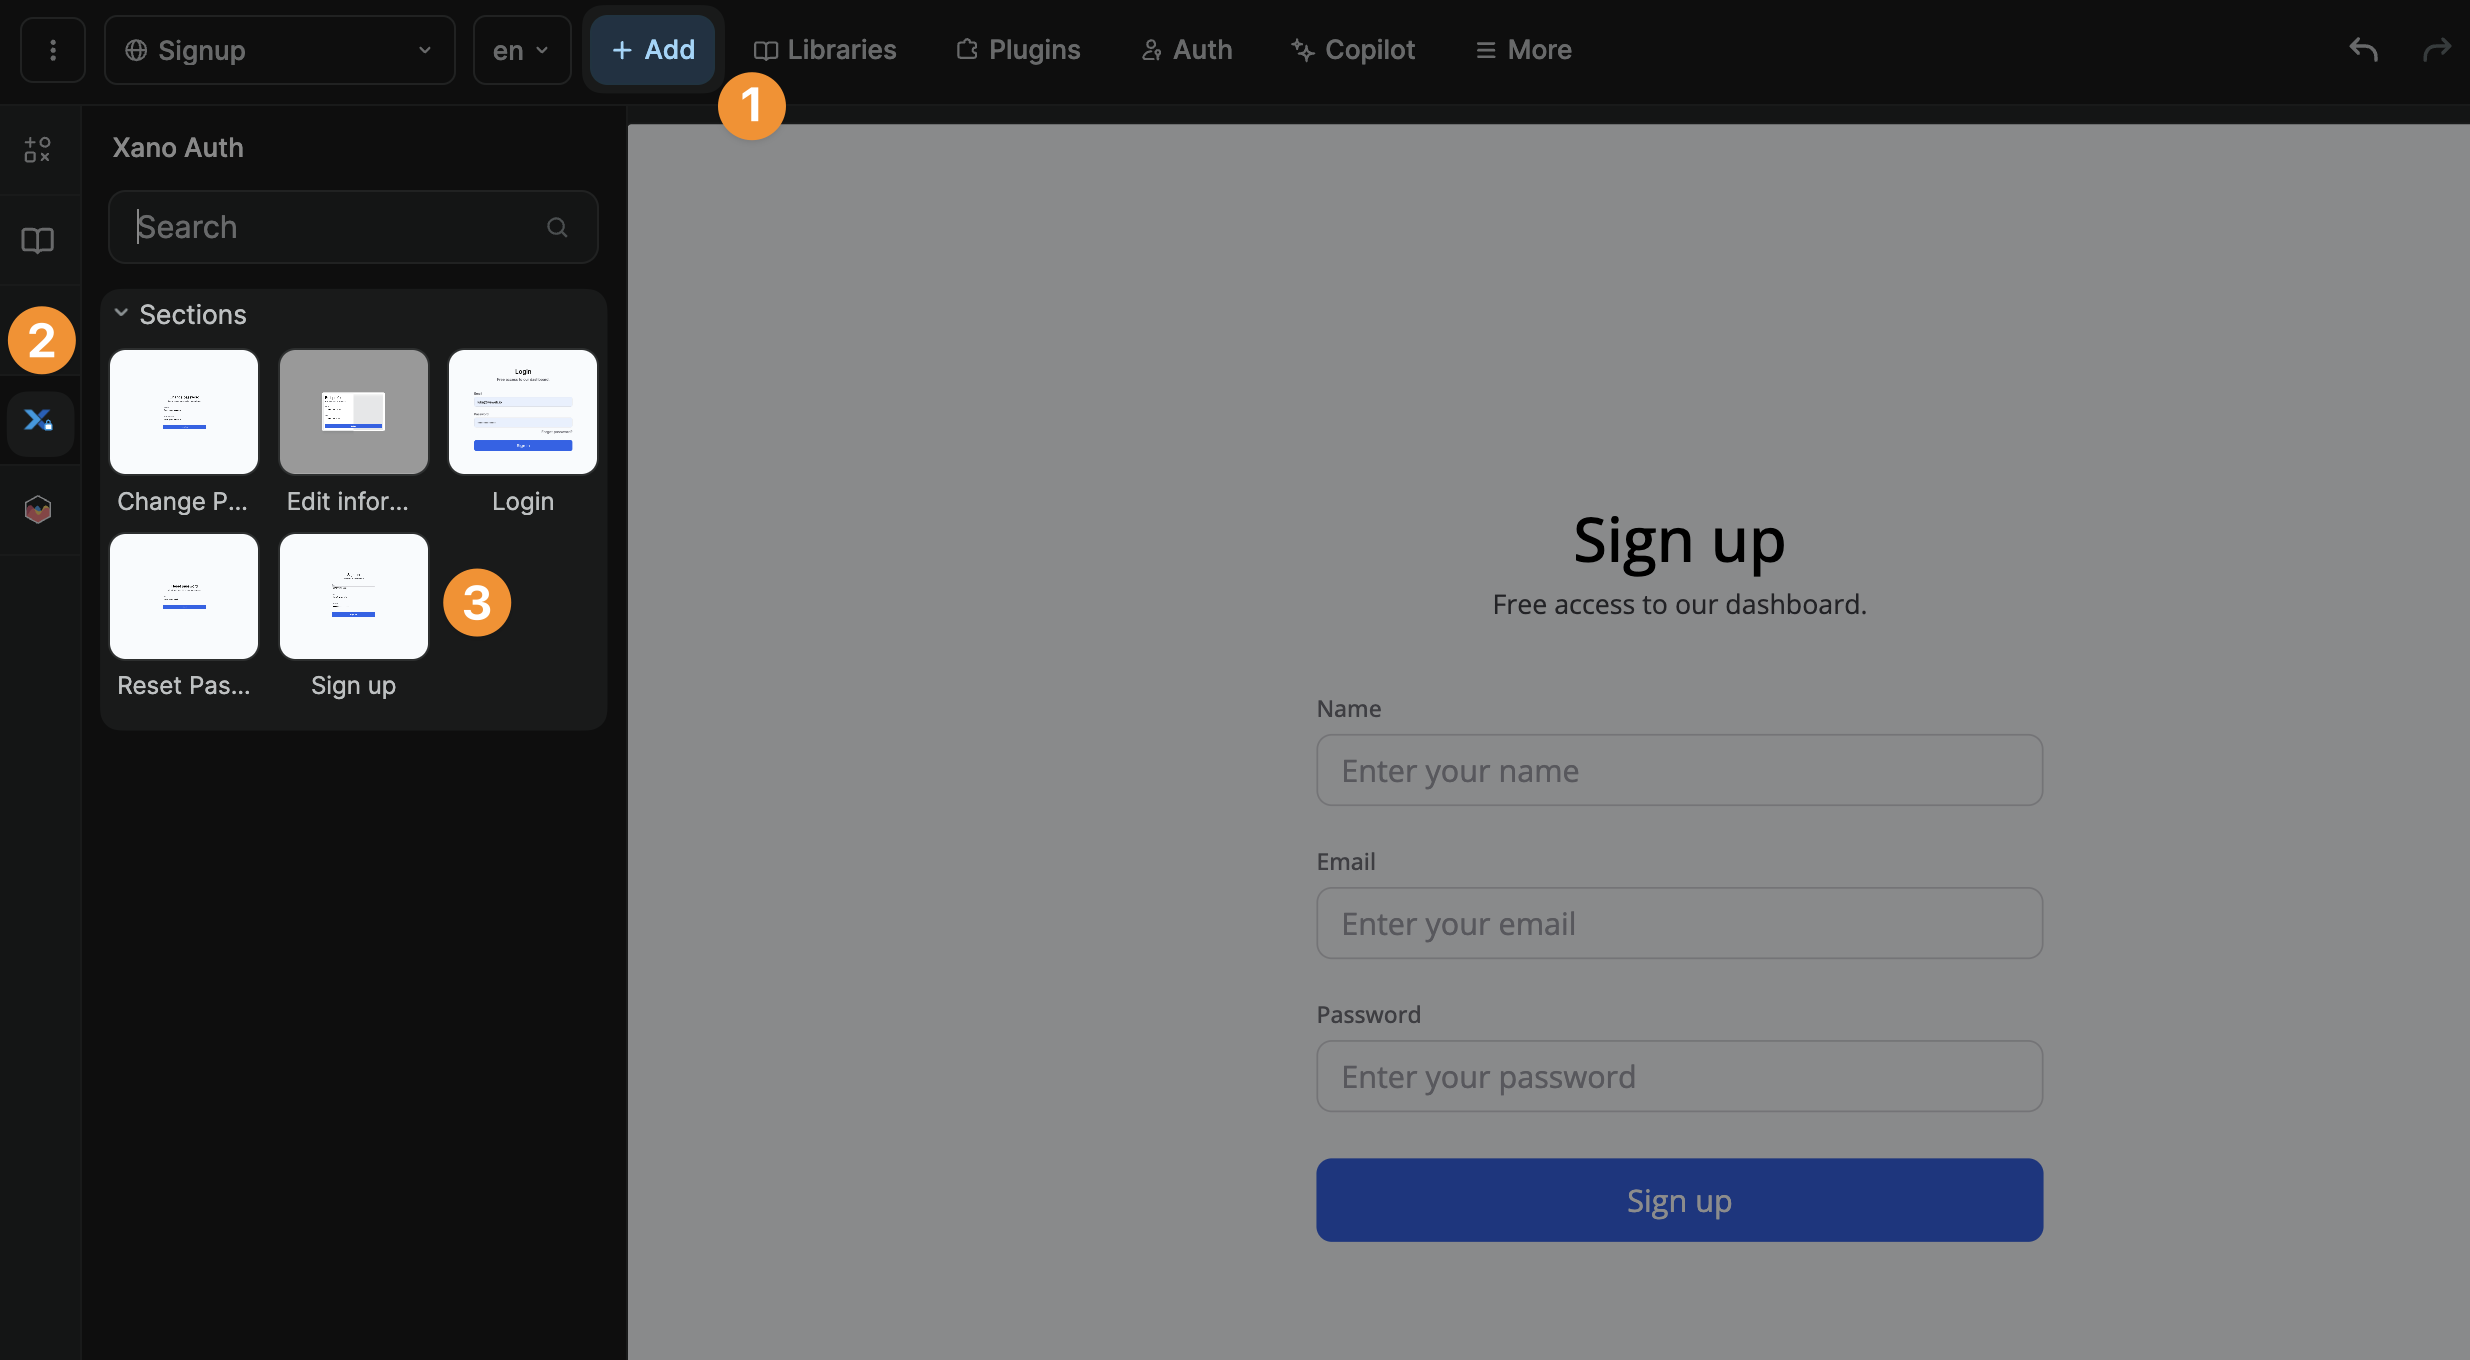
The login and signup forms both include a workflow with login and signup actions respectively but you'll need to adapt it to suit your login and signup flows.
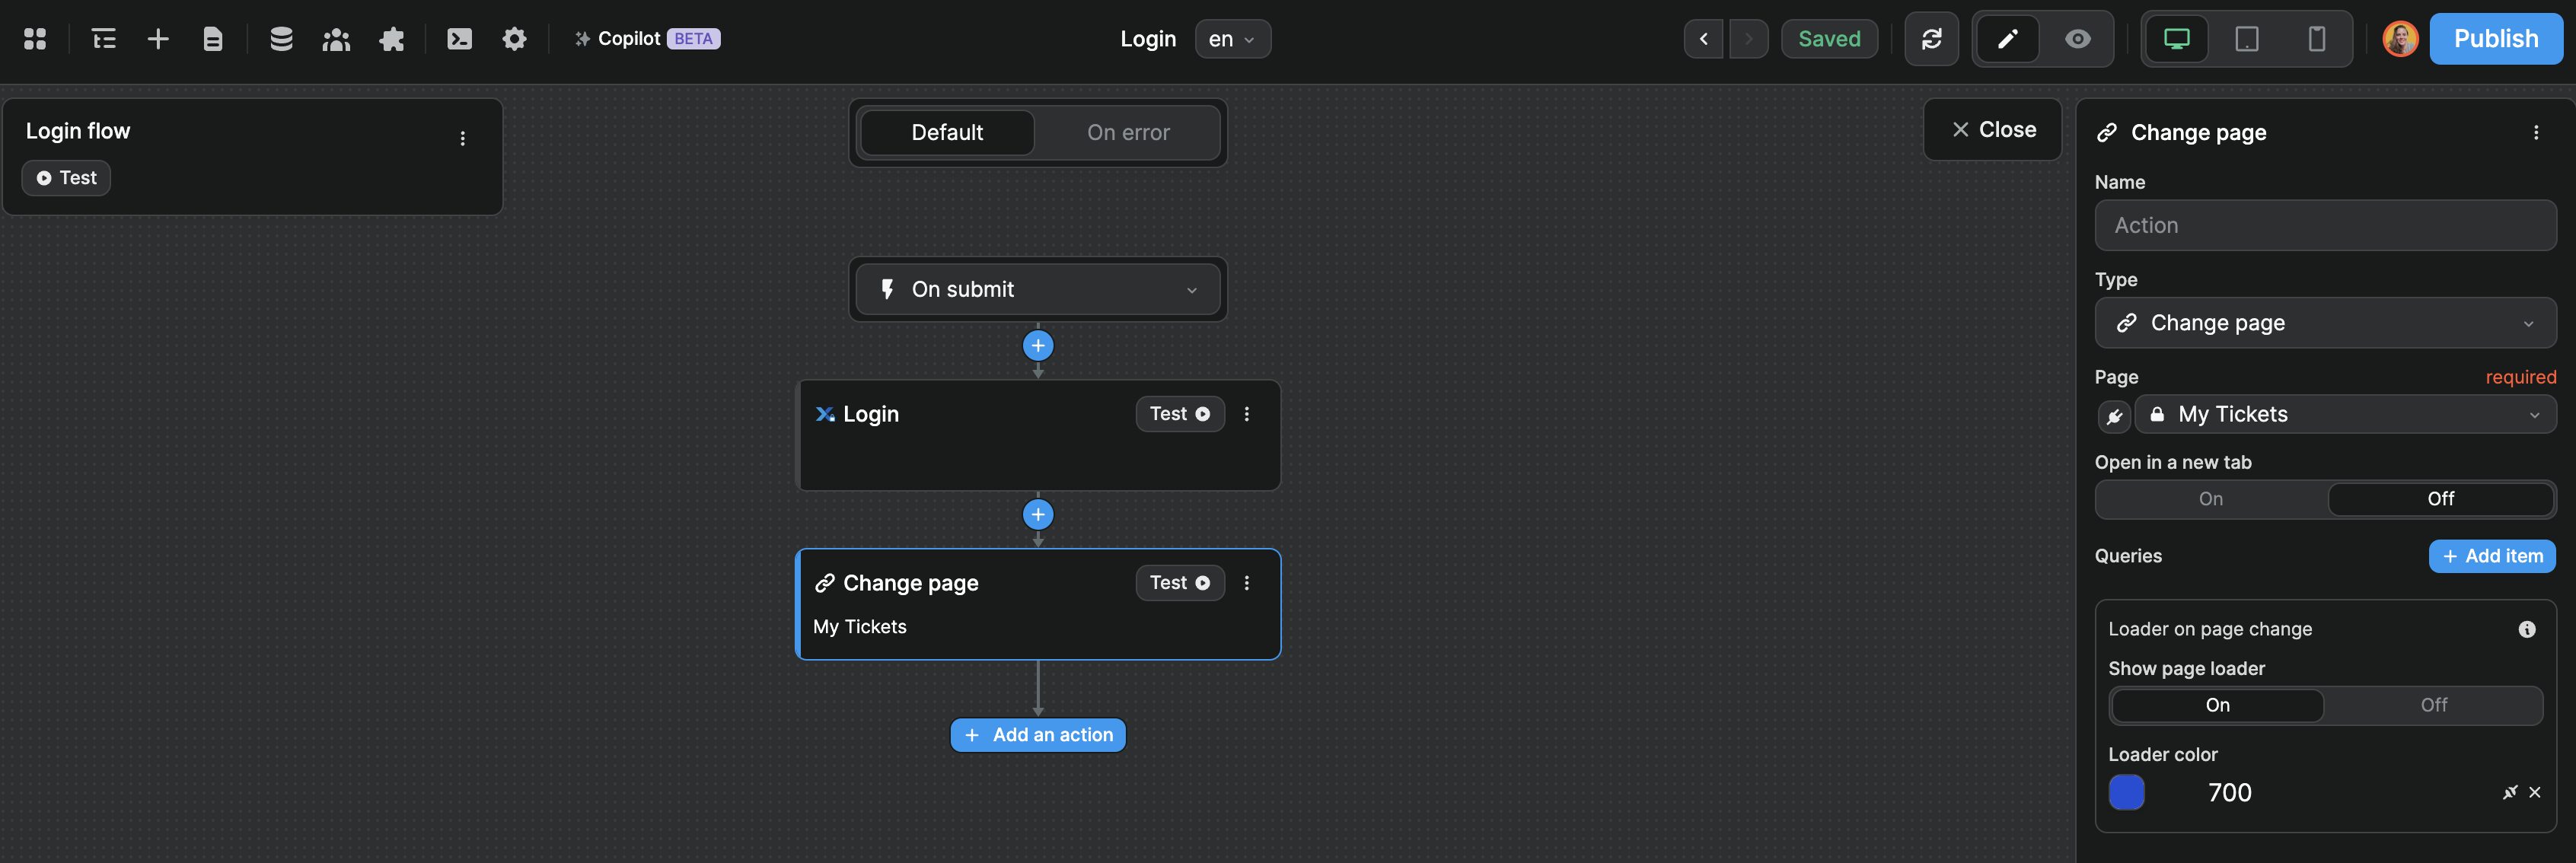
For example, if you want to display a modal for users to login, you could add a Change variable value action to close the modal once the login is complete.
In the example below, we added a Navigate to action to redirect the user after they log in:
WARNING
Signup workflows will fail if:
- The user already exists in the Xano user base, or
- The password does not match the requirements defined in Xano.
Login workflows will fail if:
- The user does not exist in the Xano user base, or
- If the password does not match the user's stored password.
Conditional display
Once you've setup user authentication, you'll probably want to display some things conditionally.
For example, you'll want to display a logout button when the user is authenticated.
You can do this by binding the display of your login and logout buttons to the isAuthenticated variable in the User tab:
WARNING
Conditional display and conditional rendering can help you build a nice user experience but should not be used as a security measure to hide user data.
Always make sure only authorized users can access personal information.
Learn more about building secure web-apps with WeWeb.
Private pages
By default, once you've added the Xano Auth plugin to your WeWeb project, you'll be able to make pages private.
You'll have the option to choose if a page should be accessible to everybody or authenticated users only:
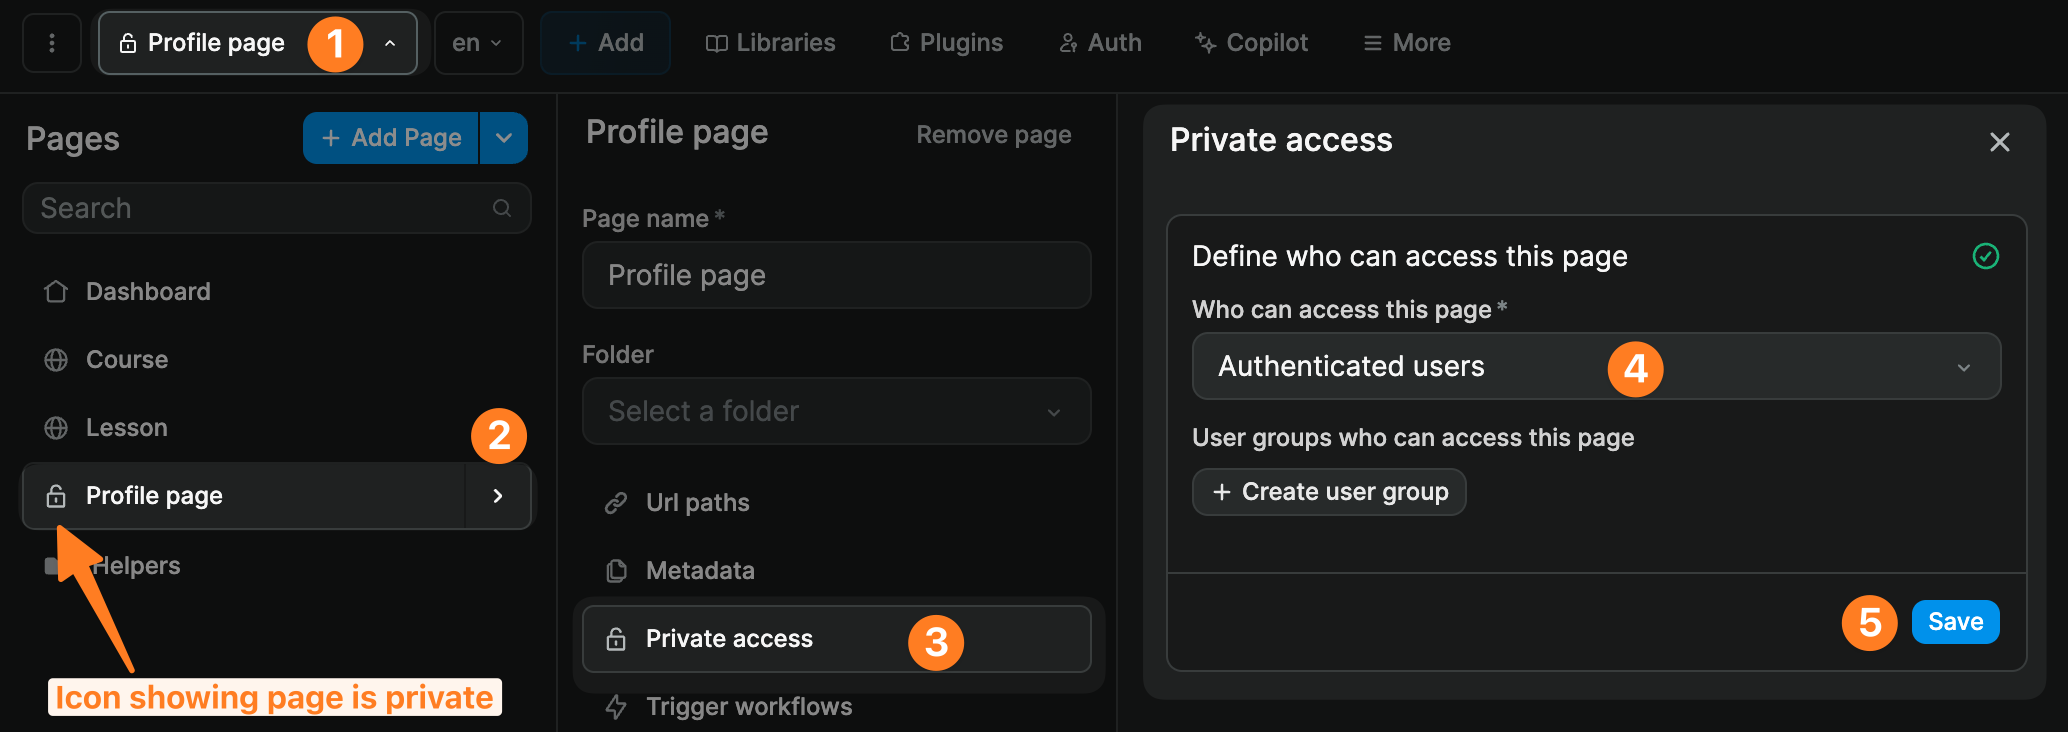
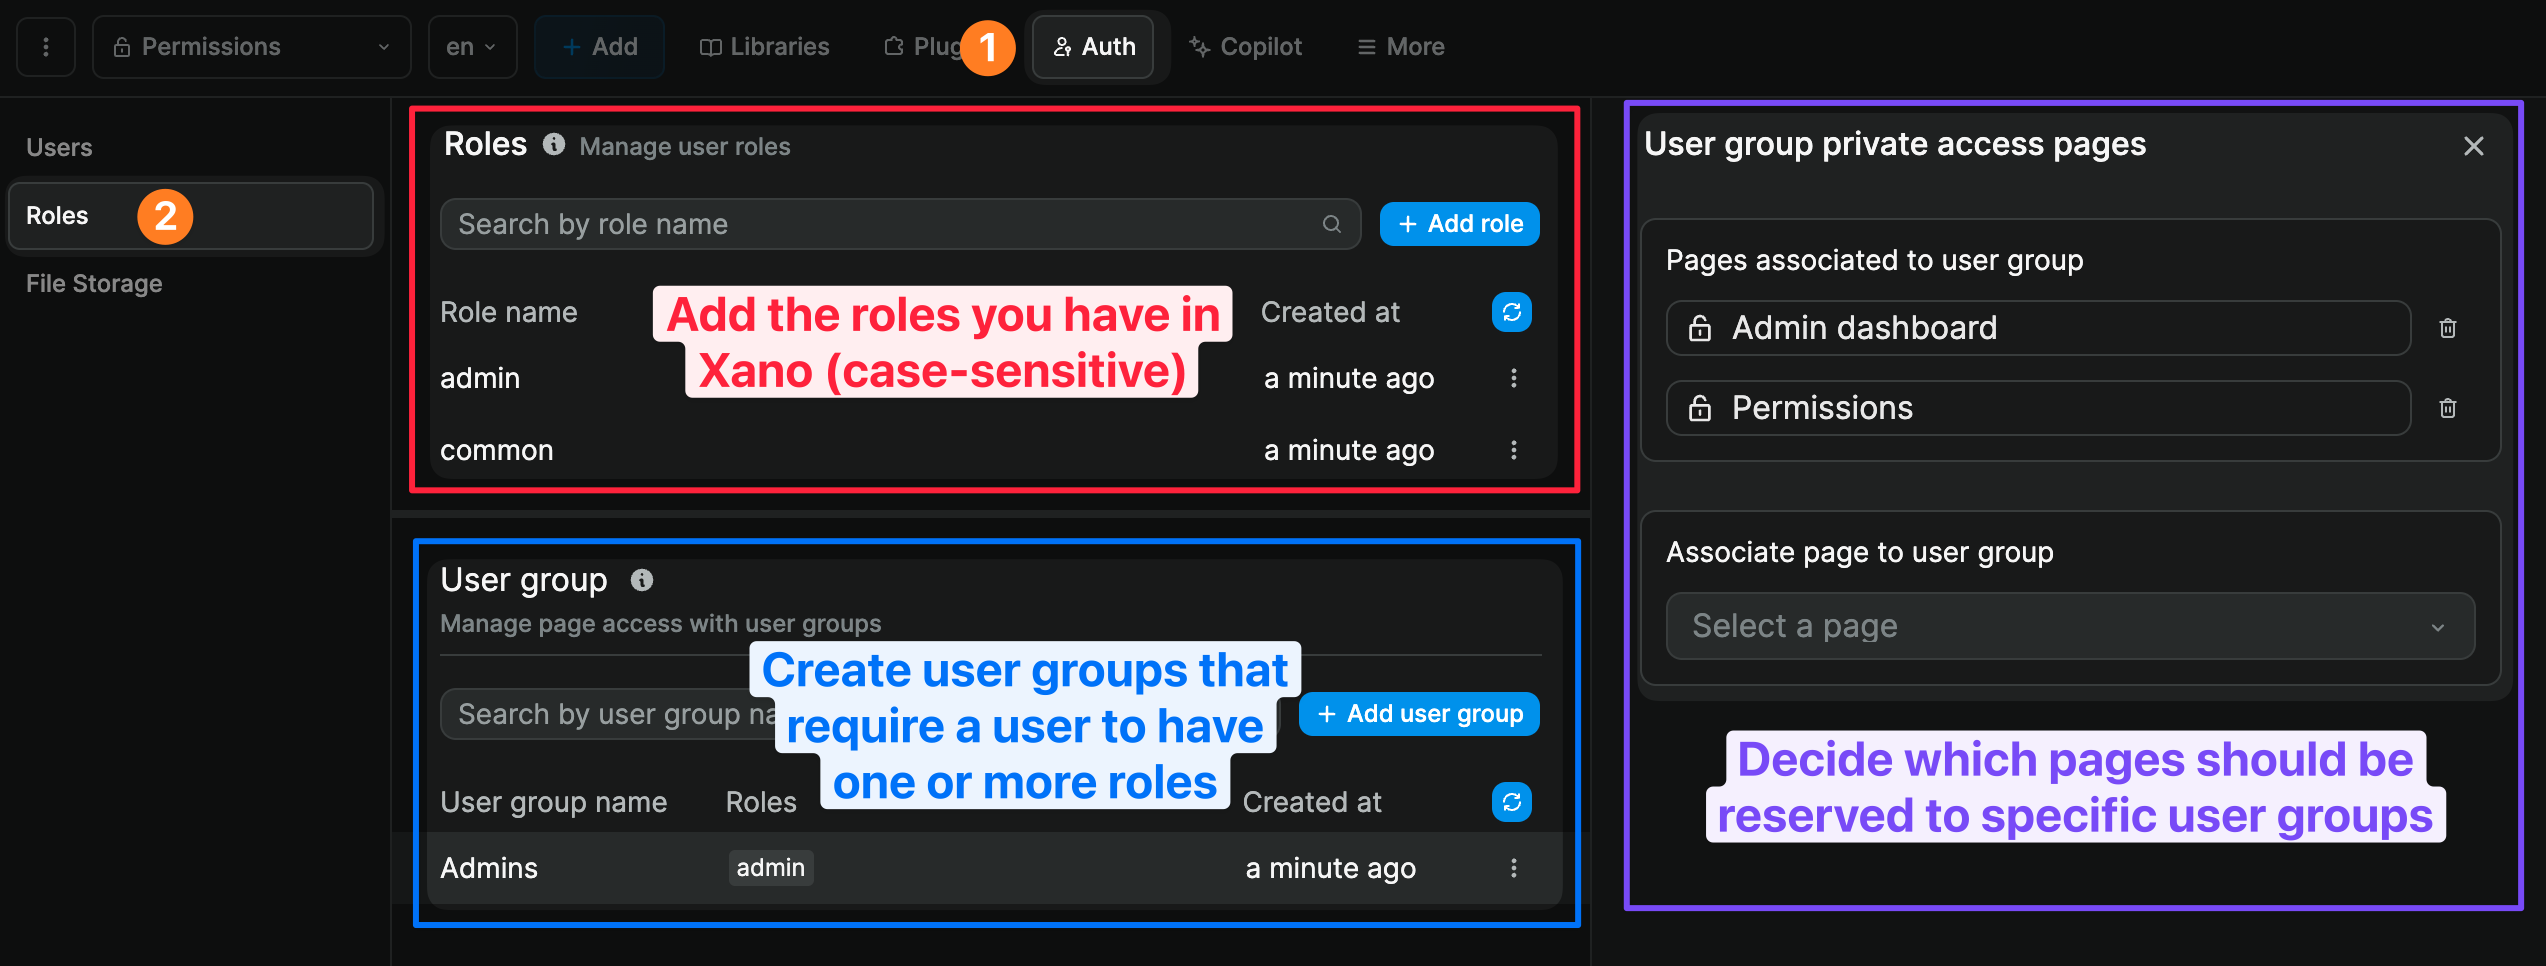
If you have gone through the User role configuration step in the Xano Auth plugin, you will also be able to:
- Add user roles in WeWeb (these role names should match the role names you have in Xano),
- Create user groups and decide what role or roles a user needs to be part of that group, and
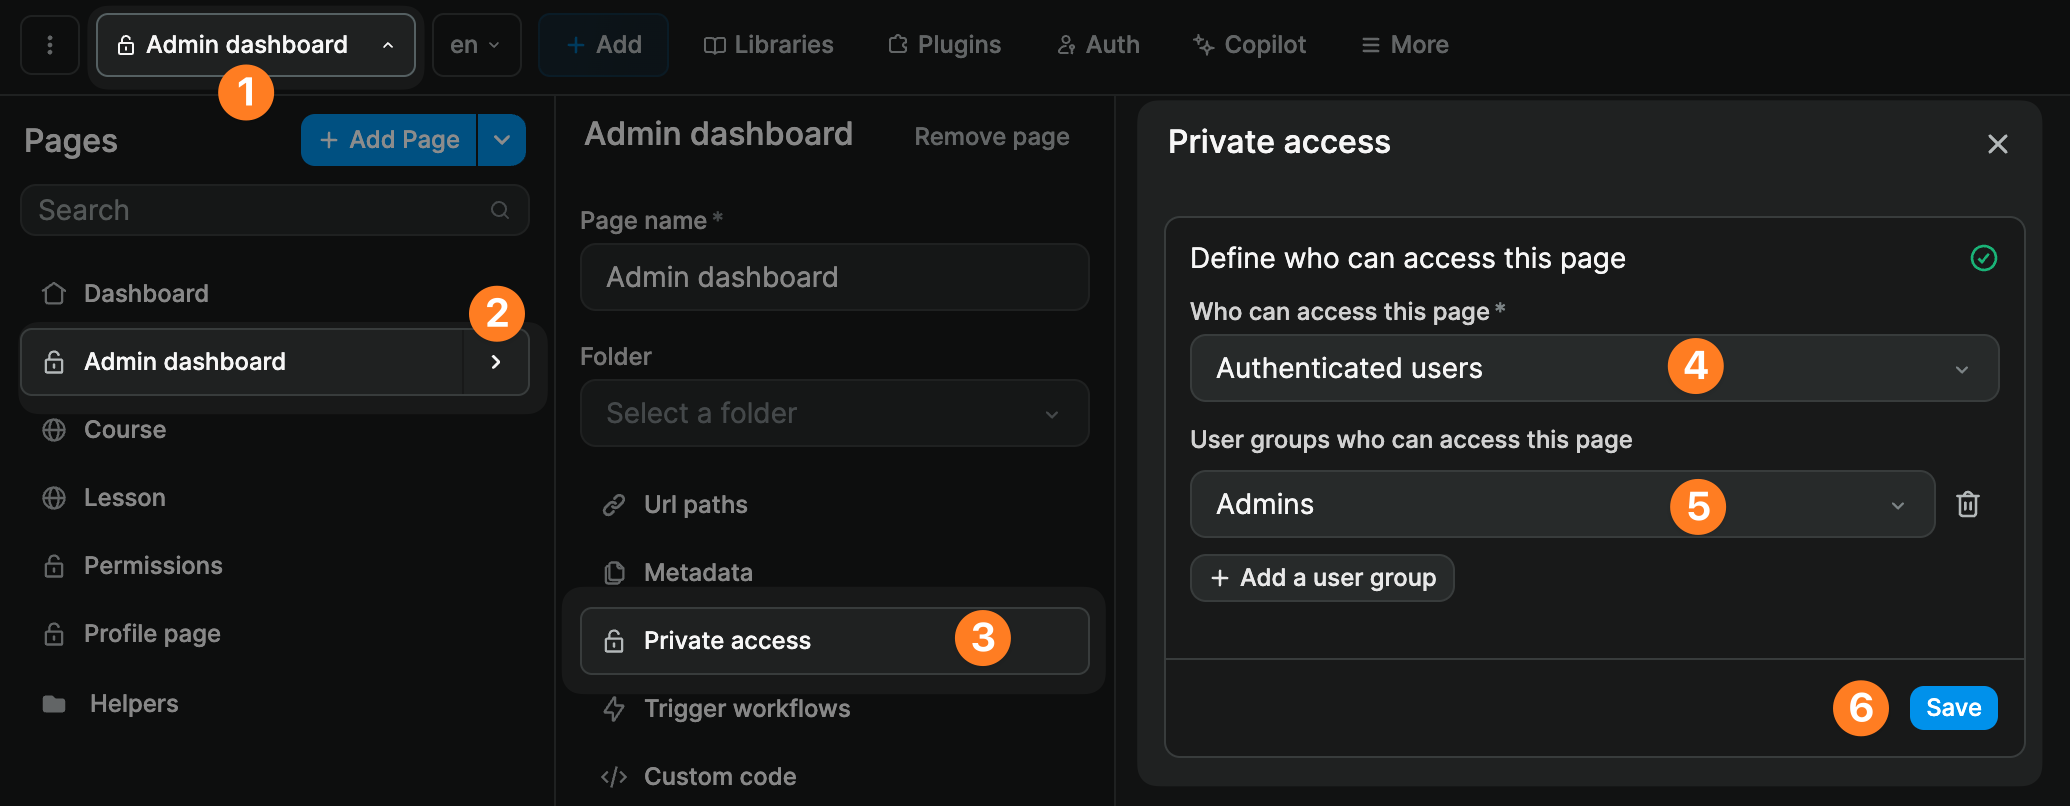
- Make a page private based on these user groups
Note that you can also make a page private to a user group at page level:
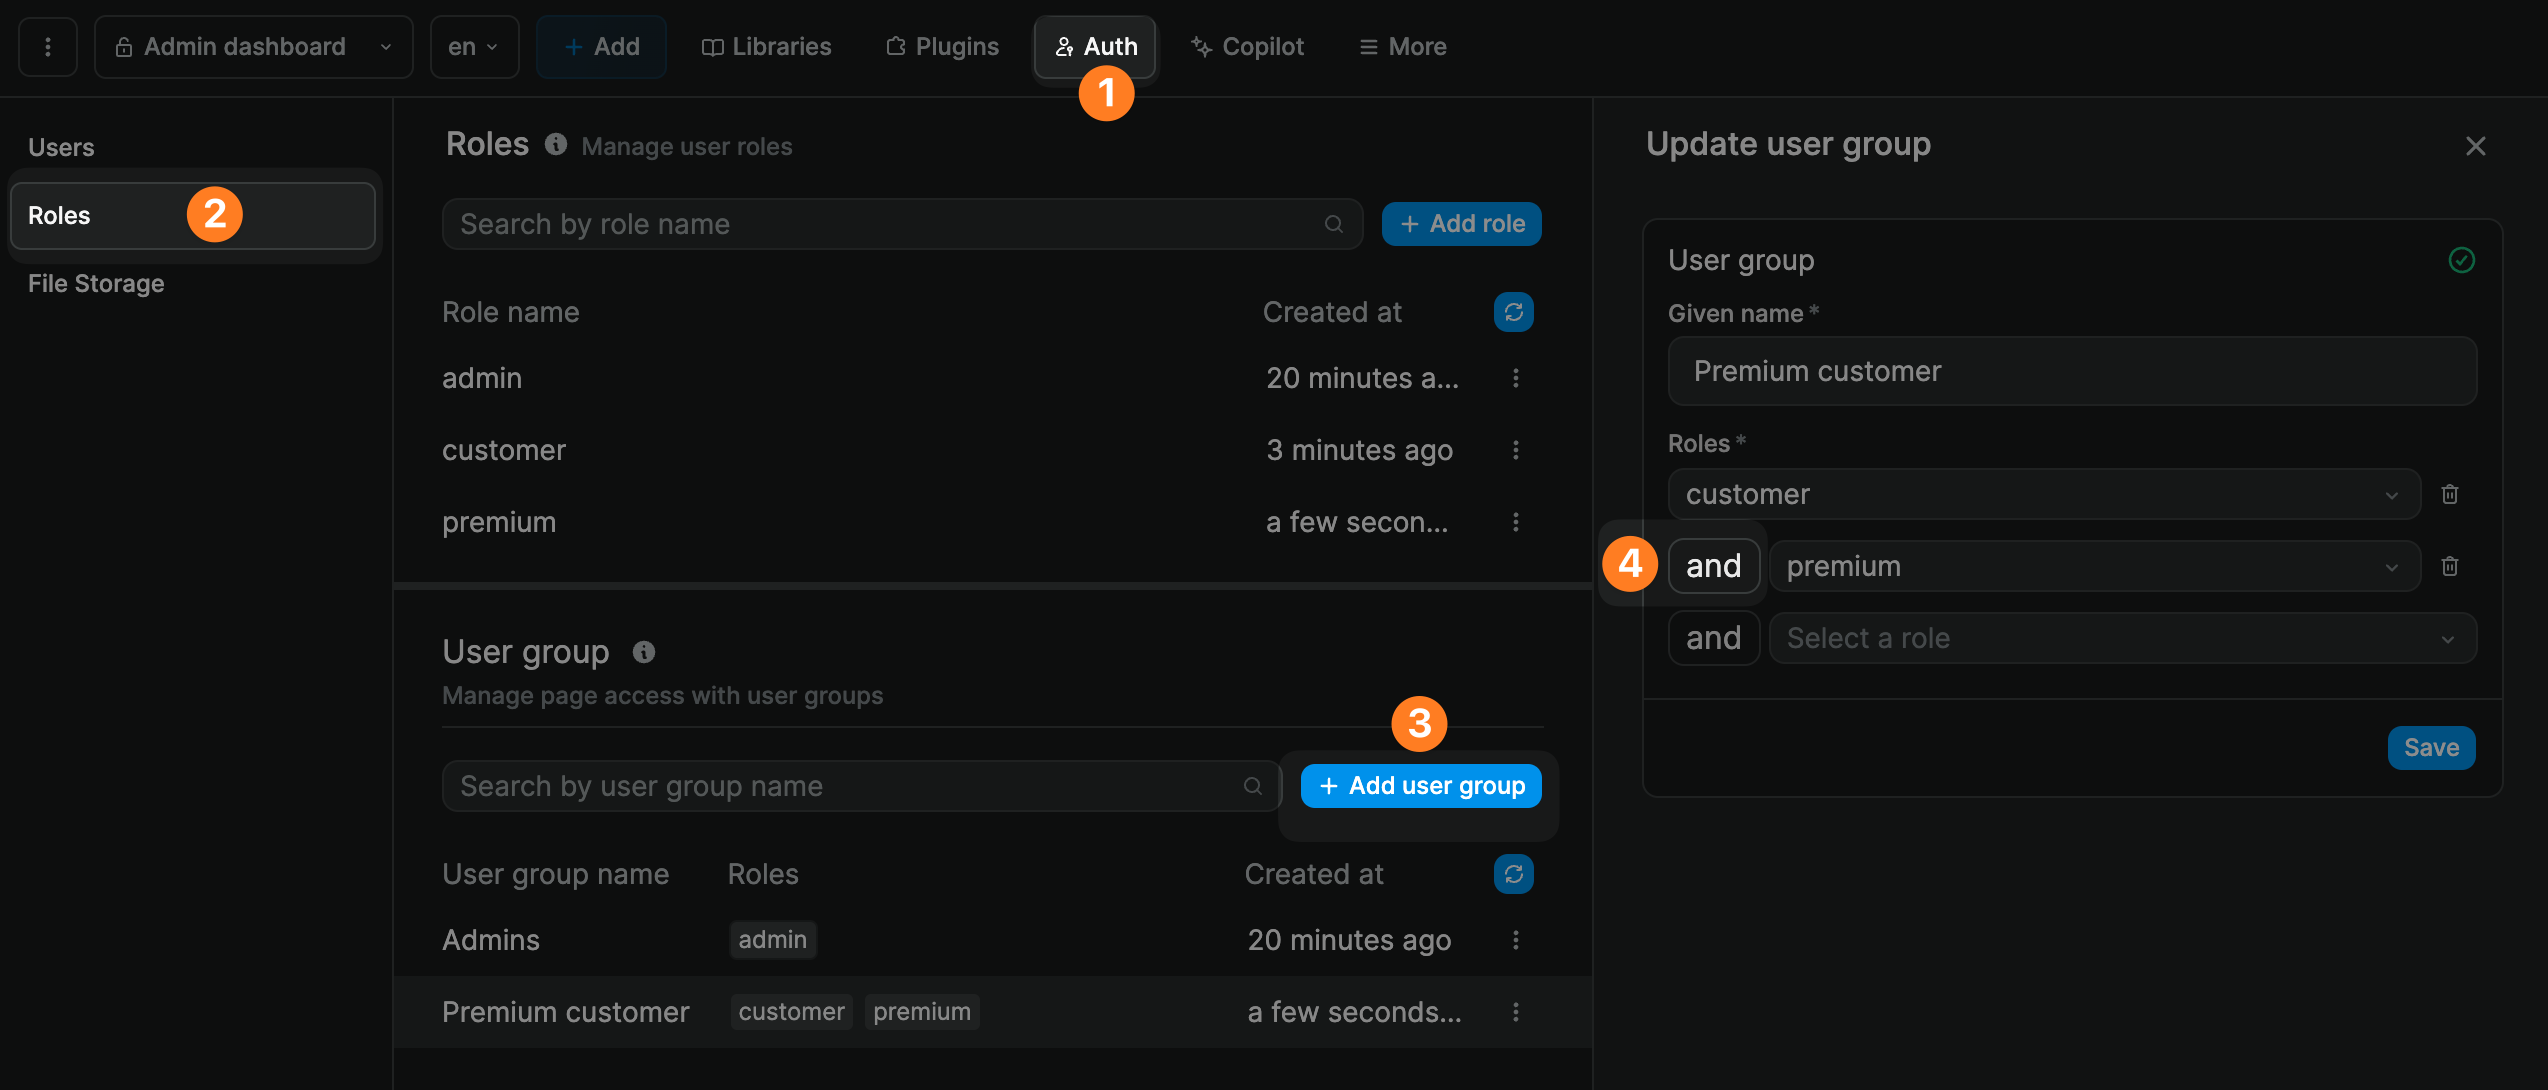
WARNING
It's important to understand that a user needs to have all the roles listed in the user group.
In the example below, the members of the Premium customer user group must have both the Customer and the Premium roles associated with their user profile:
Fetch Current User Data
Once you have setup authentication in your project, you'll probably want to display data that is related to the current user.
For example, if you were building a web-app where users can view and download their pay slips, you'd want to fetch and display only the pay slips from the user who is currently logged in.
Filter data in the backend
In theory, you could get all the pay slips from all the users and filter the Collection in WeWeb based on the current user but you definitely do not want to do that.
Why?
Because if you did that, you would be loading all the information from all your users in the frontend.
Even if you added a filter and only displayed the current user's information on the page, other people could access it in the browser.
So what should you do?
You should filter the data on the current user at backend level, i.e. make sure Xano only sends you the information from the user who is currently authenticated.
How do you do that?
In Xano, you would have a table with all your users, and a table with all the pay slips. Each pay slip would be linked to a user.
Now let's take a different example. Let's work on a web-app where users can apply to jobs.
In Xano, we have a list of job applications. Each job application is linked to a user_id in the user table:

Clone the API endpoint closest to the data you need
In our case, we want to return a list of job applications for the current user.
In the API menu, we have a default API to GET all the records from the application table.
Let's clone this endpoint to create a new one that will only GET the applications of the authenticated user:
Secure the endpoint with authentication
Now that we have this new user-application endpoint, we need to make sure our GET request will only go through if the user making it is authenticated:
Pre-requisite: you have set up a user table with authentication endpoints in Xano.
Why are we doing this?
So that we can get the user's id from the authentication token provided by Xano when the user logs in. This ensures that no one can guess what API request to call with a user email for example.
Add a filter to query user specific records
Instead of querying all the records from the application table, we want to query only the records where the linked user's id matches the id in the authentication token generated when a user logs into our web-app:
Getting the filtered data to WeWeb
Now that we have an endpoint that requires authentication and sends back filtered data based on the authenticated user, we can create a data collection in WeWeb in the Data panel:
And that's it!
You've now ensured that only an authenticated user can access their own data.
WARNING
To fetch data from a Xano endpoint with authentication enabled, you must first login as a user in WeWeb.
In the example above, you can see user 1 is authenticated in WeWeb. As a result, Xano returns all the applications with user_id 1.
The same logic applies to call endpoints that require a specific role with a precondition on the Xano endpoint. You must be logged in as a user that has the requested role(s) in your WeWeb application to be able to call such endpoints successfully.
Troubleshooting Xano Authentication
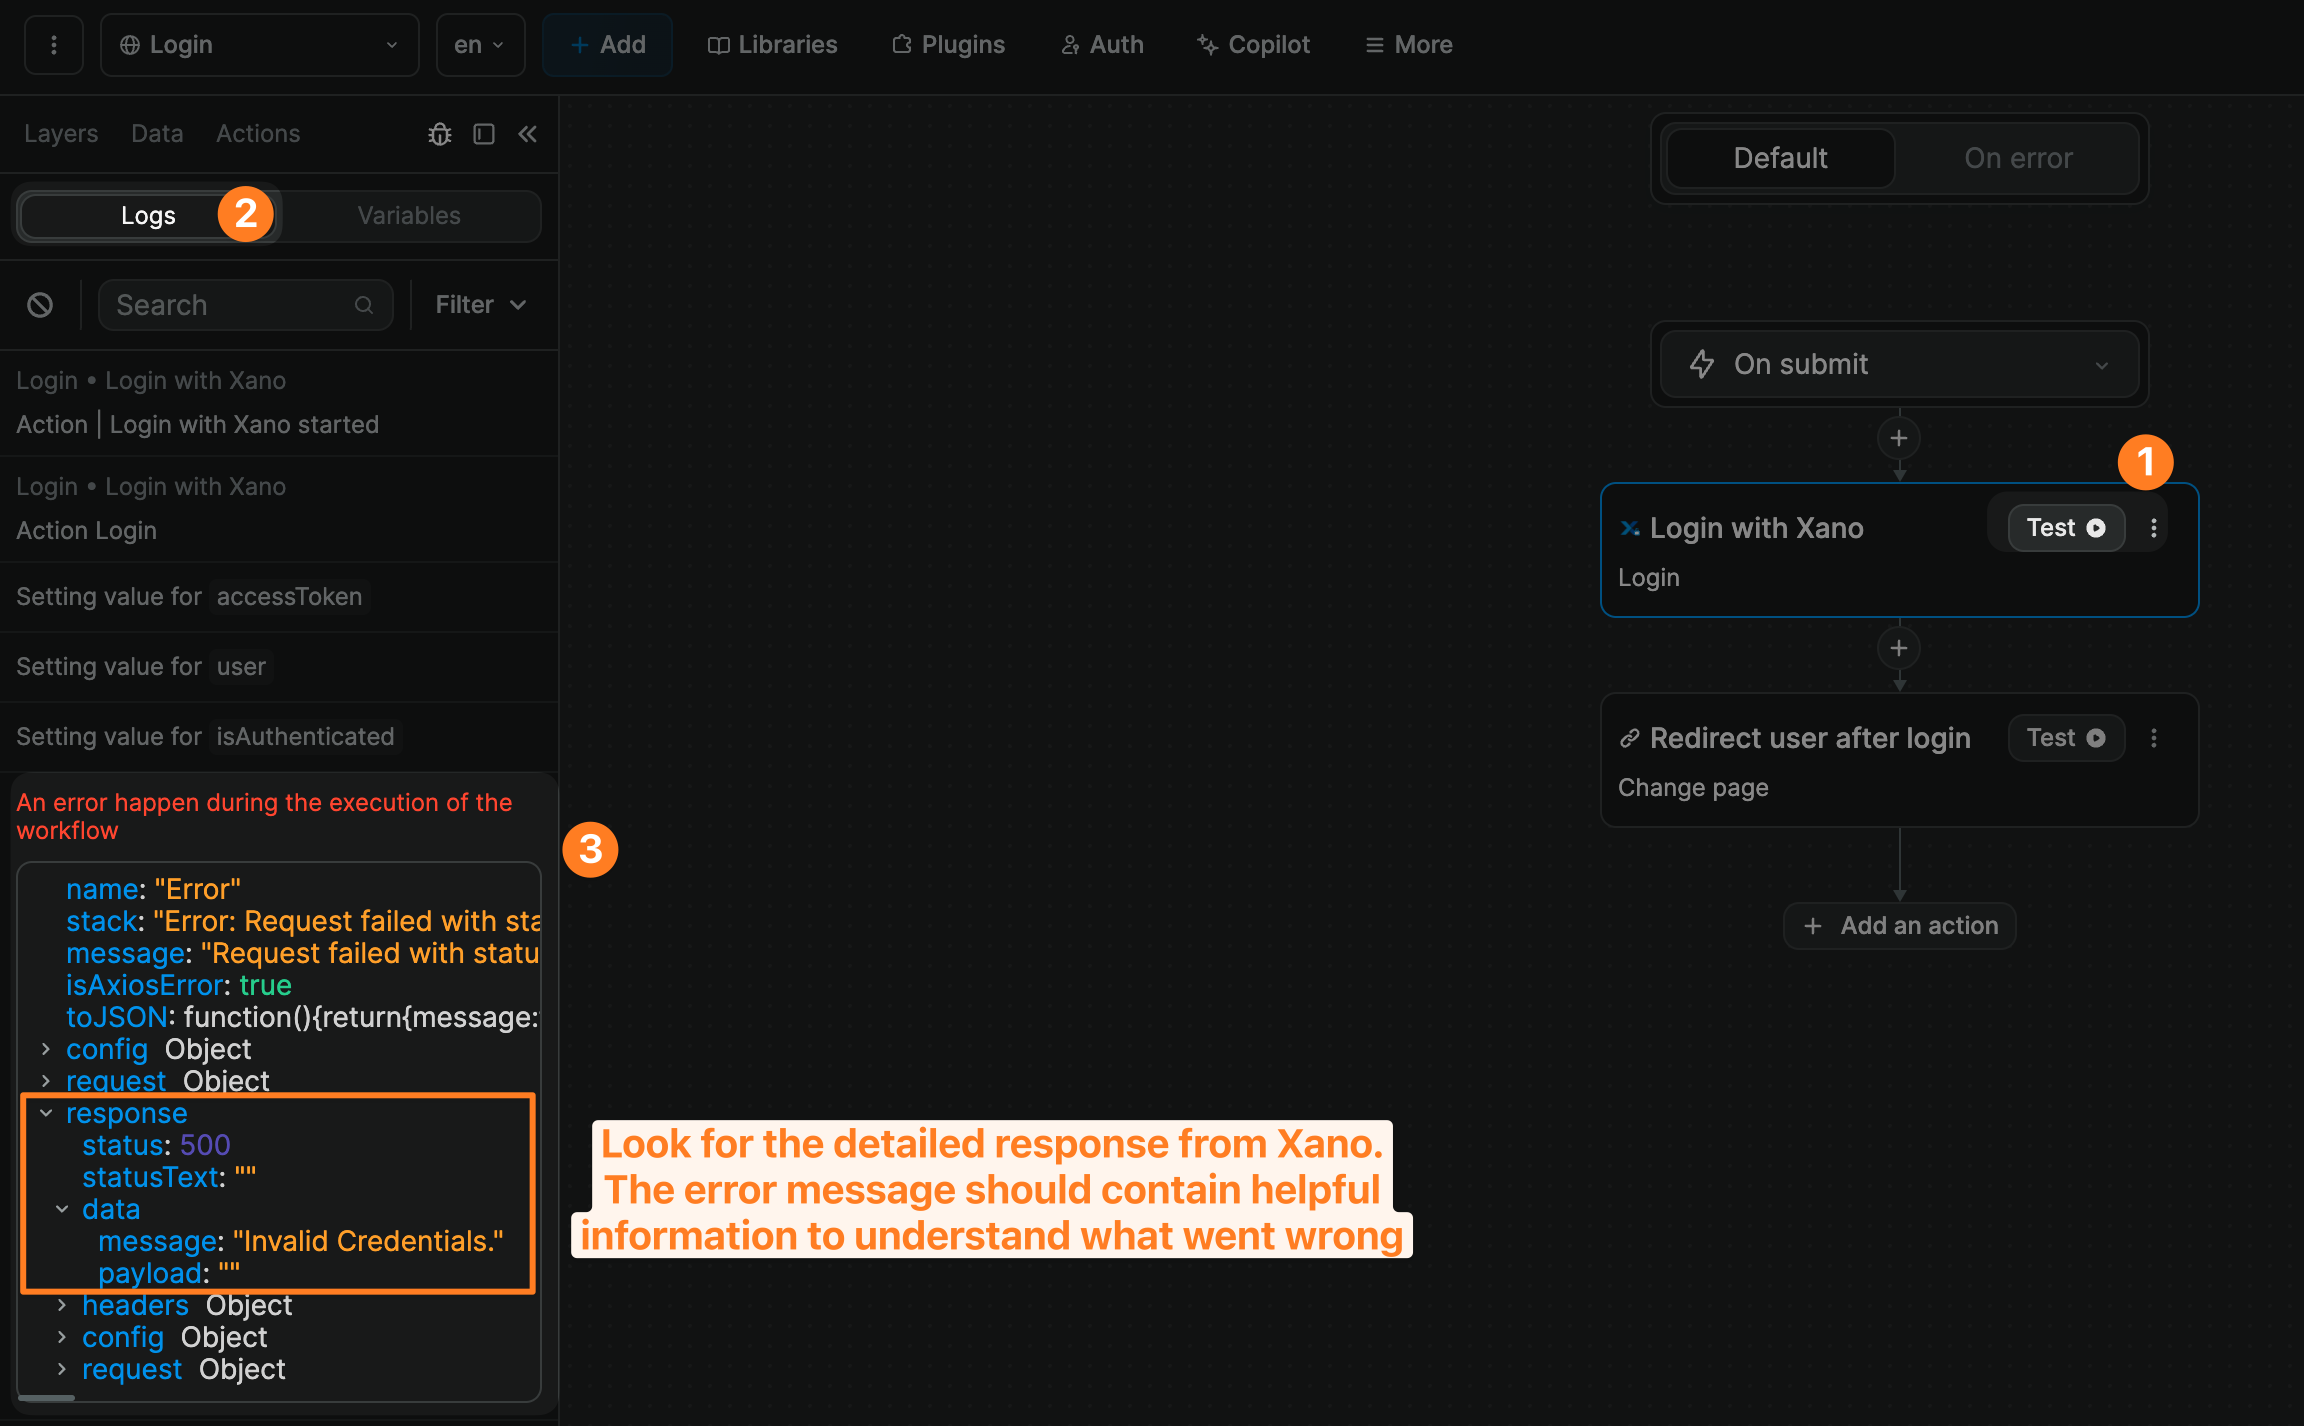
If you're experiencing issues with the Xano signup or login forms, you can test the entire workflow or one action at a time and look at the response when it fails.
Xano will return an error message in response > data > message:
Most common errors
- Trying to sign up a user that already exists in the user base in Xano (need to login instead),
- Trying to sign up a user with a password that doesn’t match Xano’s default requirements (at least 6 characters and 1 capital letter at the time of writing),
- Trying to login a user that doesn’t exist in the user base in Xano (need to signup instead)
- Trying to login with invalid credentials.
If you don't find a solution using the WeWeb debugger, consider using the Run & Debug command in Xano directly to make sure everything is properly set up in the back-end.
Forgot Password with Xano Auth
WARNING
Before we show you how to set things up in WeWeb, let's explain what you need to setup outside of WeWeb.
If you are using the Xano Auth Plugin in WeWeb, there are 2 pre-requisites to enable users to reset their password securely.
Pre-Requisite #1: Sendgrid Account
Pre-Requisite #1: Sendgrid Account
First, you'll need to open a Sendgrid account.
This will enable you to send an email with a "magic link" to users who have forgotten their password.
When the user clicks on that link, they will be redirected to a page of your WeWeb app where they will be invited to choose a new one.
But more on that later…
Pre-Requisite #2: Magic Link Endpoints in Xano
Pre-Requisite #2: Magic Link Endpoints in Xano
In Xano, you will need 3 API endpoints in addition to the 3 usual authentication endpoints (i.e. signup, login, and me).
These 3 additional endpoints are:
- Magic-link – sends a unique link to user who forgot their password
- Magic-login – allows the user to login without a password using the magic link
- Update-password – updates the user's password in the user table
In order to get these 3 new authentication endpoints, we recommend you:
- Add this Password Reset snippet in Xano,
- Watch their video explaining how the Password Reset snippet works, and
- Watch this video on how to configure your environment variables in Xano.
You can leave the redirect URL values empty for now. We'll come back to these a couple of paragraphs down.
Once you've setup Xano and Sendgrid as explained above – barring the redirect URLs – you'll be able to set things up in your WeWeb user interface.
Step 1: Create Dedicated Pages in WeWeb
In WeWeb, you'll want to create 2 pages.
The first page with a "Change password" section: 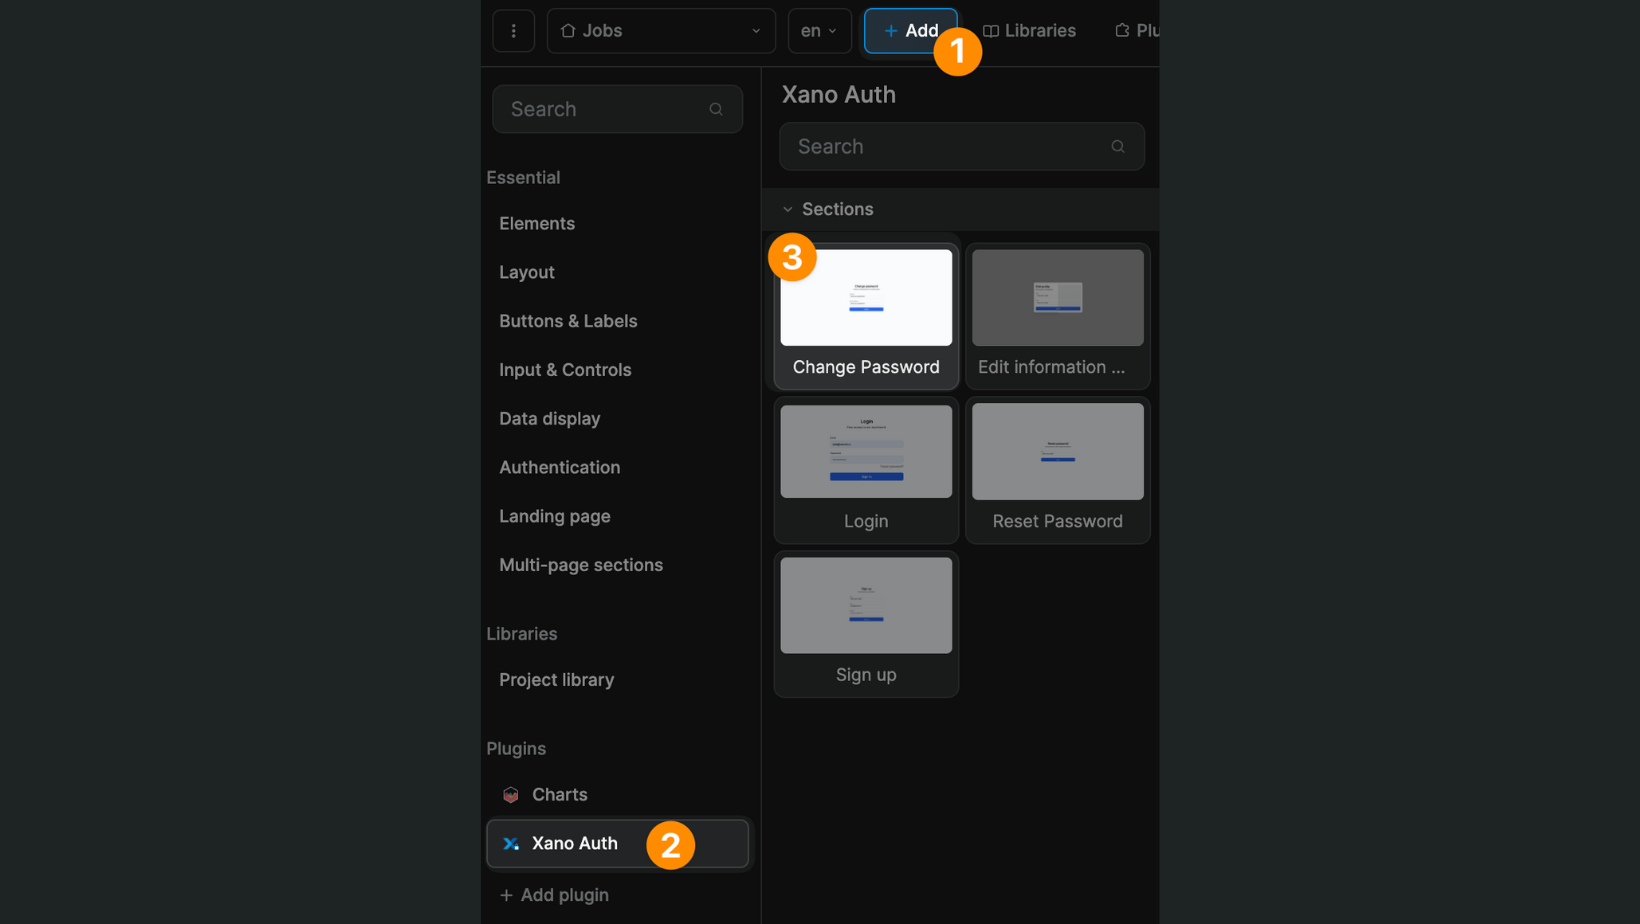
The second page with an "Reset password" section: 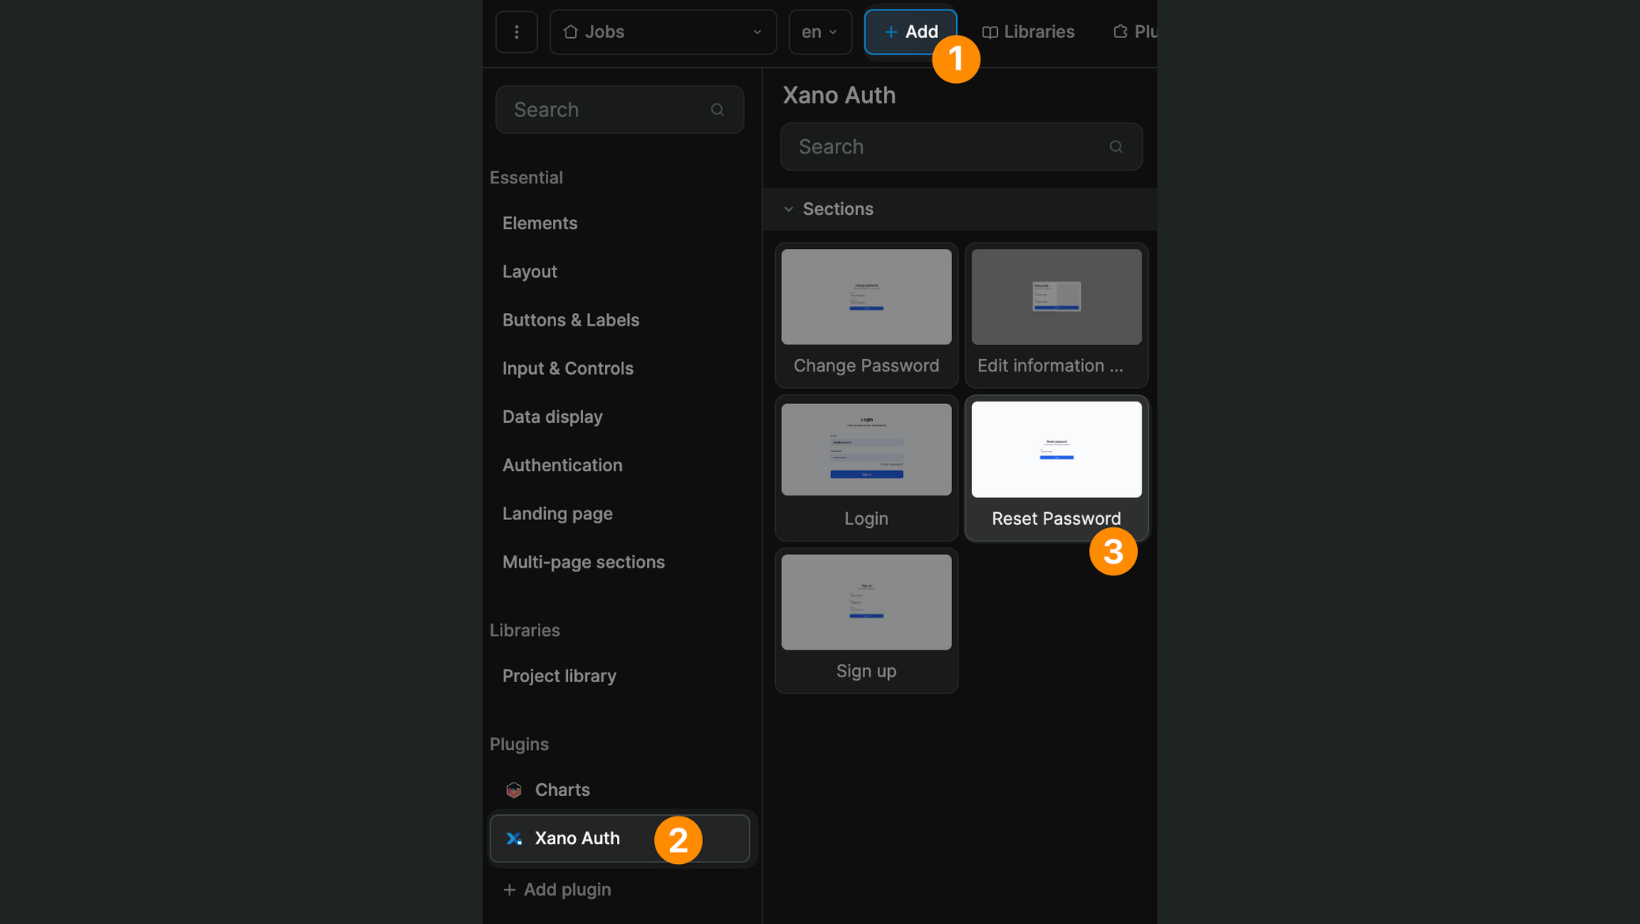
Once you have created the "Update password" page, you'll be able to update the magic_link_redirect_uri variable in your Xano settings:
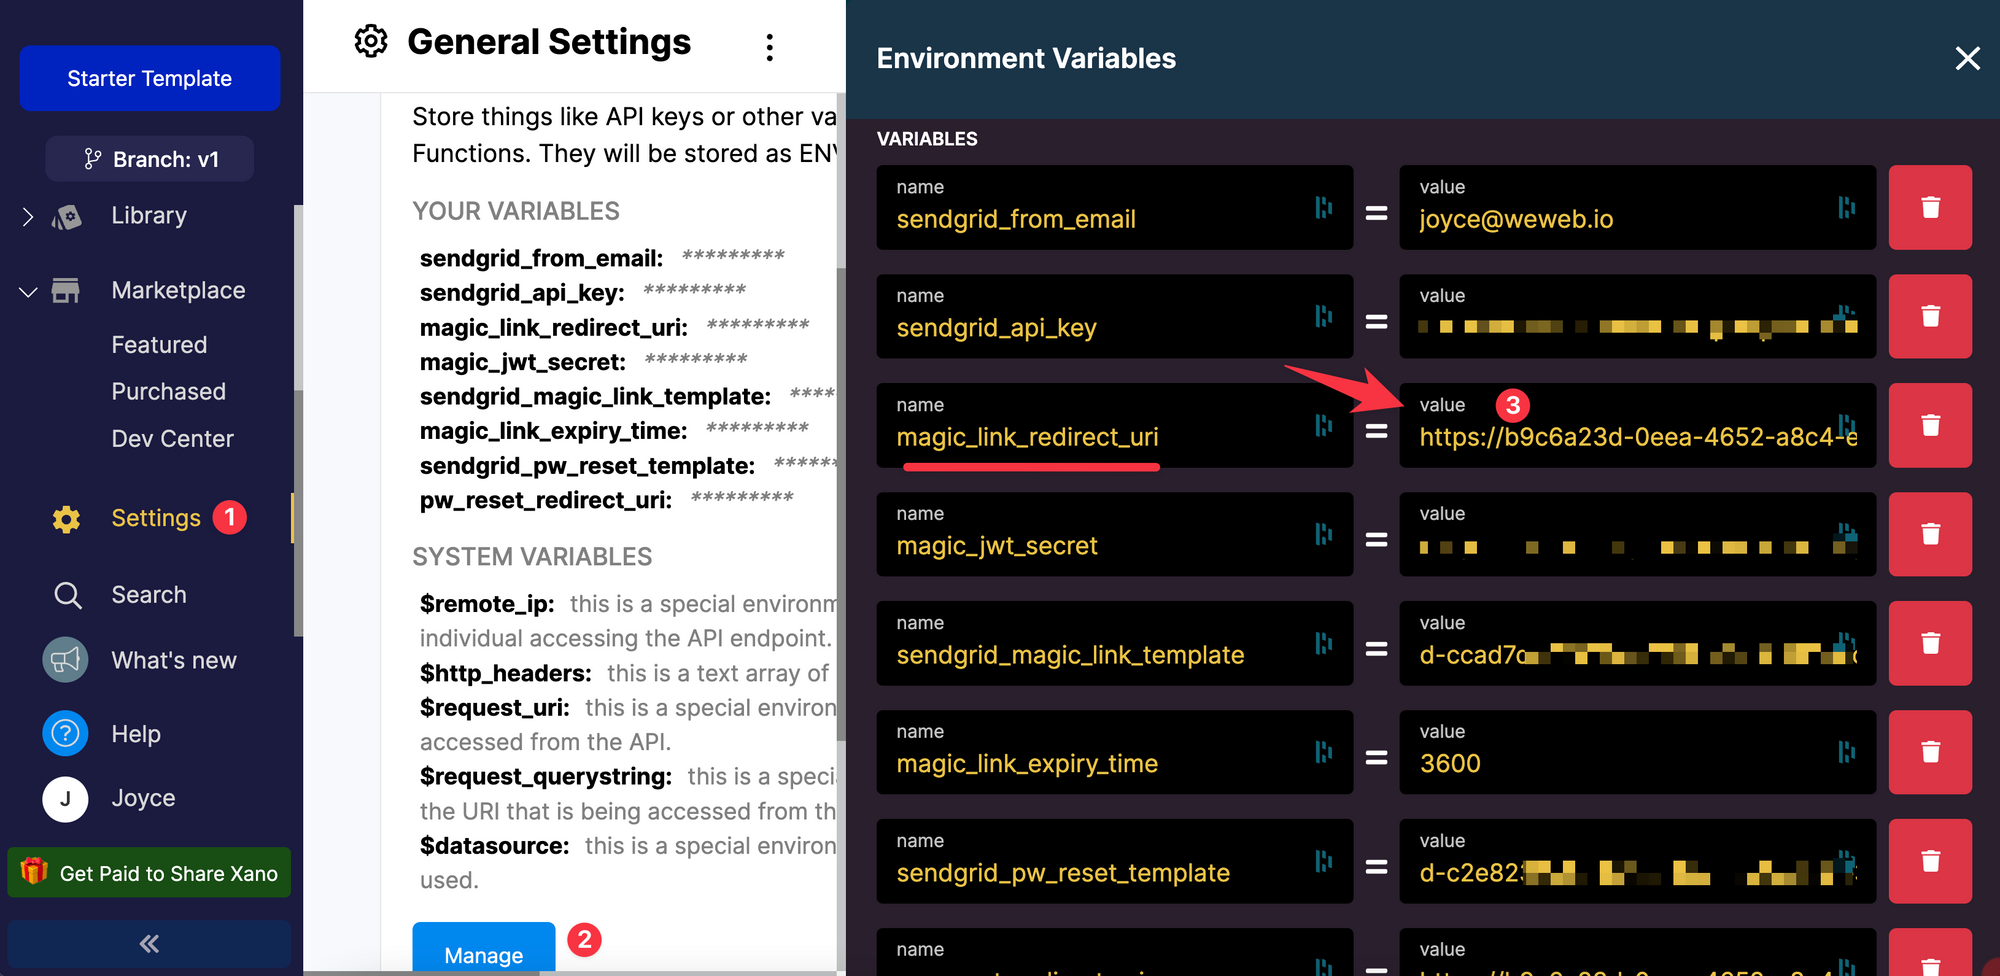
The value will be the URL of the page which contains the "Update password" form.
TIP
For testing purposes during the setup and/or if you are not yet ready to publish your WeWeb project, you can paste the URL of the page in the Editor – with the https://<your-project-id>-editor.weweb.io/<page-path> format – instead of the URL of the published staging page – with the https://<your-project-id>-staging.weweb.io/<page-path> format.
Step 2 – Workflow to Request Magic Link
On the "Forgot password" Form Container, you'll notice there is a Workflow.
Here's how you update it to ensure the user receives an email with a magic link when they submit the form:
- Copy the Xano API endpoint that requests a magic link, and
- Bind the email query string field to the email value variable in the form.
Depending on how you created your endpoints in Xano – using the Starter template or installing the Magic Link with Sendgrid extension for example – the endpoint may have a different name – request-magic-link or magic-link for example.
TIP
Before moving to the next step, add your email address to your user table in Xano, then test the workflow with your email address to make sure you receive a magic link in your inbox.
Step 3 – Workflow to Reset the User's Password
You'll also need to update the Workflow on the "Update password" Form Container.
Action 1: Login with the magic link
First, you'll need to copy the API endpoint that allows the user to login with a magic link:
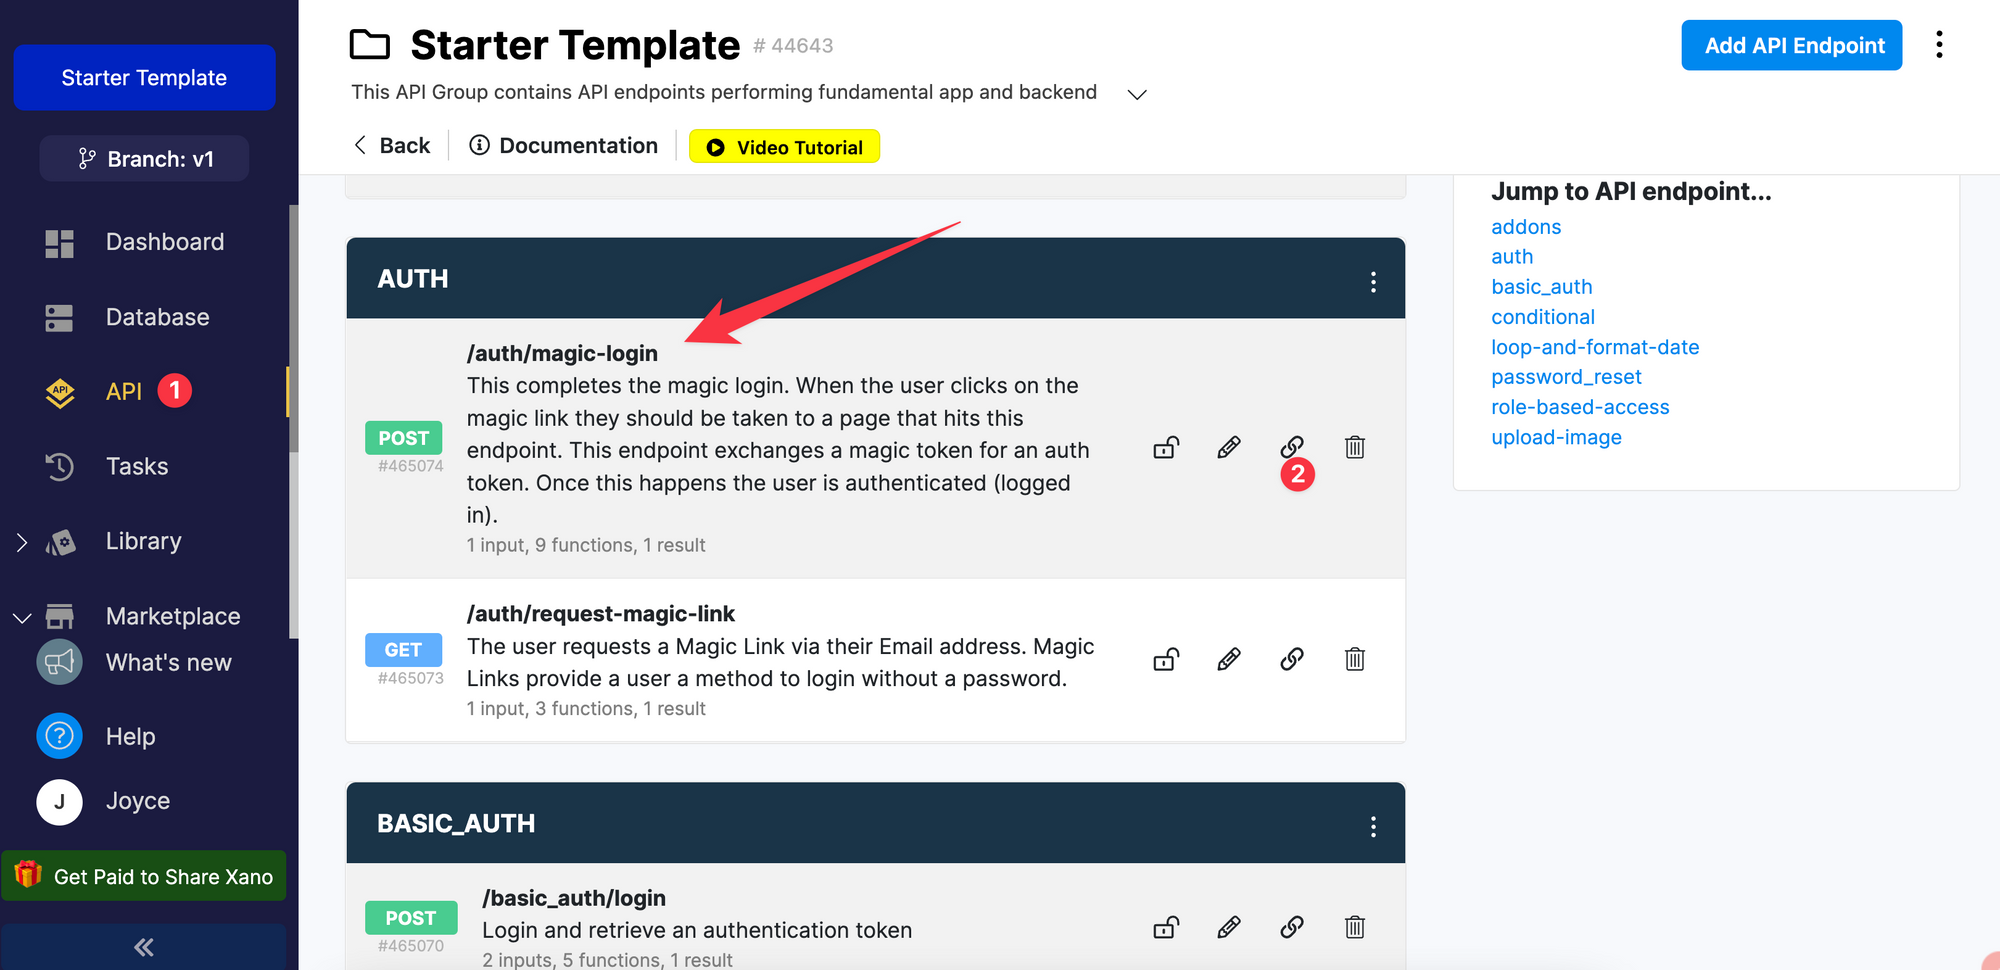
Again, the API endpoint may have a different path depending on how you created it in Xano. Make sure it's the one that allows the user to login with a magic token instead of a password.
Then, in WeWeb, you'll need to create a Variable of type Query, named token:
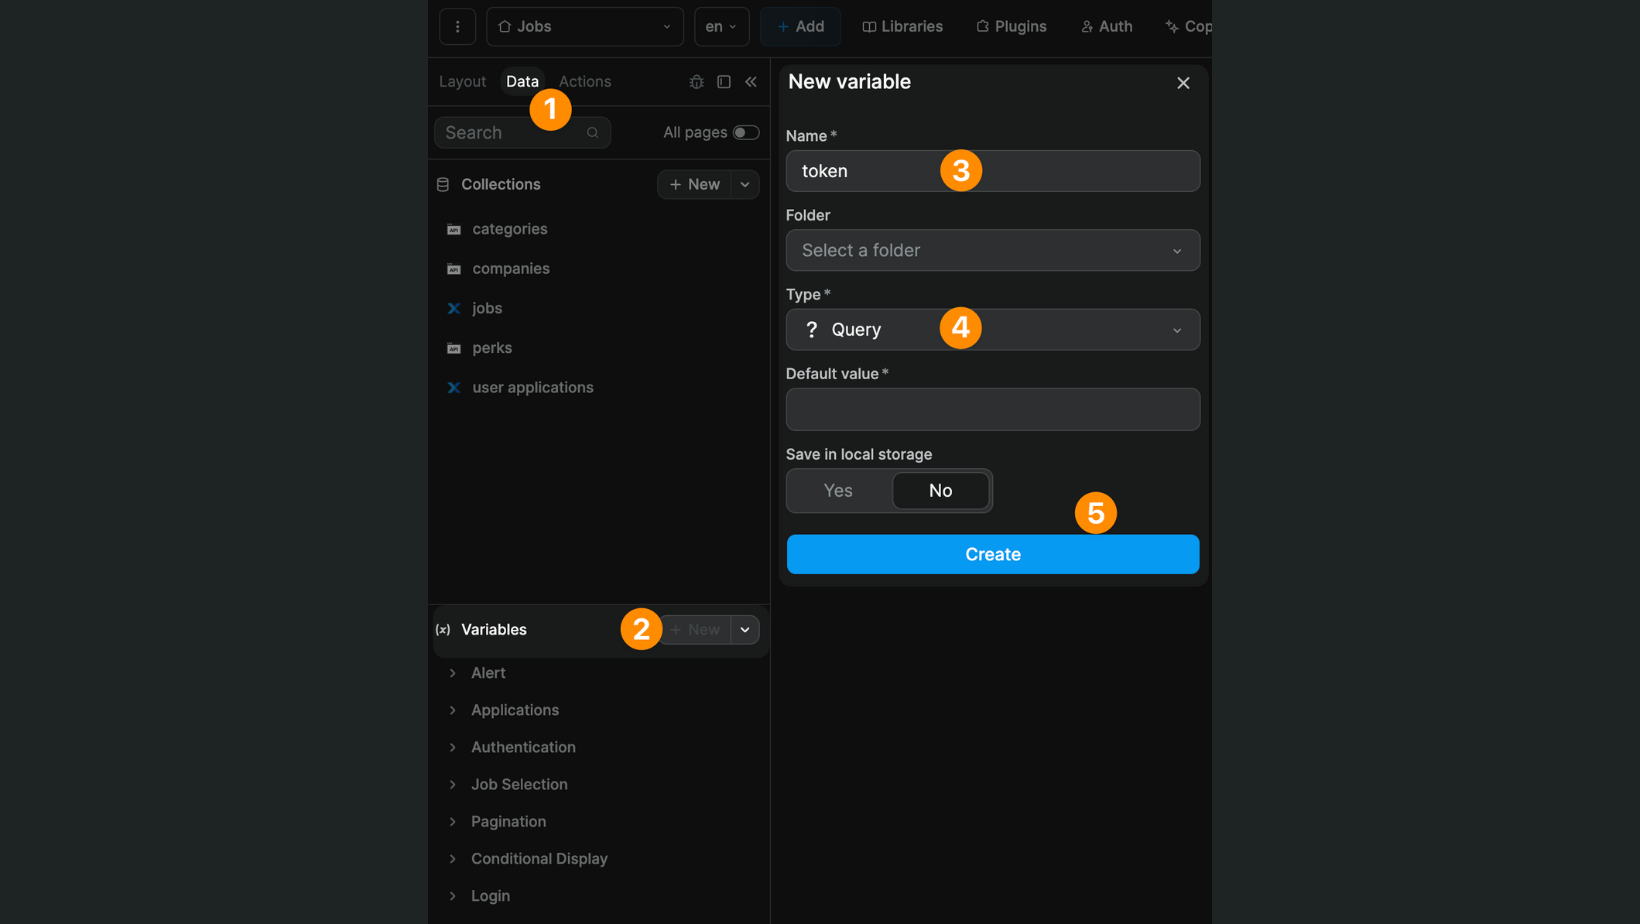
Why of type Query?
Because when the user clicks on the magic link in the email, they will be redirected to the URL you pasted in the Xano settings with an additional query string at the end that contains a magic token.
It will look something like this:

Why name it token?
Because, as you can see from the screenshot above, in the magic link provided by Xano and Sendgrid, the parameter at the beginning of the query string is token.
If we want WeWeb to get the value from this query string, we need to give our Query Variable the same name.
Finally, you'll need to bind that token variable to the magic_token field:
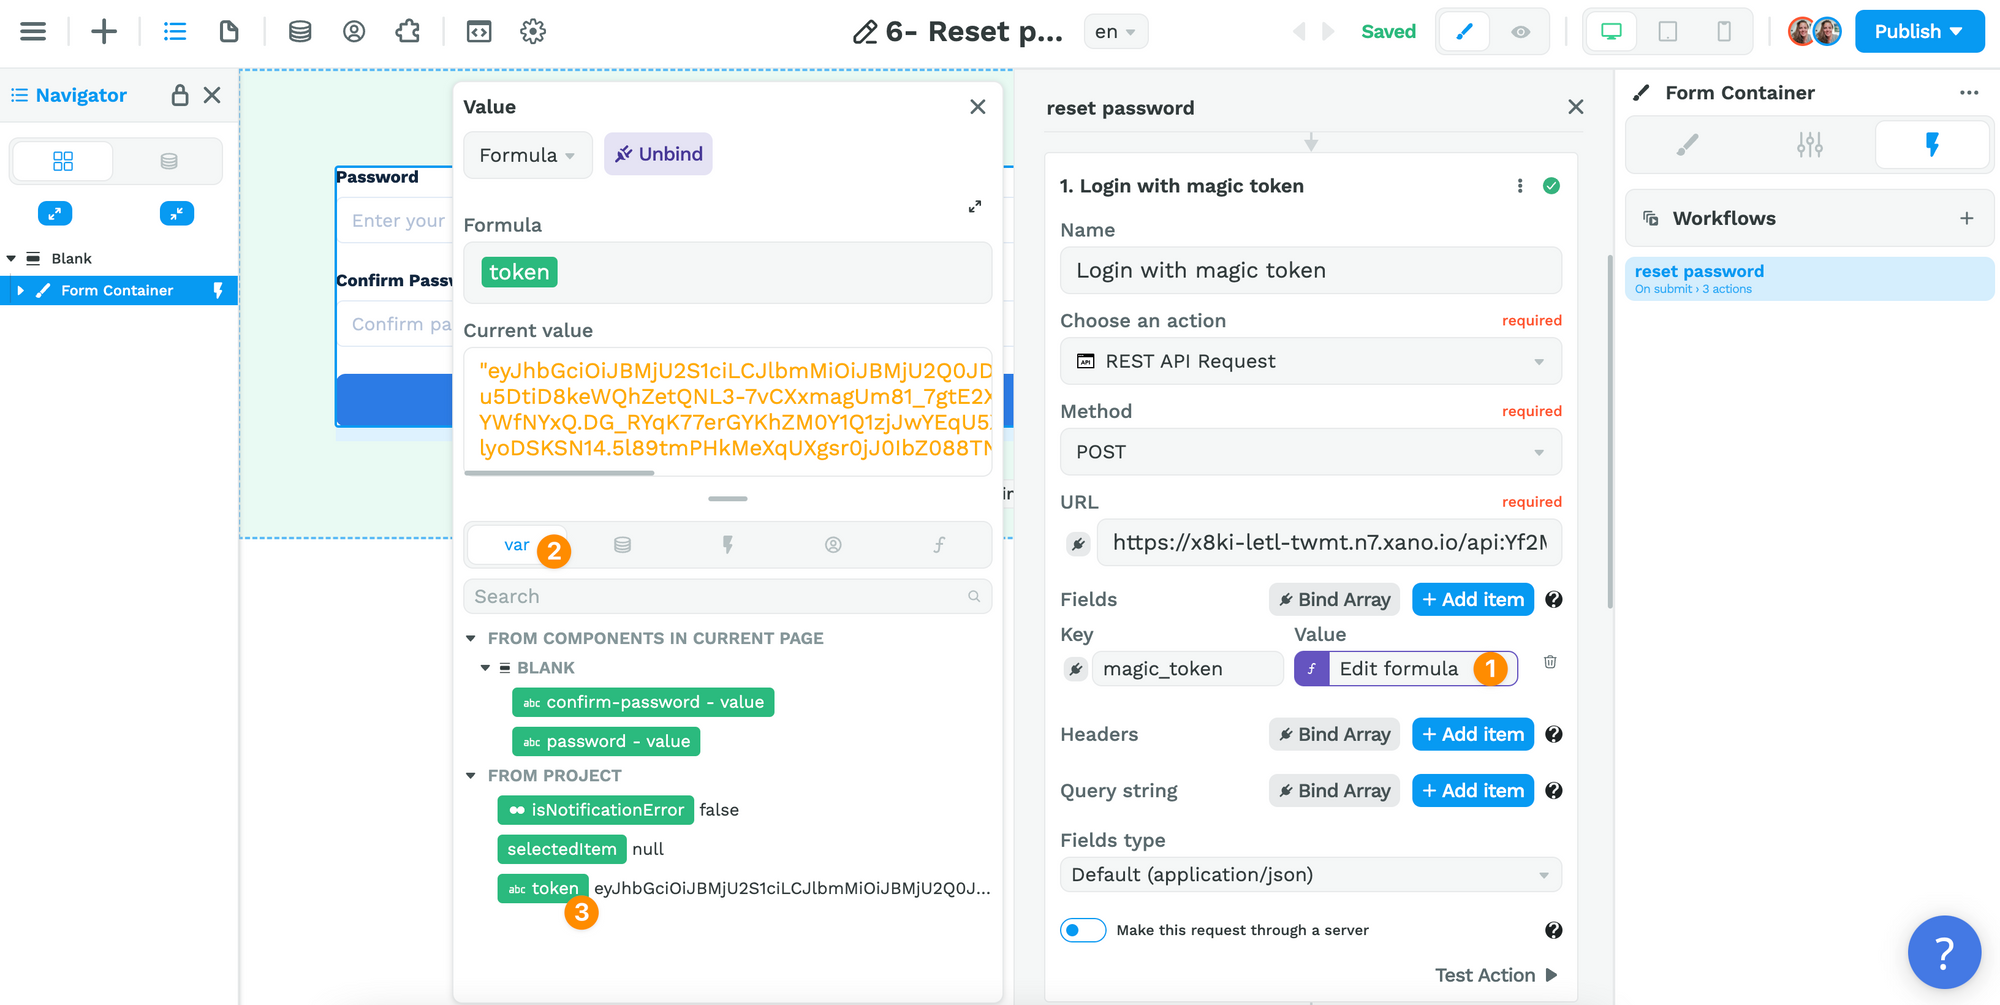
Why name the field key magic_token?
Because that's the name of the input variable in Xano by default:
WARNING
If your input variable is named differently in Xano, make sure the field name matches in WeWeb.
Action 2: Update the password
When the user submits the form, the first step will be to log in using the magic token in the magic link. That's what we saw in action 1.
The second action will be to update that user's password in the user table with the information submitted in the form.
Endpoint
First, you'll need to paste the update-password endpoint from Xano.
You should bind the password and confirm_password values to the Form Variables and the Authorization field to the authToken returned by Action 1 of the Workflow:

TIP
Make it a habit to "Run & Debug" your API endpoints in Xano before testing things in WeWeb. When something is broken, this will help you figure out if you should look for a solution in Xano or WeWeb.
I'm sure the Xano team will fix this quickly but we ran into a couple of glitches during our setup using their Starter template.
Here's how to make sure the update-password endpoint is setup correctly:
1- User field_value
First, make sure the user inputs are setup correctly in the update_password endpoint.
The field_value which should be auth > id:

Depending on how you created the endpoint, it may be missing or appear as text > id.
2- Input types of password and confirm_password variables
In the Starter template, these two variables are of type Password.
After chatting with Xano's support team, it turns out you should delete these two variables and add two Text Inputs instead:
"Sounds weird, but let me explain. When Xano has a password as type: password, it's hashed and secured so it can not ever be viewed again. So, when you send "password" and "confirm_password" as password type values, they both have different hashes, and when your precondition says "hey, are these the same?" Xano is going to say "no, they're not" because those hashes are unique every time they generate. So, if you just change those inputs to text, everything should work."
So your two text inputs should look like this:

Action 3: Redirect user to a login page
Once the user has updated their password, you'll usually want to redirect them to a login page.
If you'd like to redirect them to another page, we recommend you add a step before the Change page Action where you will login the user with their new credentials.
TIP
You can setup an On error workflow that triggers if the user's new password doesn't match the conditions in Xano in terms of length and complexity for example.
And that's it!
You've successful setup a forgot password flow for your users using WeWeb, Xano Auth, and Sendgrid 🙂
OAuth (social sign-in)
Pre-requisites
Before you can setup a signup and/or login flow with a third-party provider in WeWeb, you'll need to:
- Created and configured a project with the OAuth provider of your choice (e.g. Google, Slack, LinkedIn, etc.)
- Installed and configured the related OAuth extension in Xano with the OAuth credentials provided by the provider
TIP
If you are new to OAuth and need help understanding how to configure things with your provider, consider reading our article on how to add Google OAuth with OpenID where we go into more detail about:
- Setting up an OAuth consent screen, and
- Configuring the correct redirect URLs with a provider.
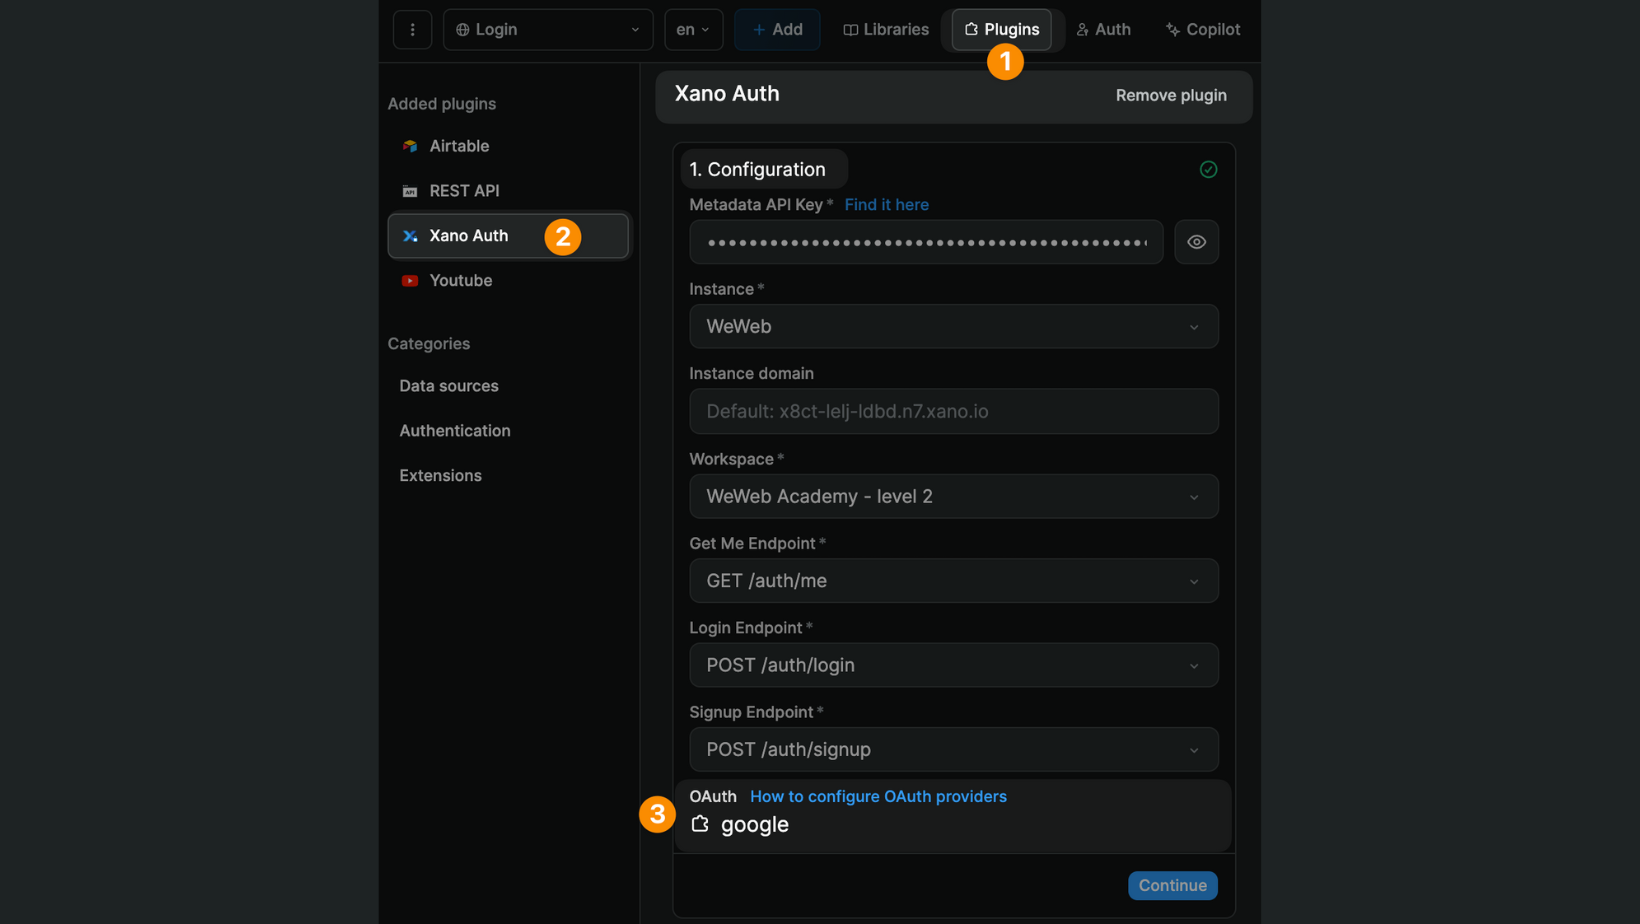
Assuming you have added and installed an OAuth extension in Xano, you will be able to see the provider(s) in the configuration of the Xano Auth plugin:
TIP
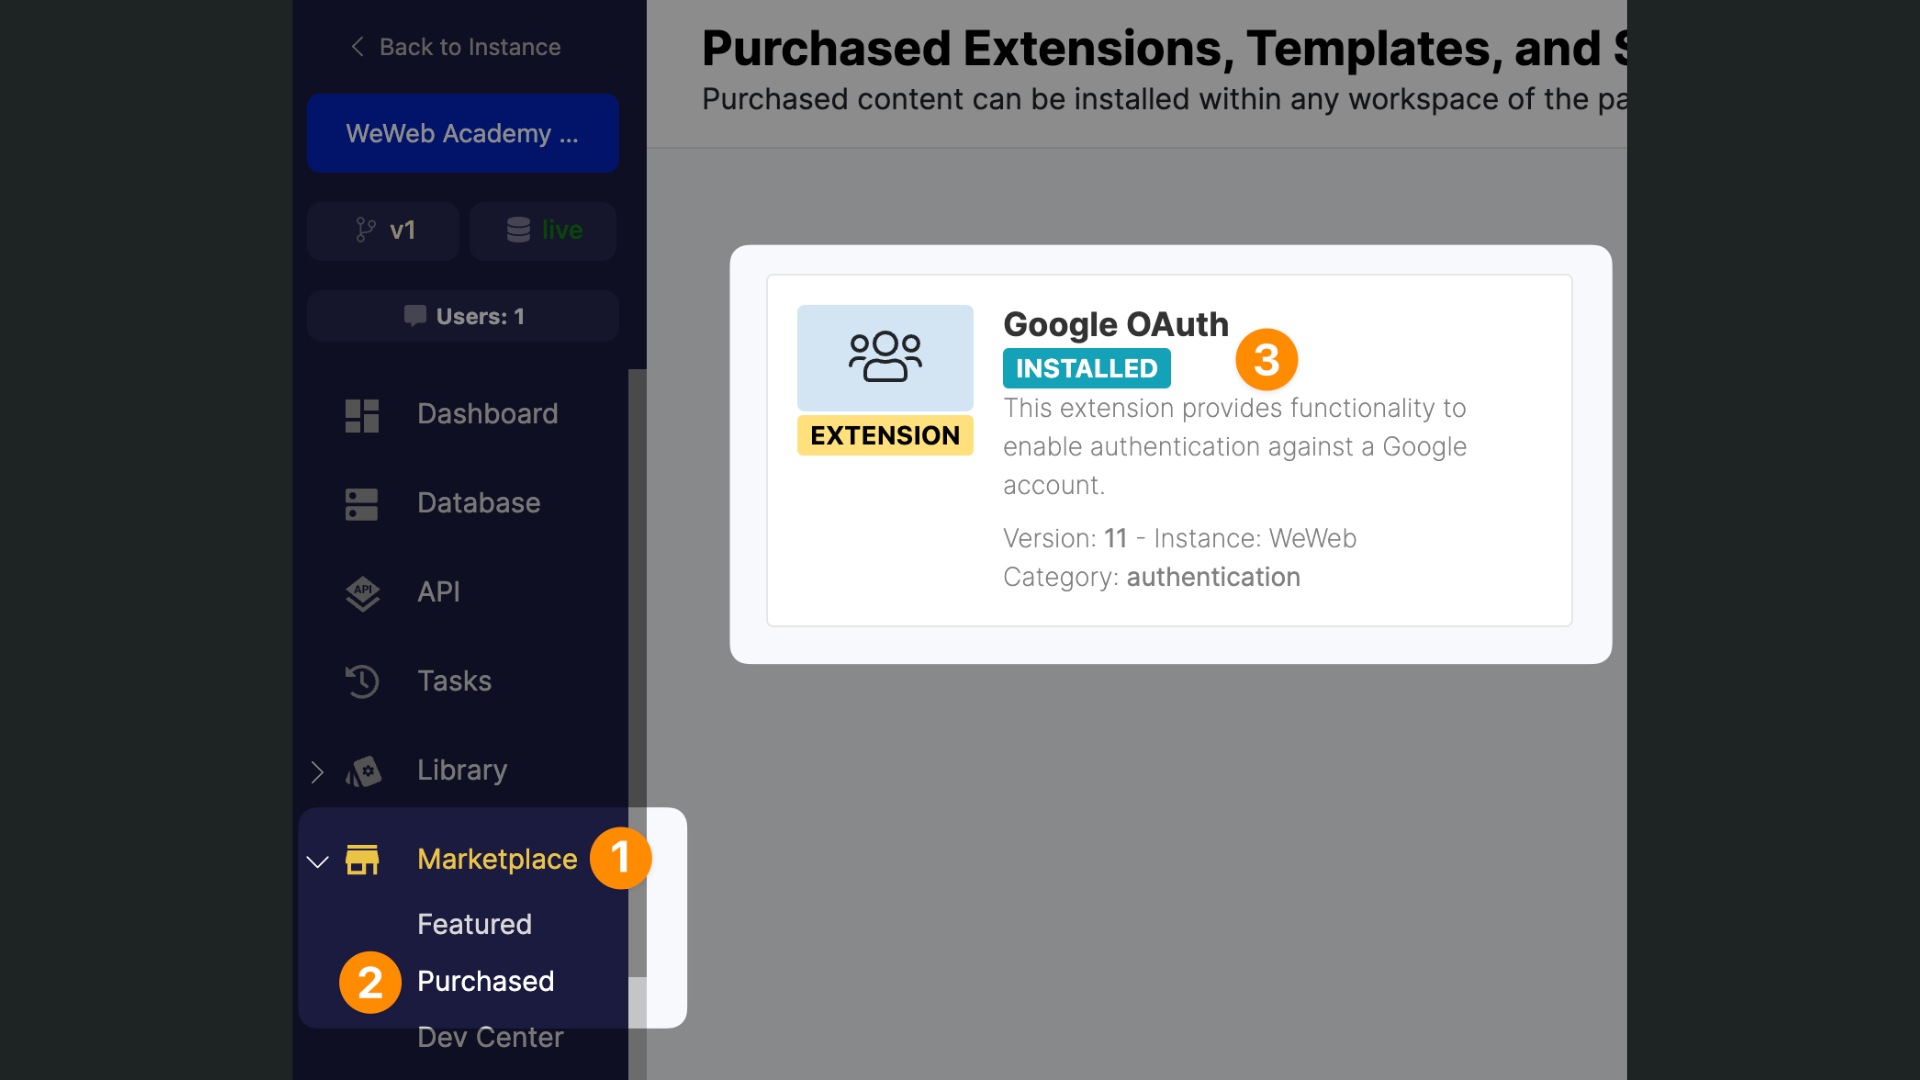
If you can't see the OAuth provider you're looking for, check that it is correctly installed in Xano in Marketplace > Purchased:
Login or signup flow
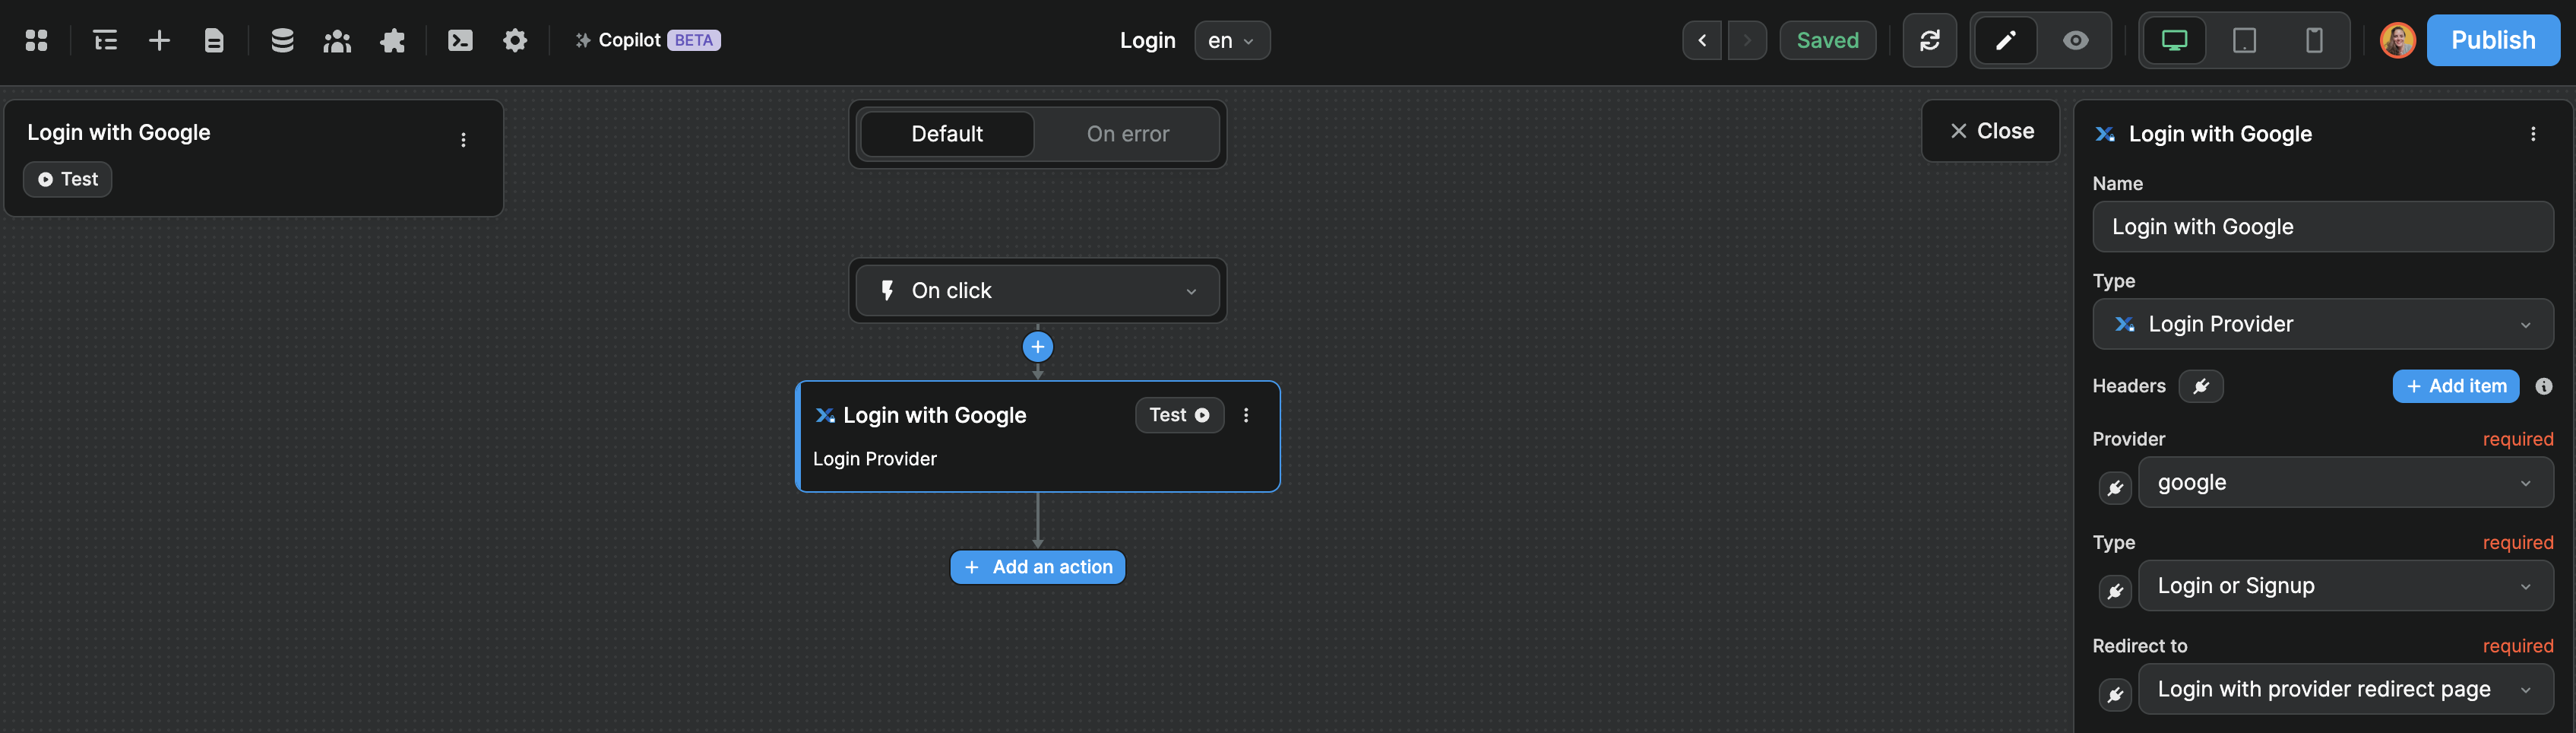
The first step to allow users to signup or login with an OAuth provider is to trigger a workflow, for example, on click of a "Continue with Google" button.
In that workflow, you'll need to:
- Choose the
Login Provideraction, - Select which provider you want to work with, and
- Redirect the user to a public, blank page
This last step is crucial (more on this in a second).
In our case, we named the page Login with provider redirect page to be super explicit but of course, you can choose a shorter name. It doesn't really matter since the user will not even notice they are routed through this page.
Public blank page for 3rd-party
Before your app is fully secured, it needs to render a page to save the authentication cookies and get back the user from the OAuth provider. That needs to happen on a public page.
Then you can redirect the user to the page of your choice, public or private.
The process is the following:
- User selects Oauth provider on your WeWeb app
- User is redirected to the Oauth provider consent screen
- User is redirected back to your WeWeb app, on a public page, where cookies are setup
- User is redirected to a private page on your WeWeb app
We took care of steps 1 through 3 when we created the workflow with the Login Provider action above and redirected users to an empty public page.
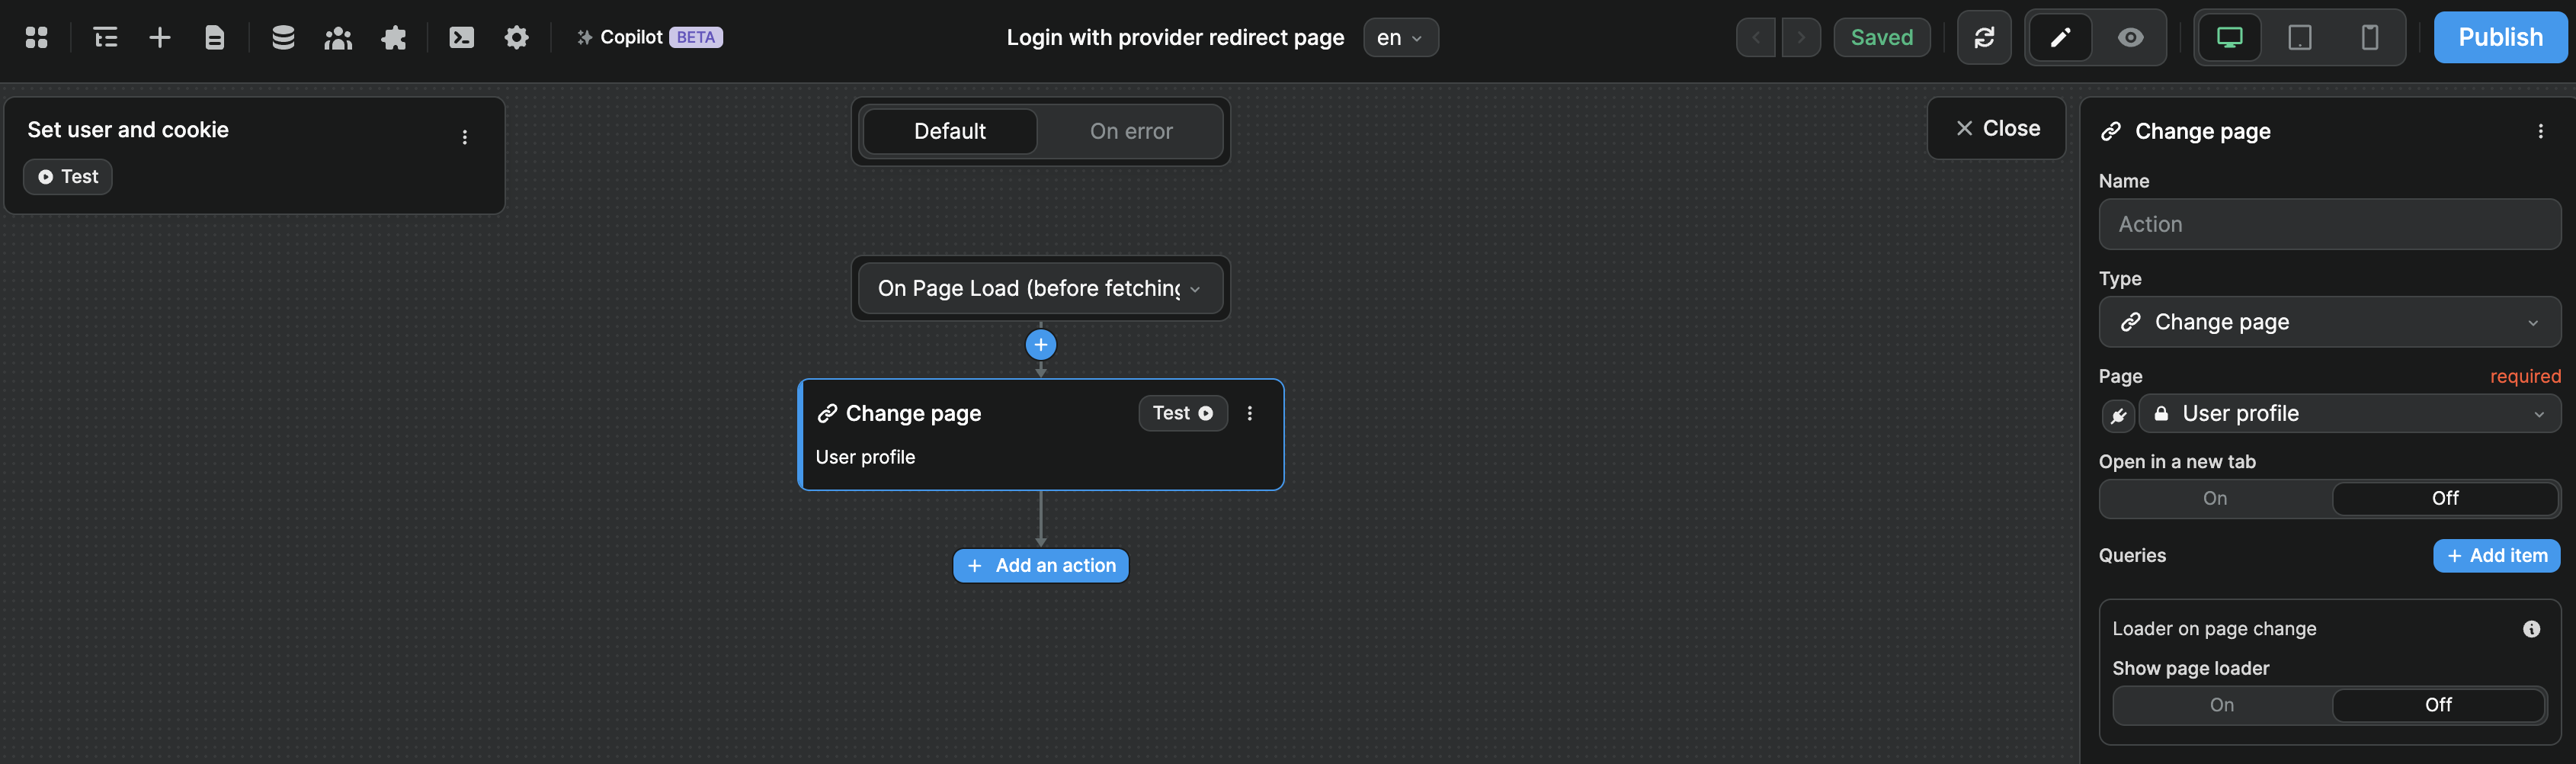
Now we need to trigger a workflow on that page so that the authenticated user is immediately redirected to the page we want them to see post signup/login:
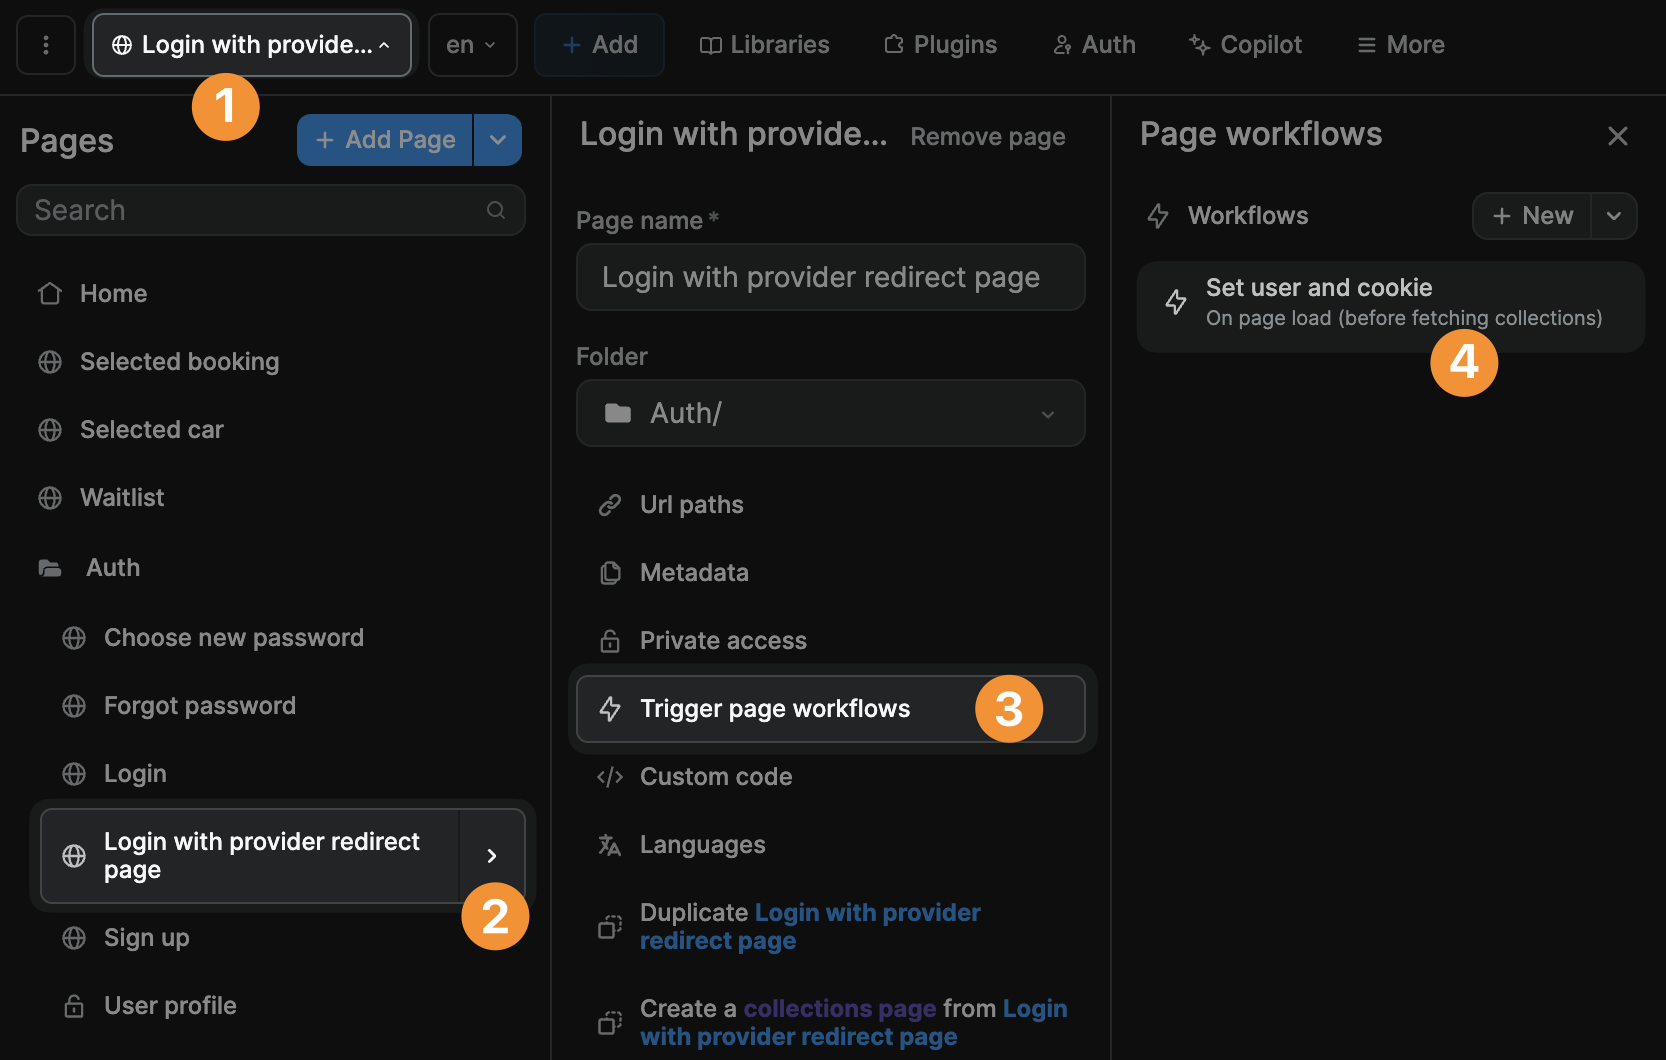
The workflow should have:
- A trigger
On Page Load (before fetching collections)because you want to redirect the user as soon as possible - A
Navigate toaction that redirects the user to the page you want them to see after signing up or logging in
That's it, you've got OAuth configured on your Xano project.