Appearance
Add a custom domain
What is a domain?
A domain is your website's address on the internet - it's what people type into their browser to visit your site.
When you publish a WeWeb app, we provide a default subdomain on the weweb-preview.io domain, served over SSL. For instance, yourapp.weweb-preview.io.
If you want to customize this and use your own domain name, you can do this in the Domains section of the project Settings tab.
TIP
Custom domains are only available if you have a hosting plan, which requires a seat plan.
First, you'll need to go to your Project Settings, click on Domains, then on Connect an existing domain name:
1. Choose a subdomain
Here, you'll have to type the subdomain and domain name you want to use:
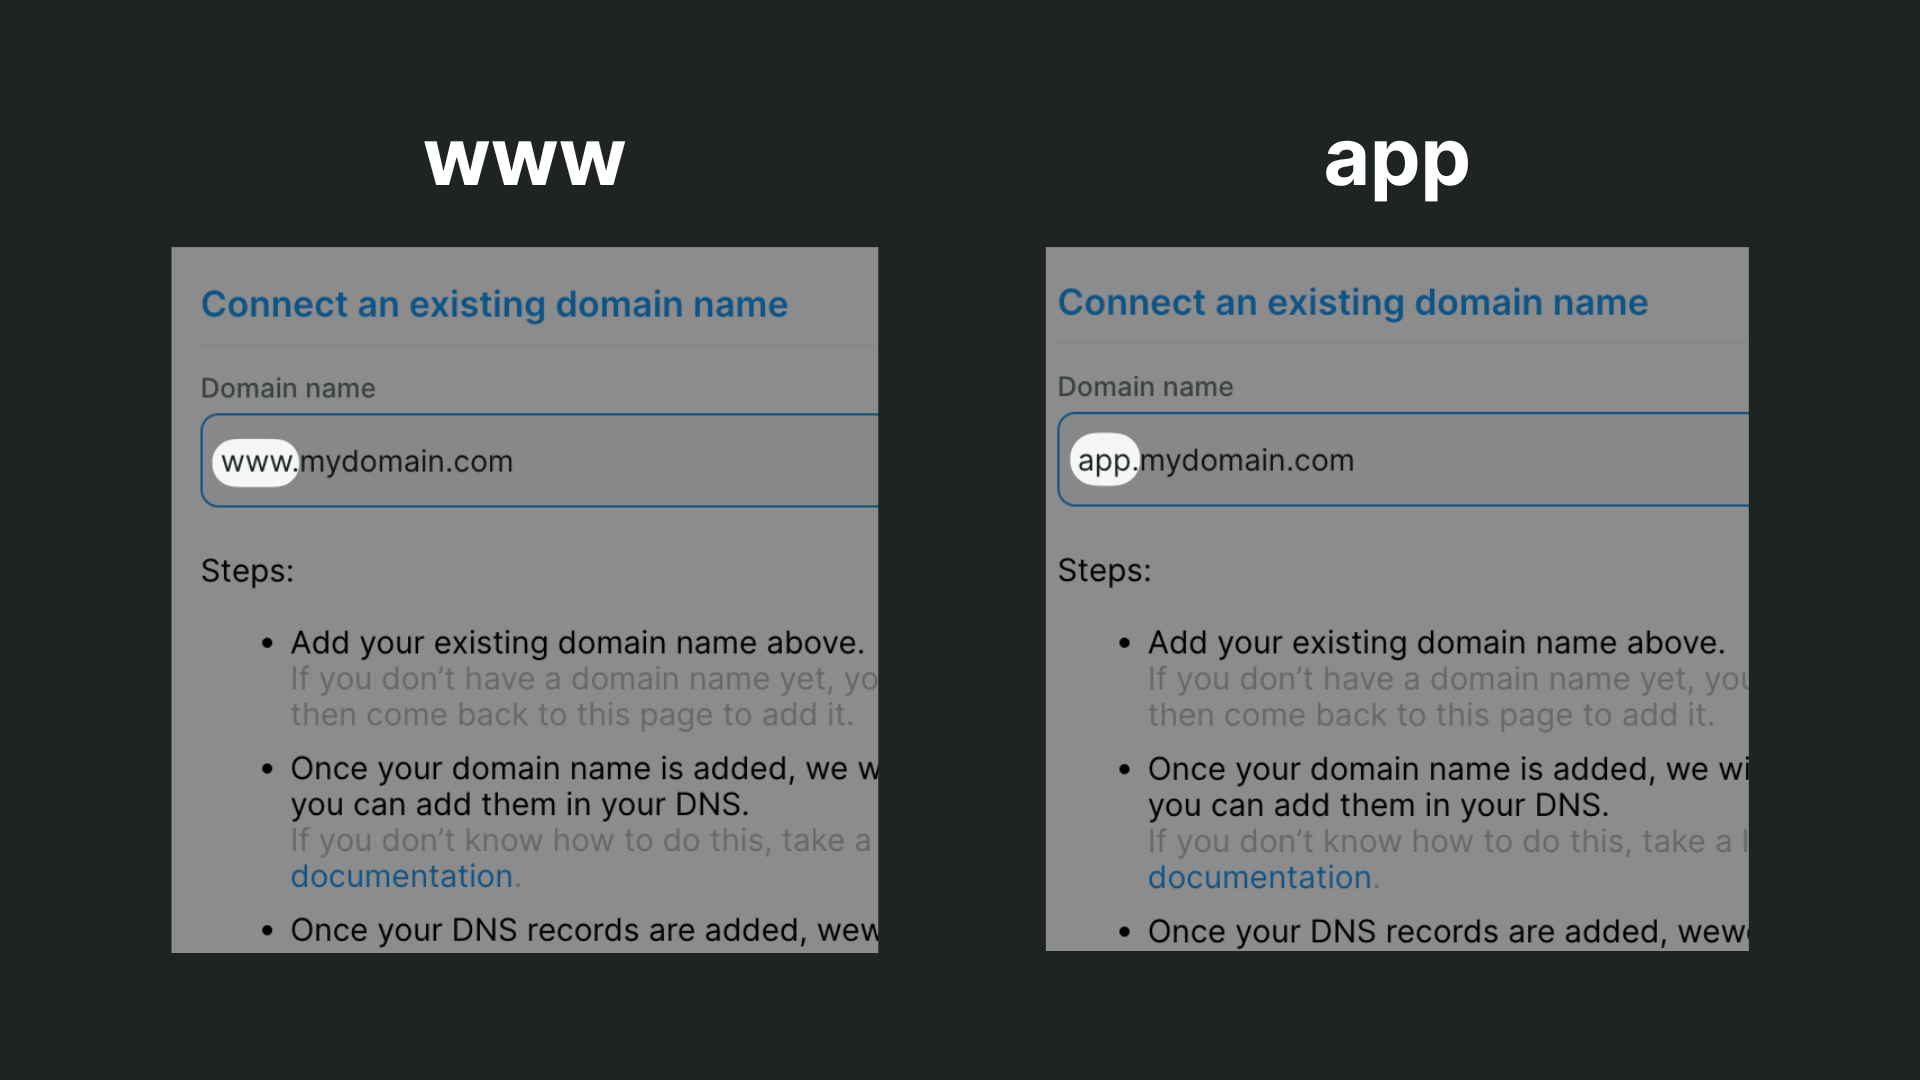
For example, type in www.mydomain.com if you want to host your website on the www subdomain or app.mydomain.com if you want to publish your app on the app subdomain.
WARNING
WeWeb doesn't support naked domain like mydomain.com for the moment. Be sure to use a subdomain. The most common one is www but you could use app or dashboard or any other subdomain that you see fit.
For example, WeWeb serves apps on the support, academy and marketplace subdomains of weweb.io.
TIP
When you purchase a domain name with a registar, you don't need to purchase an SSL certificate. WeWeb will provide one for you and update it automatically on a yearly basis as long as you've added the CNAME record in the DNS (see below).
2. Update your DNS records
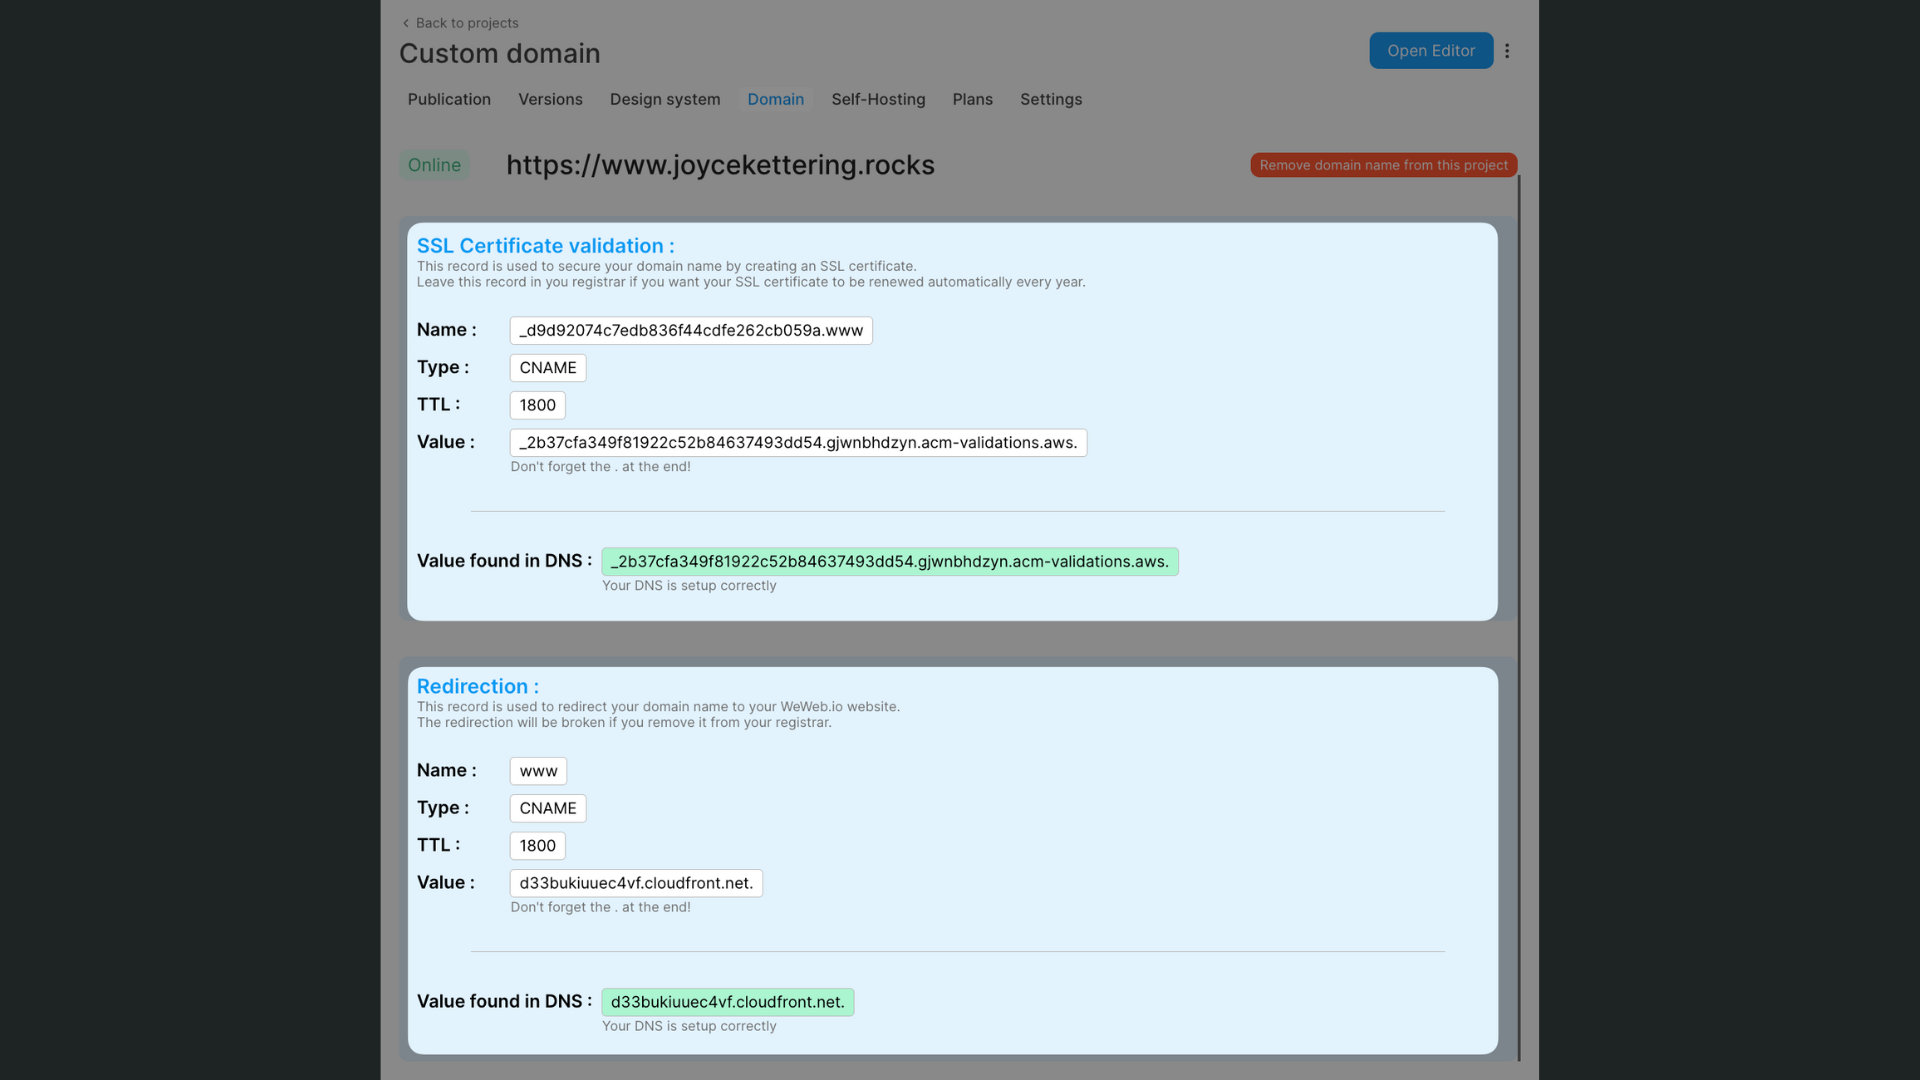
Once you've told WeWeb on what subdomain you want to host your app, you will be provided with information to create two DNS records, both CNAME records:
- the first will tell the DNS where to find the SSL certificate of your app (so it uses
https) - the second will tell the DNS where to find your app
TIP
Thinking of the DNS (which stands for Domain Name System) as "the phonebook of the Internet" can be helpful because it reminds us the DNS needs to know at what address (IP or URL) it can find information related to our websites.
To update the DNS with these new records, you'll need to find the appropriate section in your domain registar (e.g. Cloudflare, GoDaddy, etc.)
Each registar will have its own way of referring to what WeWeb calls Name and Value. For example, Cloudflare refers to Name and Content while Namecheap refers to Host and Value.
In the end, no matter what your registar calls these fields, the two CNAME records in your DNS should look something like this:
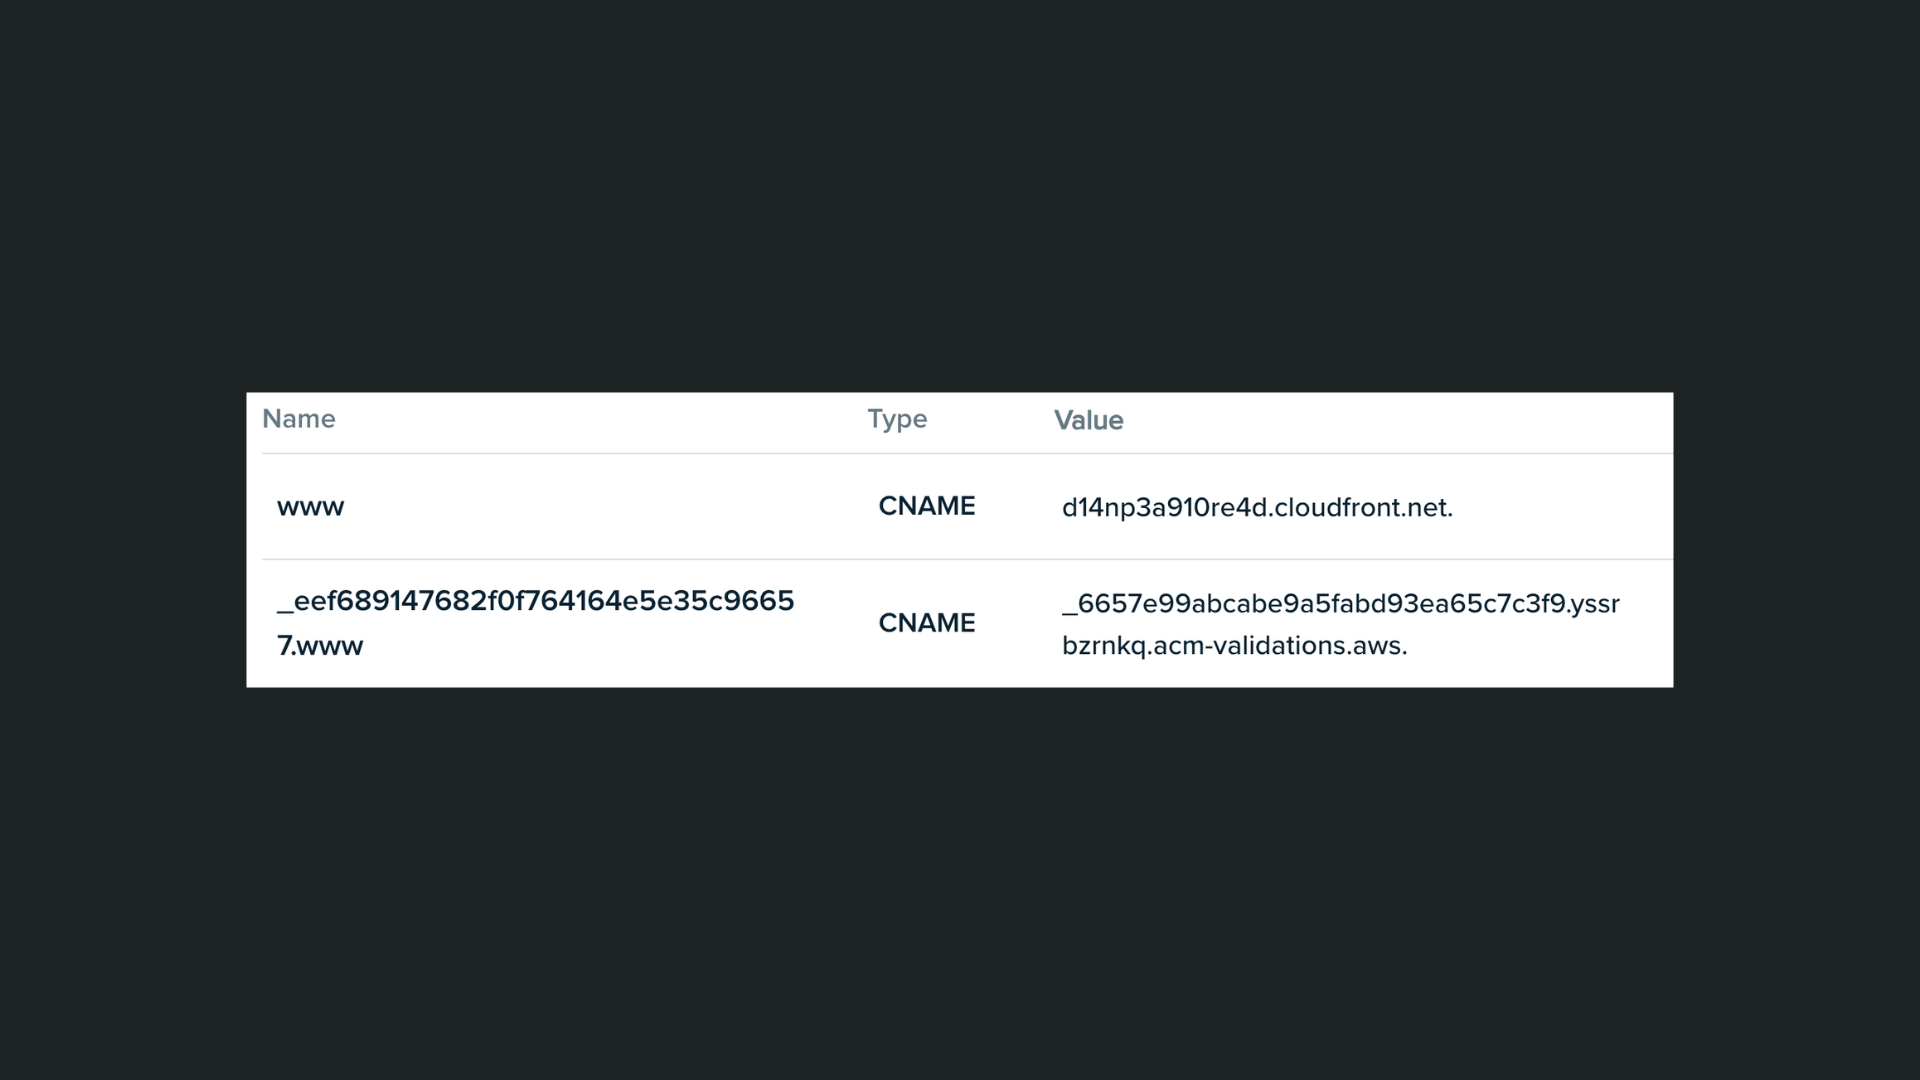
In the example above, you can see we chose to redirect our app users to the www subdomain. If we had chosen to publish our app on app.joycekettering.rocks, you would see app here instead of www.
TIP
Some registars will refer to the TTL value in seconds like WeWeb (1800) and others in minutes (30) while others don't give you the option to customize it and simply set it to Auto by default.
All three approaches are fine and will not affect the end-result.
3. Wait for DNS propagation
Once you've added the CNAME records to the DNS, you'll have to wait.
WARNING
Depending on your registar, it can take up to 48 hours for the new CNAME records to take affect. You can check the progress on the DNS checker website
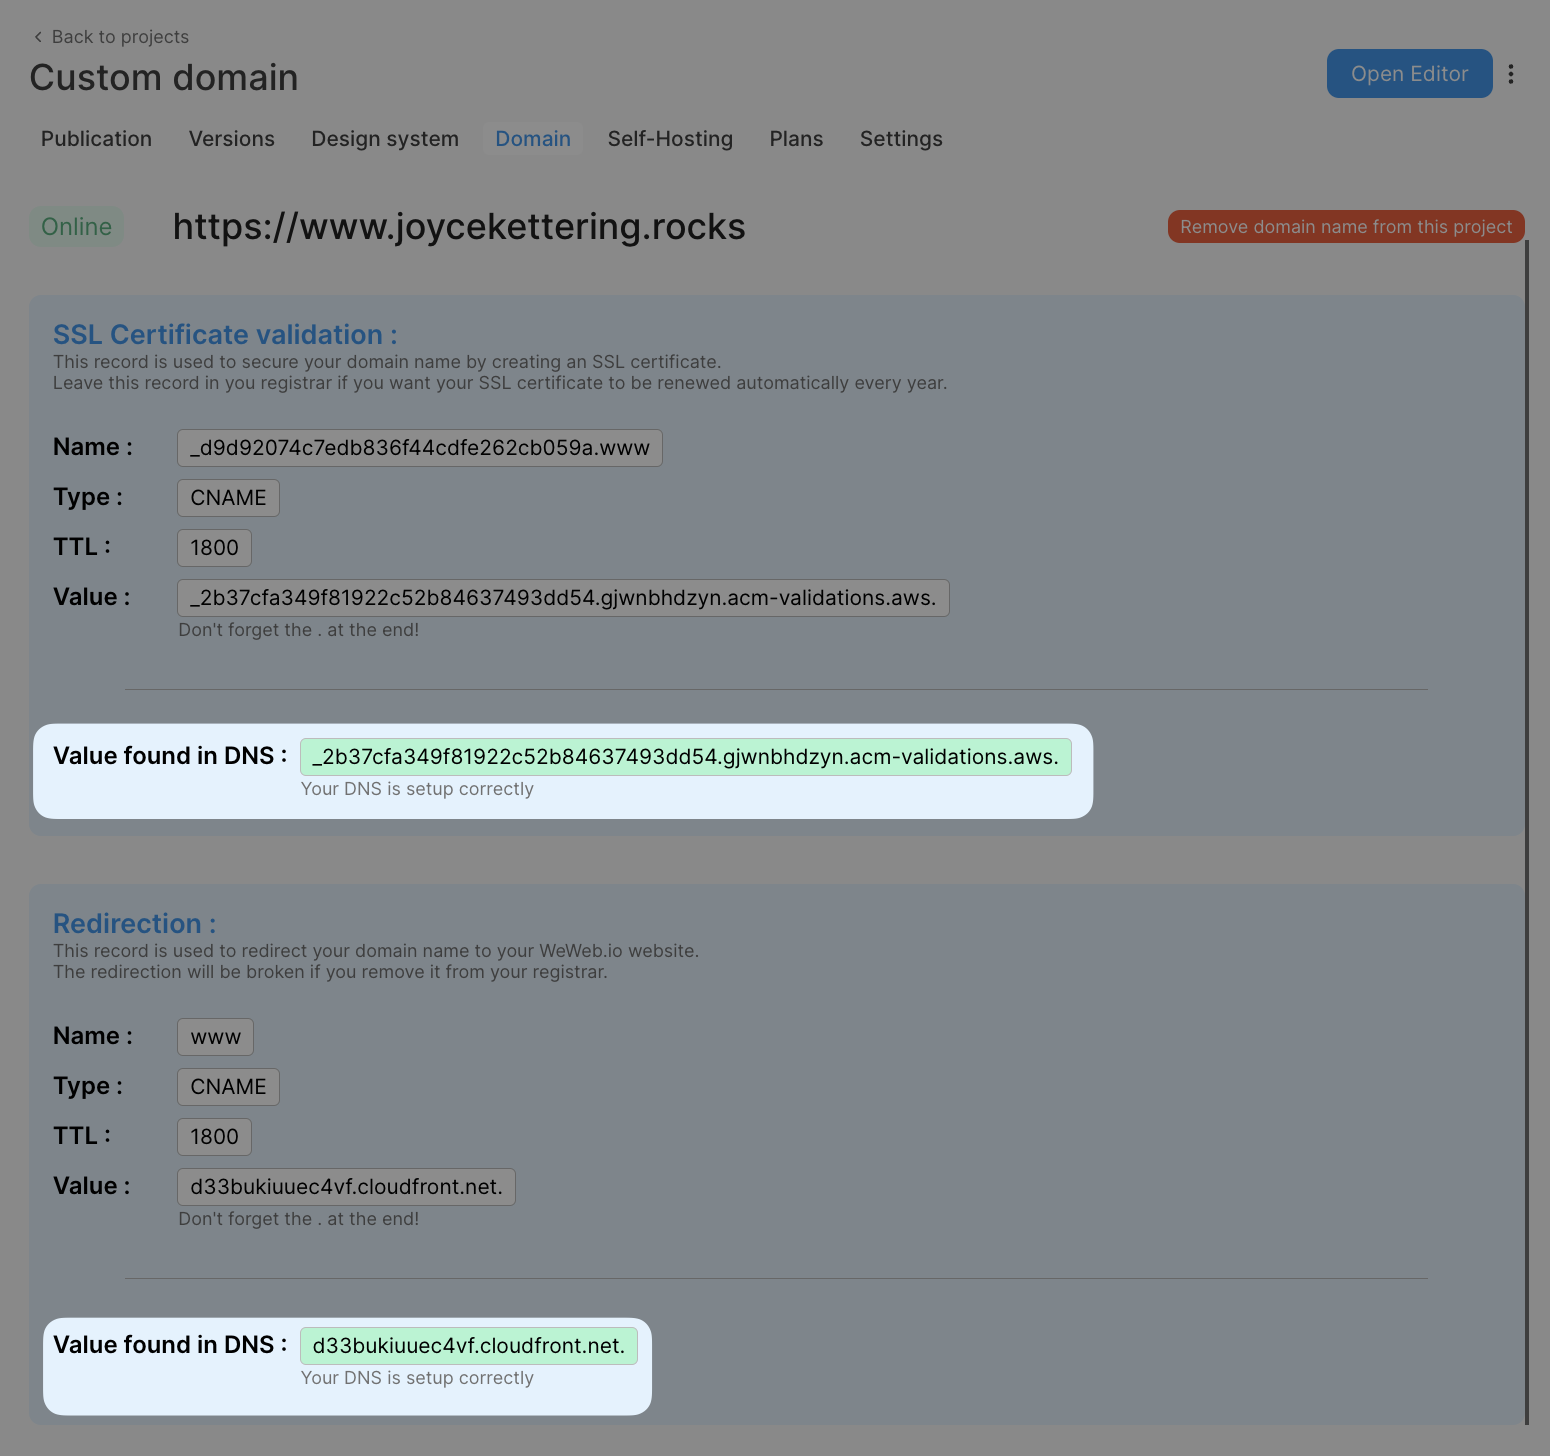
Once DNS records are fully propagated, you should be able to access your app when you type its address with the subdomain (e.g. www.yourdomain.com) and the Value found in DNS fields in WeWeb should appear in green with a success hint saying Your DNS is setup correctly:
4. Redirect root domain (optional)
If you chose to publish your WeWeb app on the www subdomain, you will most likely want to setup a redirection from your root domain to that subdomain so that users who type in yourdomain.com are redirected to the www.yourdomain.com.
To do this, you will need to create an alias record on the DNS. You can do this:
- in your domain registar or, if your domain registar doesn't support root domain redirection,
- through a third-party Delivery Network System like Cloudflare.
For option 1, we recommend you refer to your domain registar's documentation to check if they have the ability to provide naked domain redirects for https. Many don't because their redirect server can't provide SSL service.
For such cases, we recommend using CloudFlare to handle your DNS settings and setup a permanent 301 redirection from your root domain to the subdomain of your app (e.g. www or app).
At the time of writing, Cloudflare allows you to do this on a free plan. We have detailed the process in the Namecheap section. While the process to update nameservers will vary from one registar to another, the logic will be the same.
TIP
In most cases, if you published your WeWeb app to a subdomain other than www (e.g. app or academy), it's because you already have a website using the www subdomain. If that's the case, think twice before redirecting your root domain to another subdomain.
Users who type in a root domain name usually expect to land on the www subdomain. Sending them to one of your apps and not your main website could be very confusing.
Cloudflare
DNS records
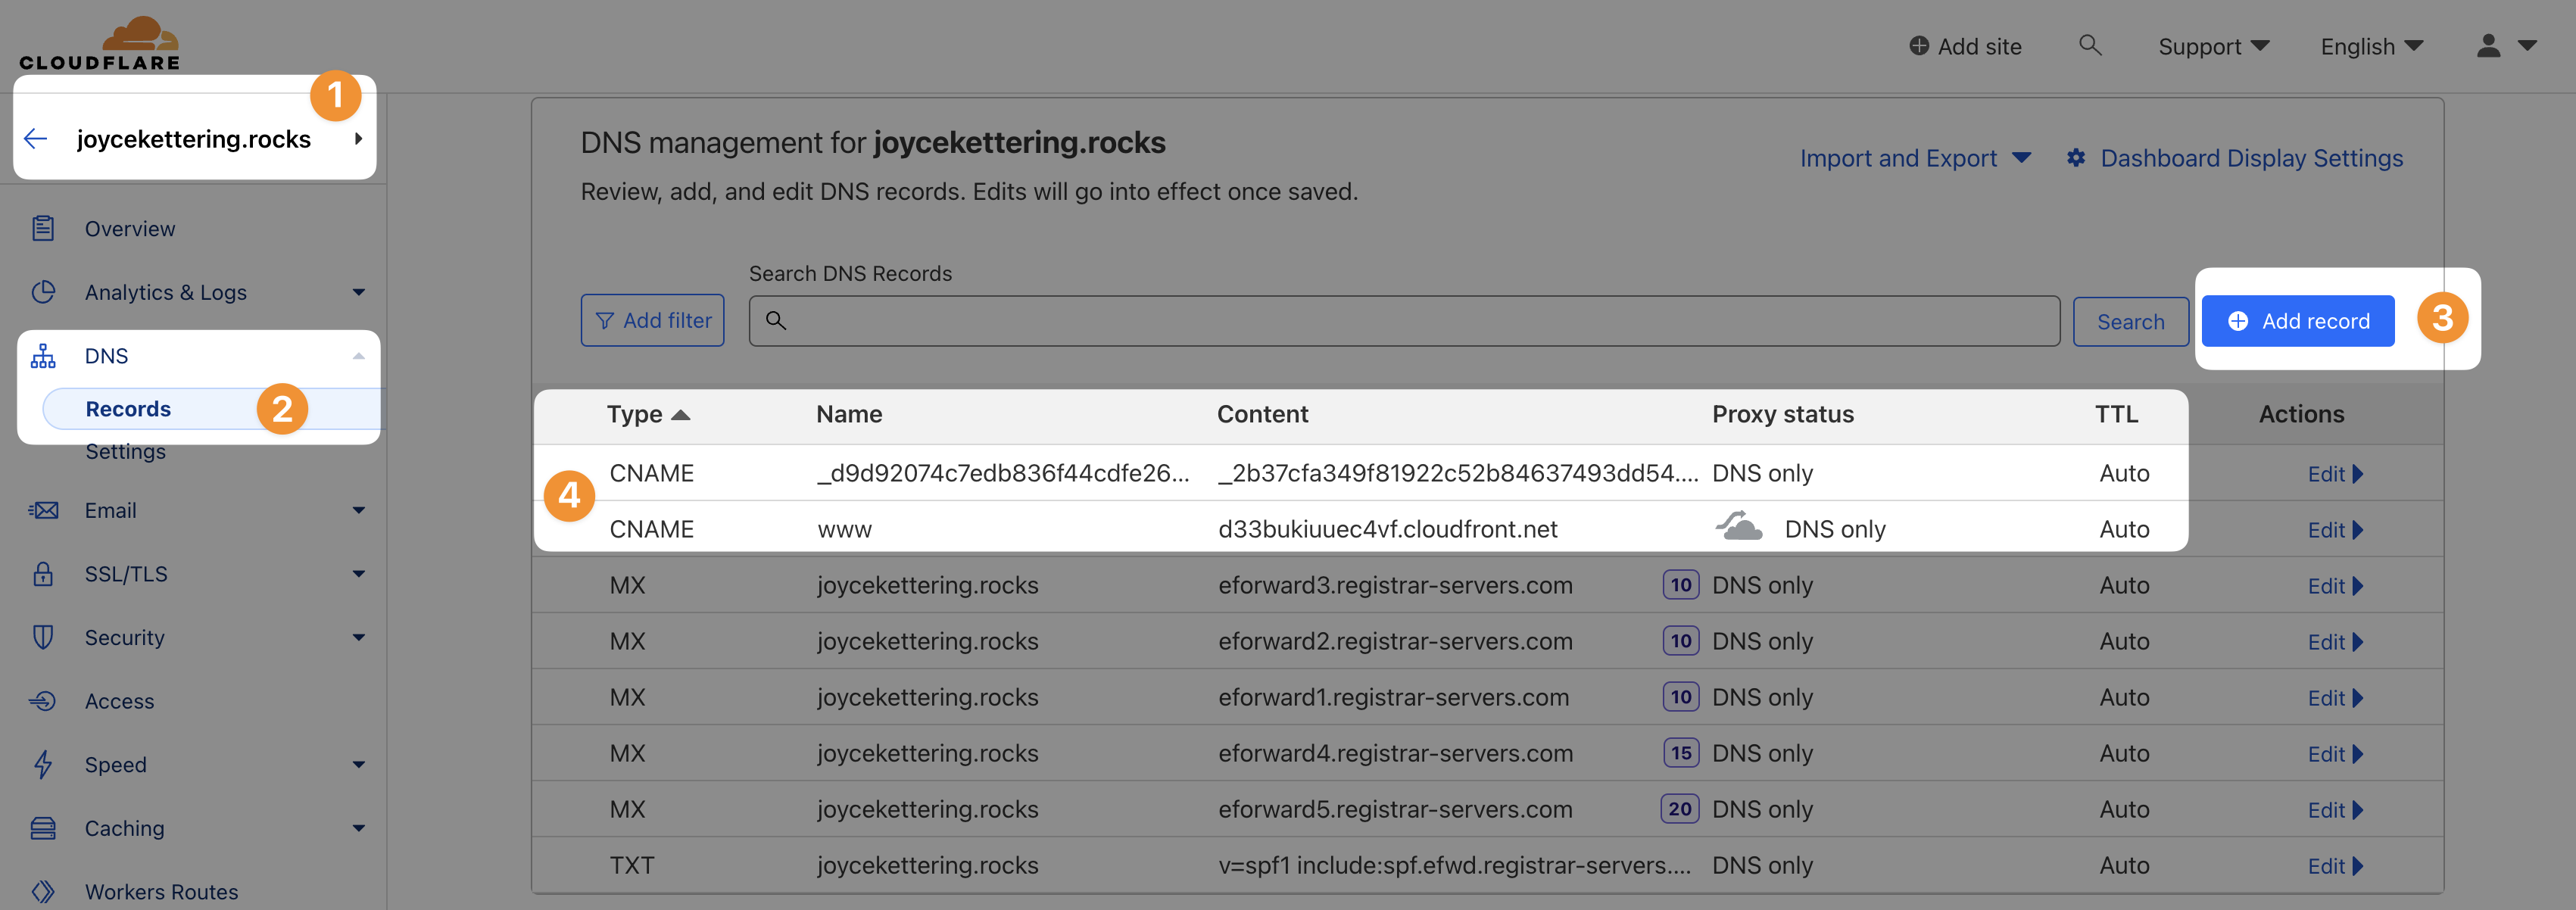
To create the two required CNAME records in Cloudflare:
- on the
Websitetab of your dashboard, select the project you want to configure - select
DNS>Recordsin the side menu - click on
Add record - create two CNAME records using the values provided in WeWeb
WARNING
Make sure the Proxy status is disabled and says DNS only on both records.
It can take up to 48 hours for the new CNAME records to take affect. You can check the progress on the DNS checker website
Once DNS records are fully propagated, your website should be live on your domain.
Root domain redirection
If you chose to publish your WeWeb app on the www subdomain, you will most likely want to setup a redirection from your root domain (e.g. yourdomain.com) to that subdomain (i.e. www.yourdomain.com).
There are two steps to do this in Cloudflare while still supporting the https SSL certificate:
- create an alias for the root domain, and
- create a page rule to redirect traffic on the root domain to the
httpspage on the subdomain
Alias record
To create a root domain alias in Cloudflare, add a new CNAME record with the Proxy status enabled that makes the root domain an alias of your www subdomain:

WARNING
For this record, make sure the Proxy status is Proxied.
Page rule
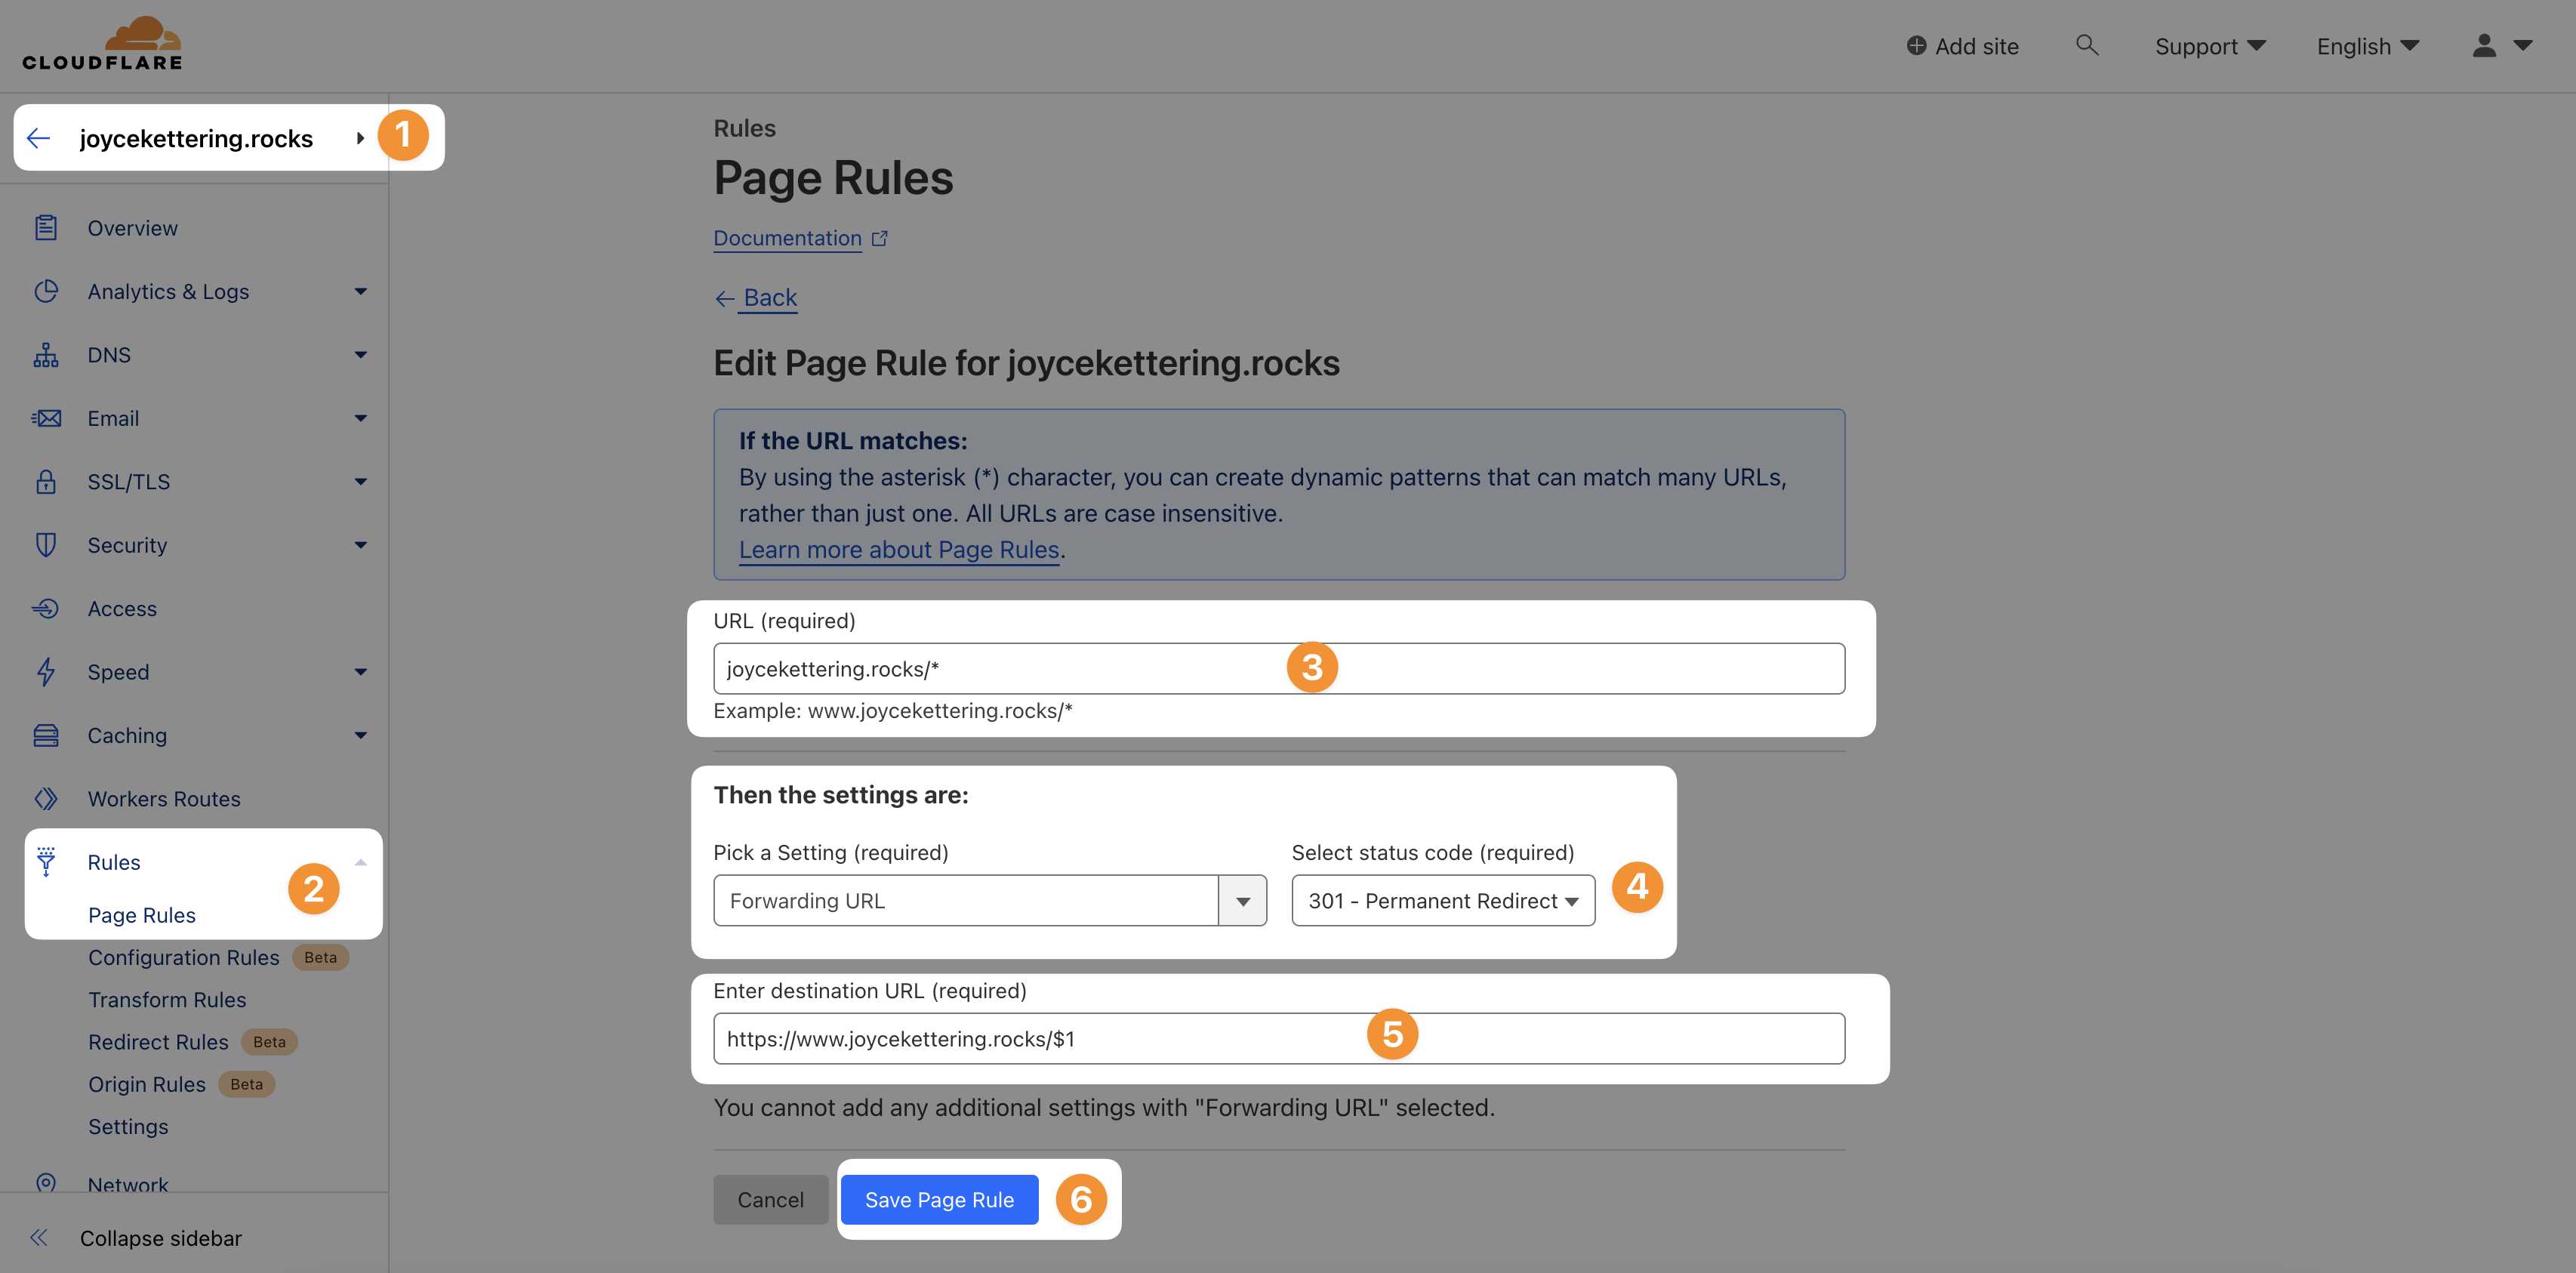
To create a root domain redirection page rule in Cloudflare:
- make sure you're in the right project
- go to
Rules>Page Rules - type in the root domain with a
/*wildcard at the end to include all the pages on the domain (e.g.yourdomain.com/*) - choose the
Forwarding URLsetting with a301 - Permanent redirectto ensure the redirection is permanent - type in the URL where users should be redirected. This time, make sure it:
- starts with
https://at the beginning and the subdomain you want to redirect to (usuallyhttps://www.), and - ends with
/$1so the redirection URL is dynamic (i.e. so that if someone types inyourdomain.com/dashboard, they are redirected to thedashboardpage, not just the homepage of your app)
- starts with
- don't forget to save and deploy the page rule
Once you save the page rule, it should look something like this (make sure the Action option is enabled):

TIP
In most cases, if you published your WeWeb app to a subdomain other than www (e.g. app or academy), it's because you already have a website using the www subdomain. If that's the case, think twice before redirecting your root domain to another subdomain.
Users who type in a root domain name usually expect to land on the www subdomain. Sending them to one of your apps and not your main website could be very confusing.
Namecheap
DNS Records
To add the two required CNAME records in Namecheap go to Domain List > Manage:

In the Advanced DNS menu, click on Add new record and copy/paste the information from your WeWeb project. It should look something like this:

- Both records should be of
TypeCNAME - Replace
Hostby theNamevalue in WeWeb - Replace
Valueby theDatavalue in WeWeb - You can leave the
TTLvalue asAutomatic
Once you've saved the changes, it can take up to 48 hours for the new CNAME records to take affect. You can check the progress on the DNS checker website. Once DNS records are fully propagated, your website should be live on your domain.
Root domain redirection
If you chose to publish your WeWeb app on the www subdomain, you will most likely want to setup a redirection from your root domain (e.g. yourdomain.com) to that subdomain (i.e. www.domain.com).
TIP
In most cases, if you published your WeWeb app to a subdomain other than www (e.g. app or academy), it's because you already have a website using the www subdomain. If that's the case, think twice before redirecting your root domain to another subdomain.
Users who type in a root domain name usually expect to land on the www subdomain. Sending them to one of your apps and not your main website could be very confusing.
At the time of writing, Namecheap does not support naked domain redirects for https because their redirect server can't provide SSL service. You can, however, use Cloudflare on a free plan to handle your DNS settings and setup a permanent 301 redirection from your root domain to the www subdomain.
In your Cloudflare account, when you add a site, you are invited to:
- type in the domain name of the website, and
- choose a plan.

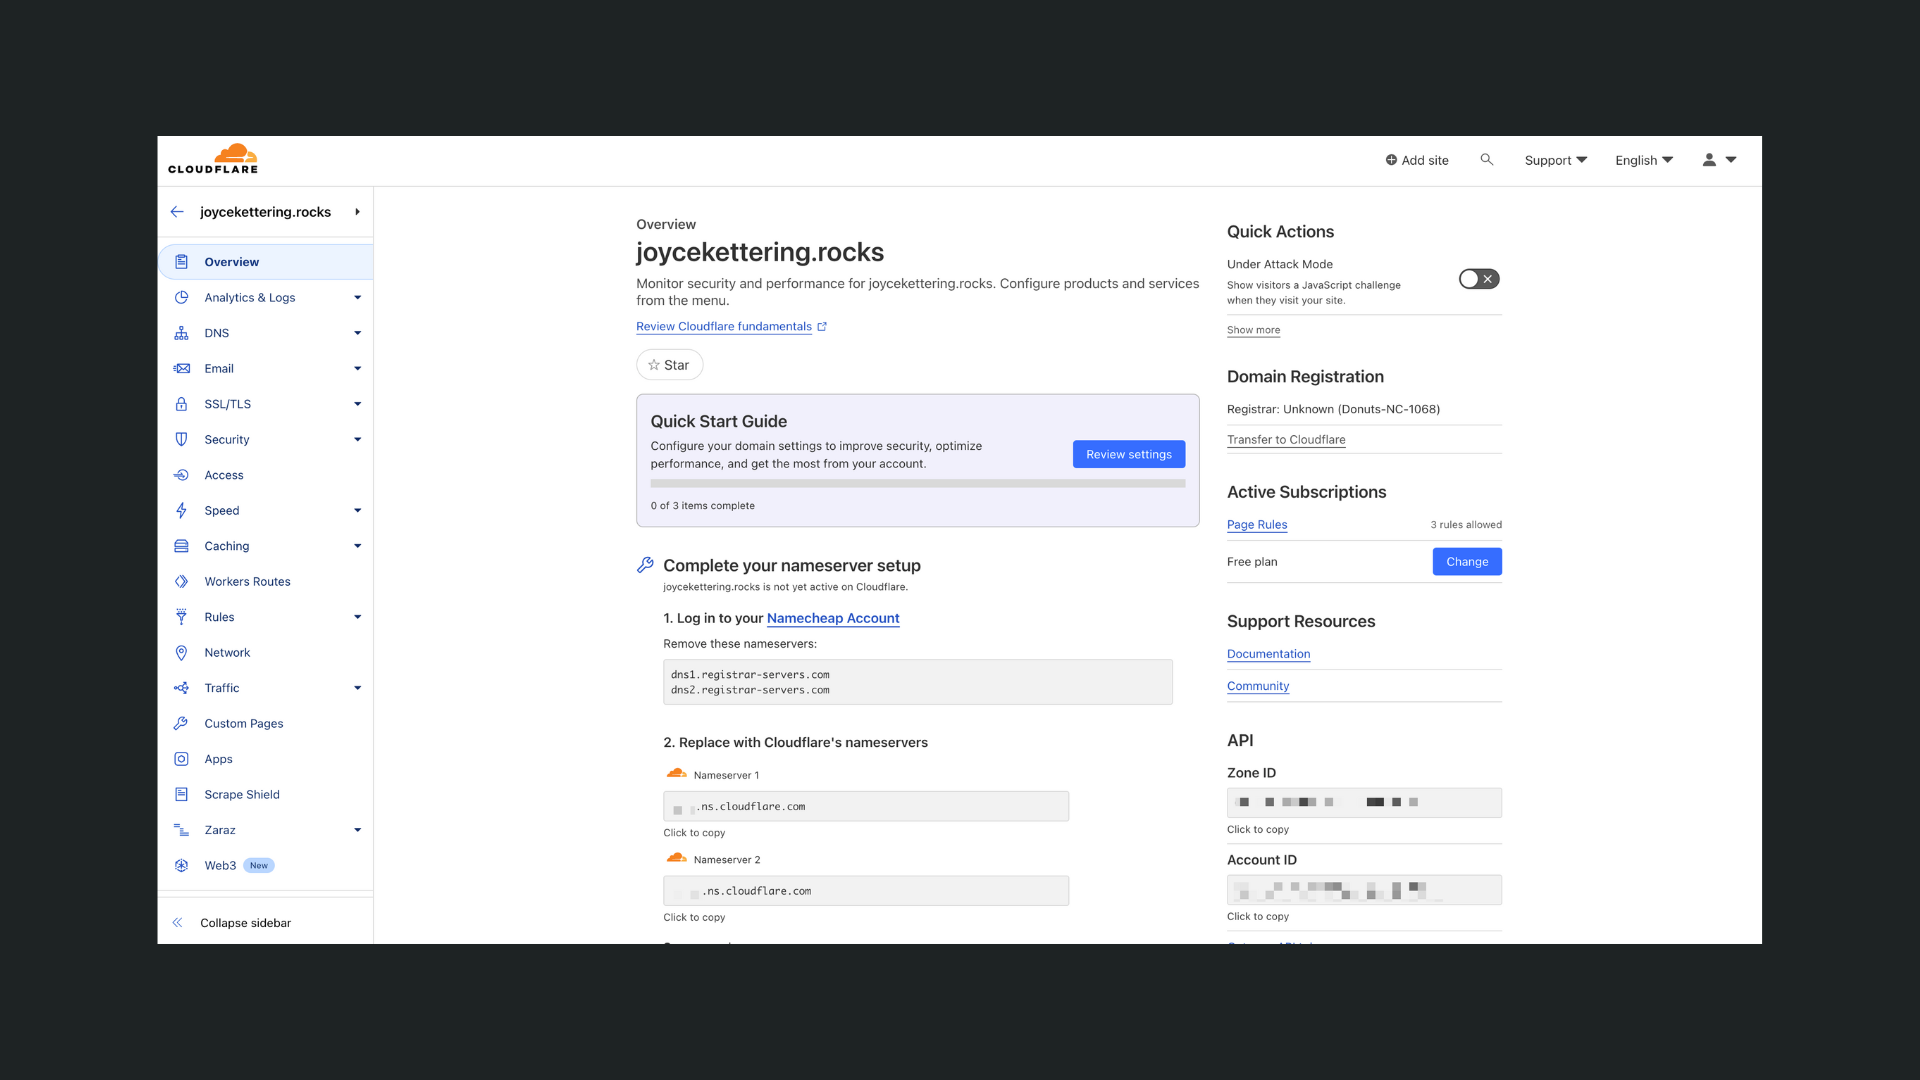
Assuming your domain name was not purchased on or transferred to Cloudflare, you will then be invited to replace the default nameservers of your domain registar (in this case Namecheap) with Cloudflare nameservers:
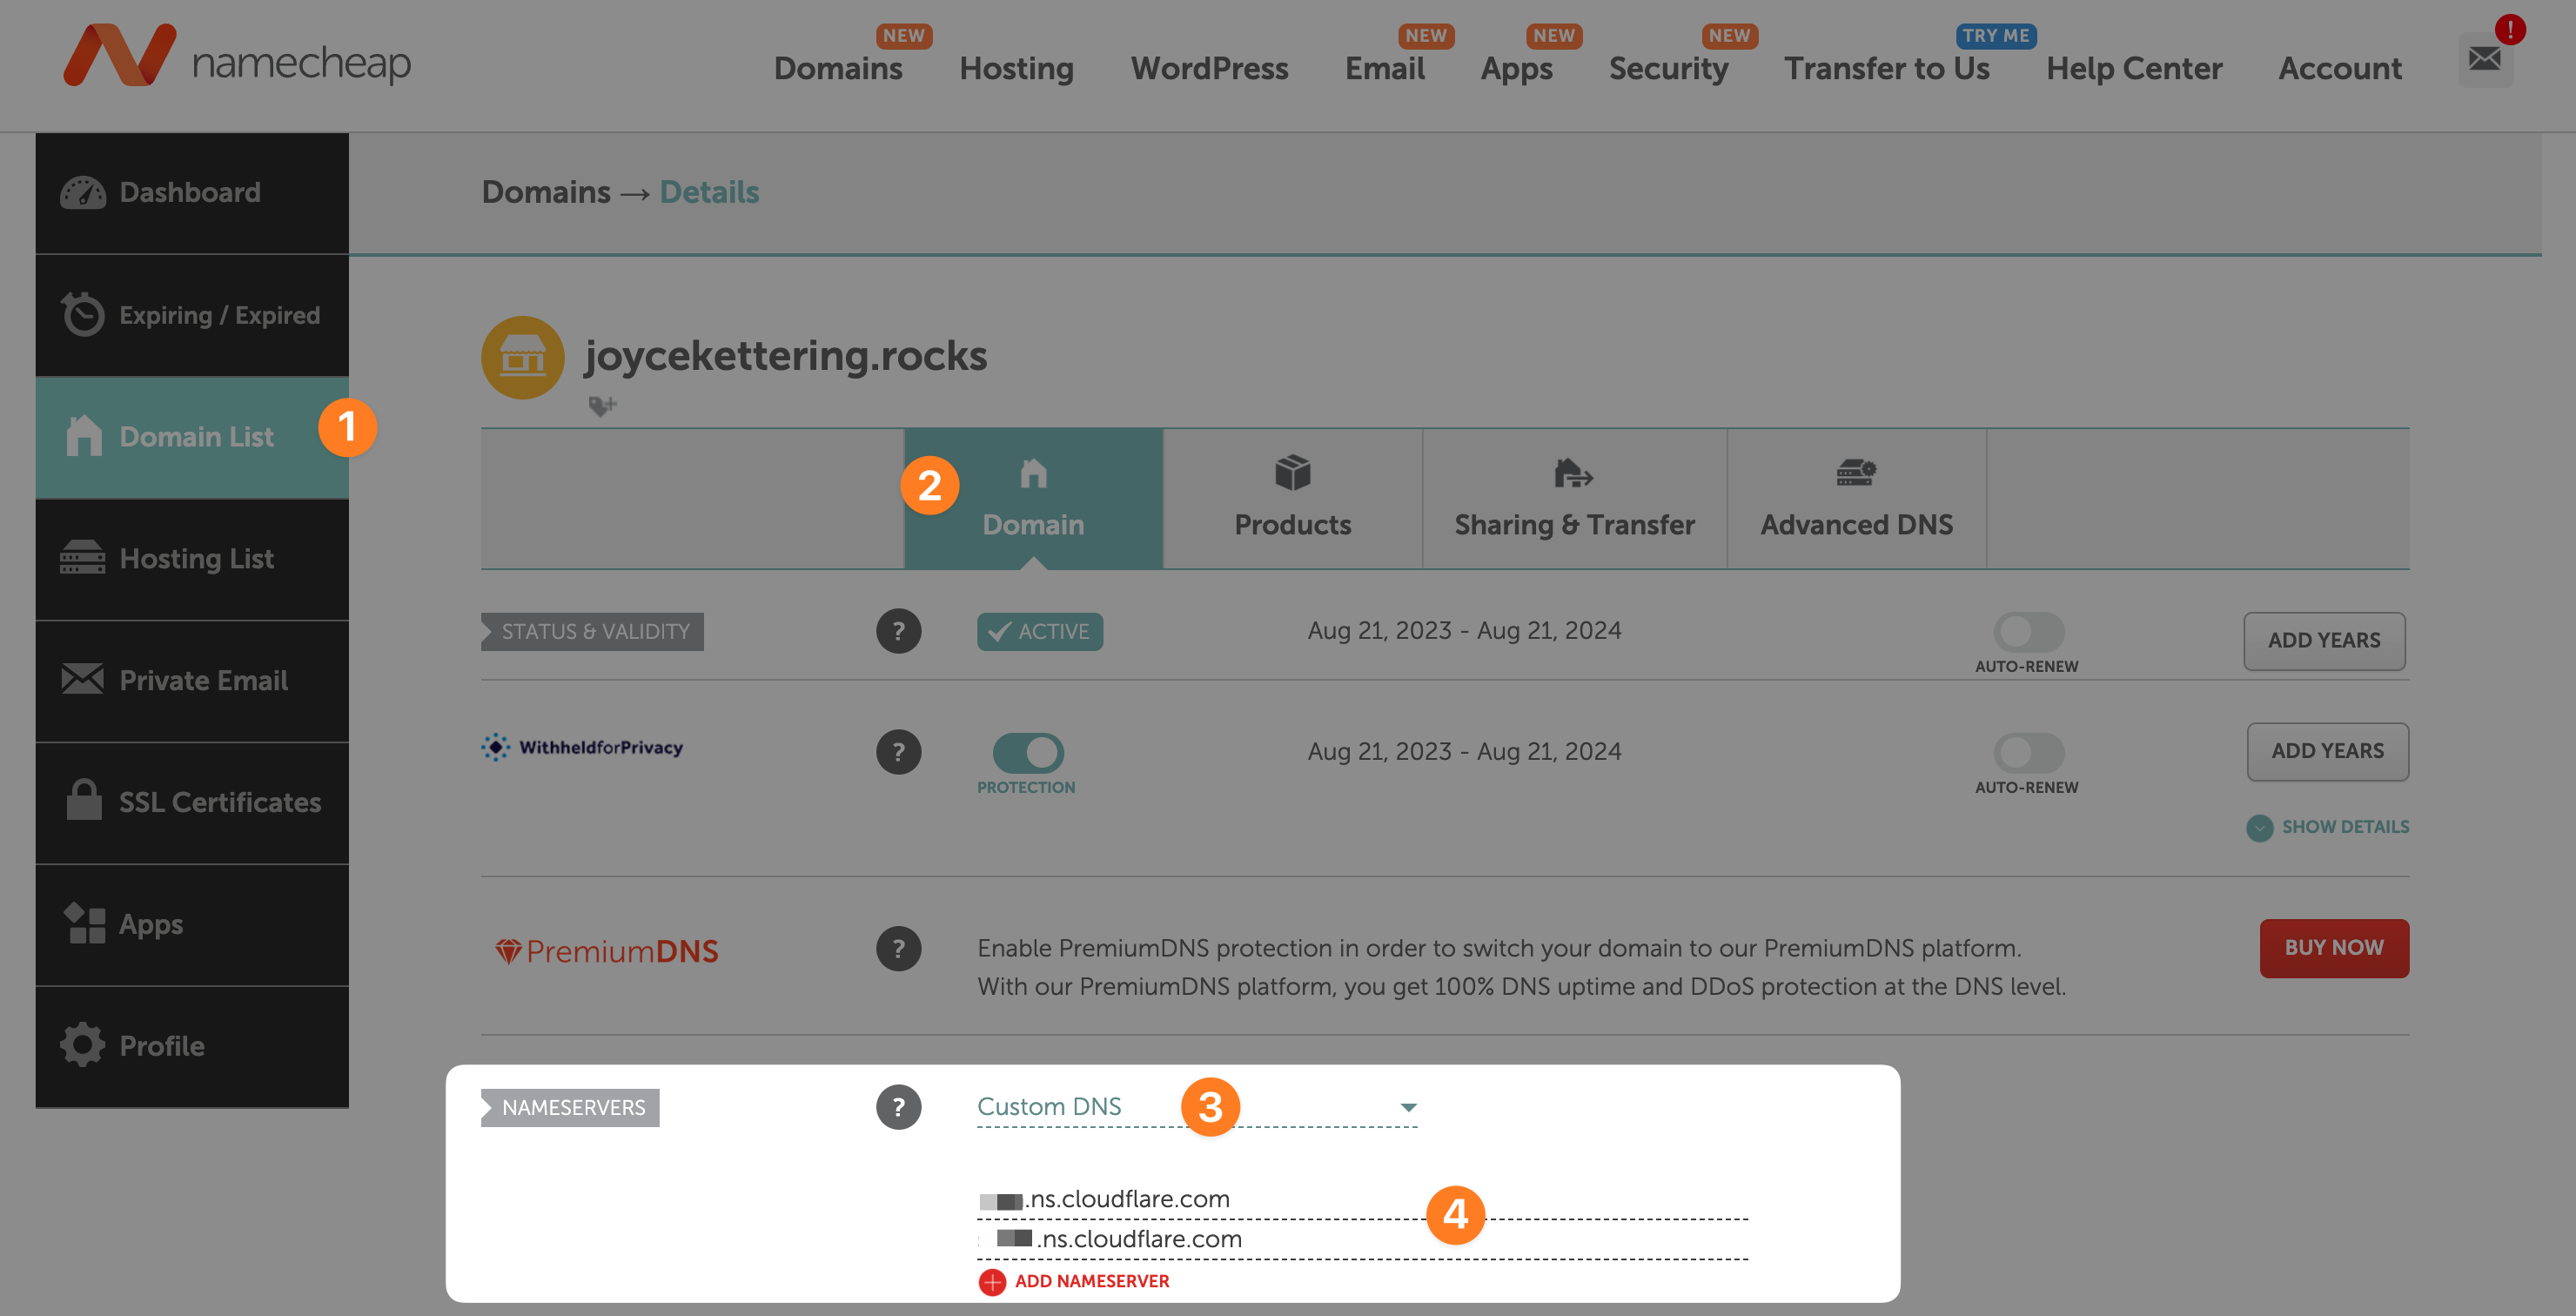
In Namecheap, you can do this by going to your Domain list and clicking on Manage, then choosing the Custom DNS option in the Nameservers section of the page:
WARNING
Once you've updated the nameservers in your domain registar, you can click on the Check nameservers button in Cloudflare to speed up the process but updating the nameservers can take a few hours regardless:

Be patient. Cloudflare will send you an email and update the project dashboard once its done:
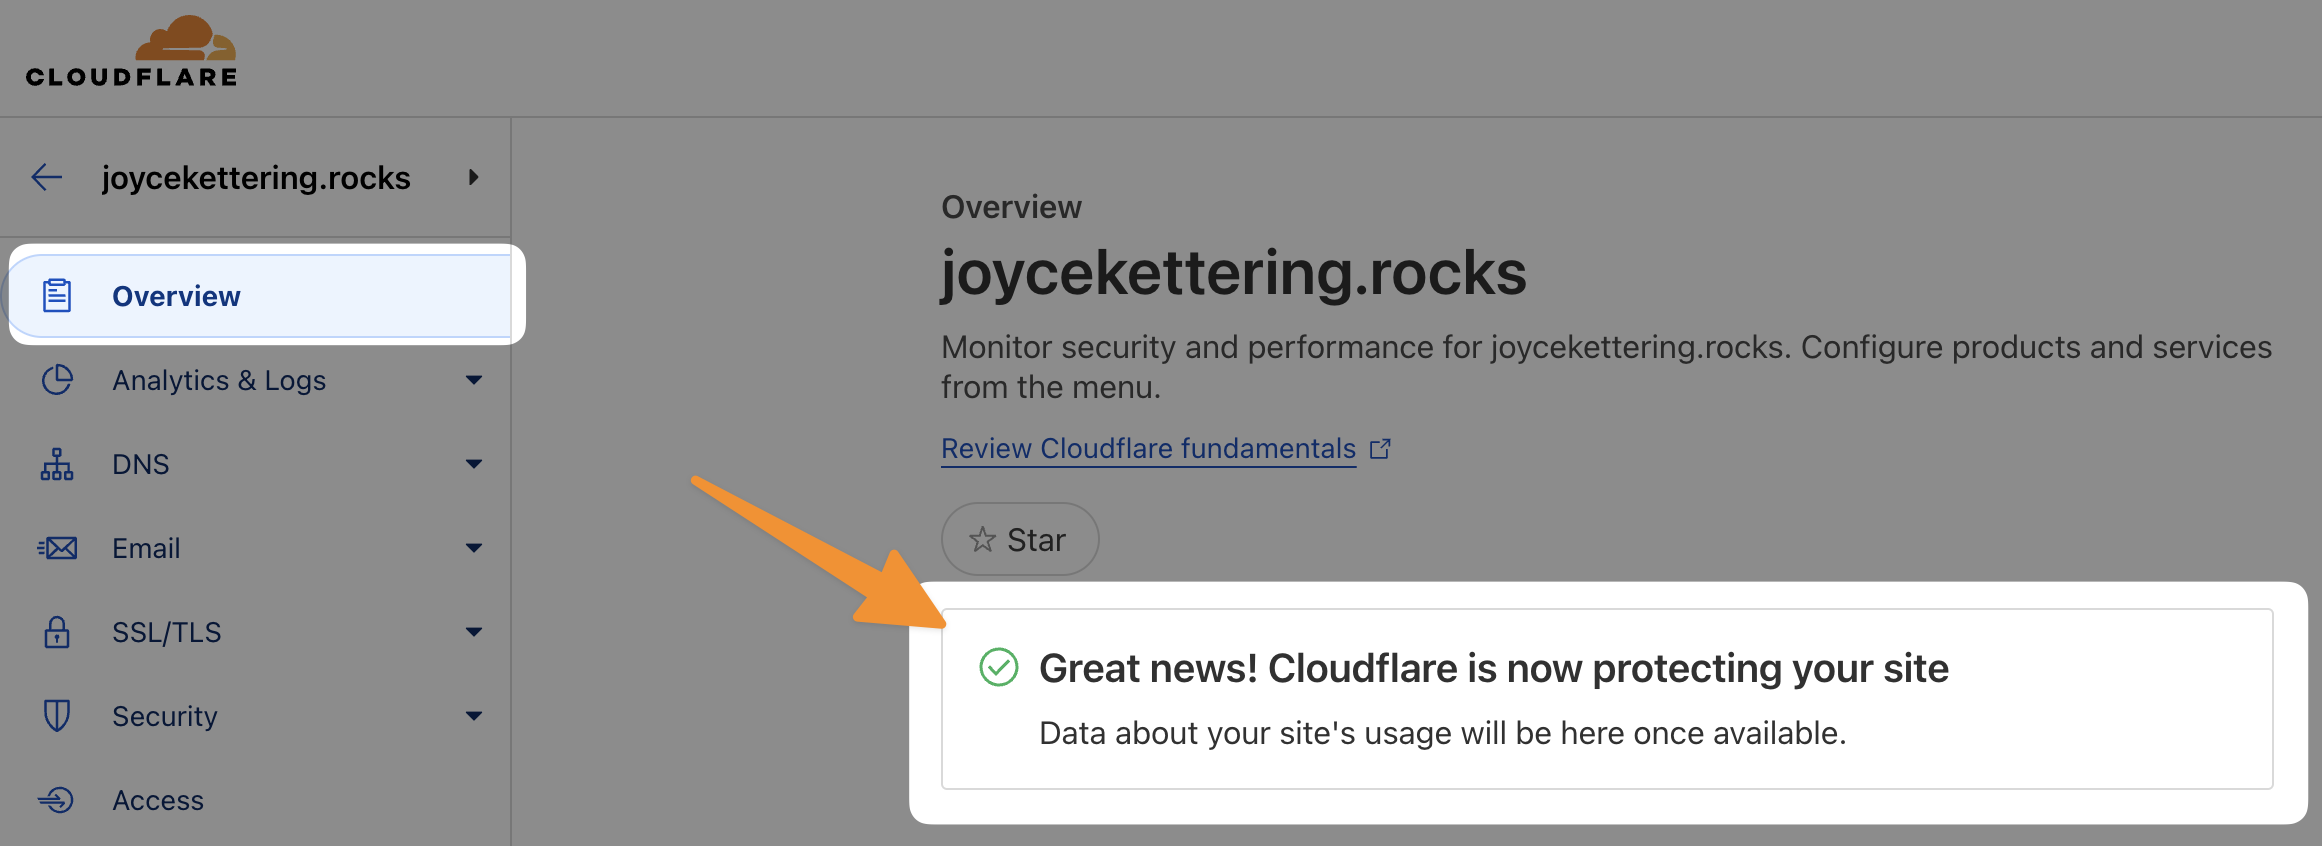
Once this process is complete, you should be able to see your DNS records in Cloudflare.
However, you'll still want to:
- ensure the two CNAME records provided by WeWeb are properly setup in Cloudflare
- create a new CNAME record to alias the root domain
- create a page rule to redirect users from your root domain to the
wwwsubdomain
Please refer to our step-by-step Cloudflare guide to ensure your DNS records are setup properly and create a redirection page rule.
GoDaddy
In your GoDaddy dashboard, go to My Products where you will find your list of domain names.
Click on DNS for the domain you want to add to WeWeb:

On the DNS management page, click on Add:
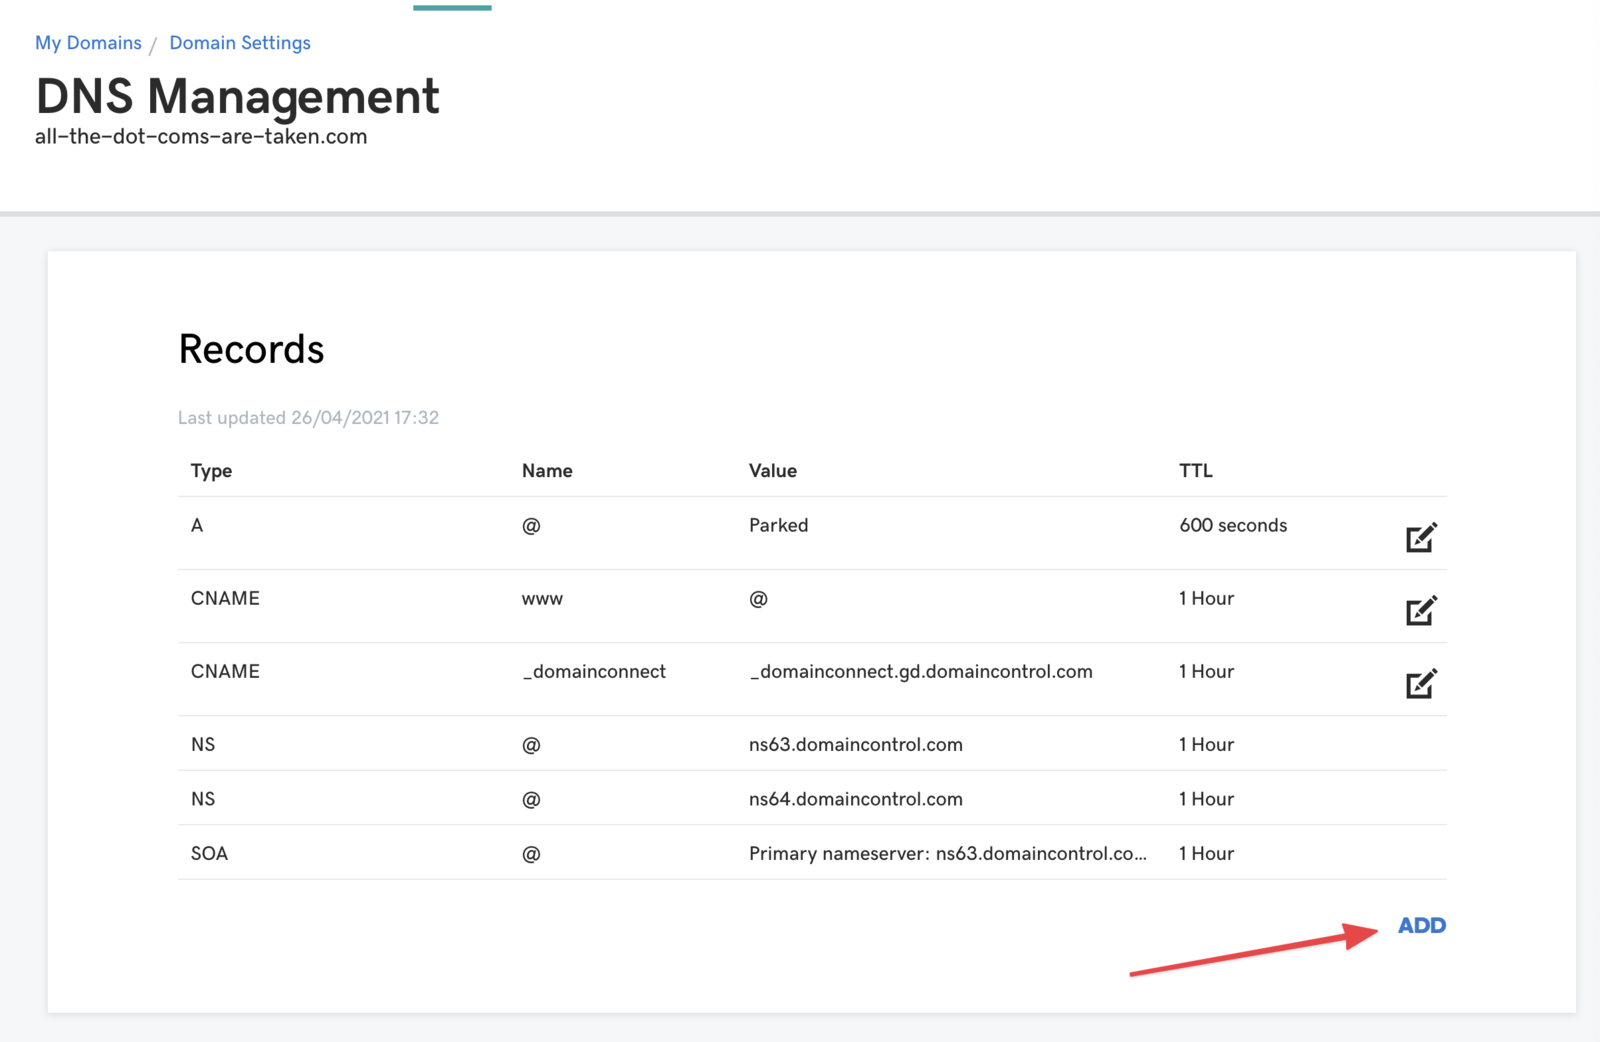
Add 2 records like the following images:
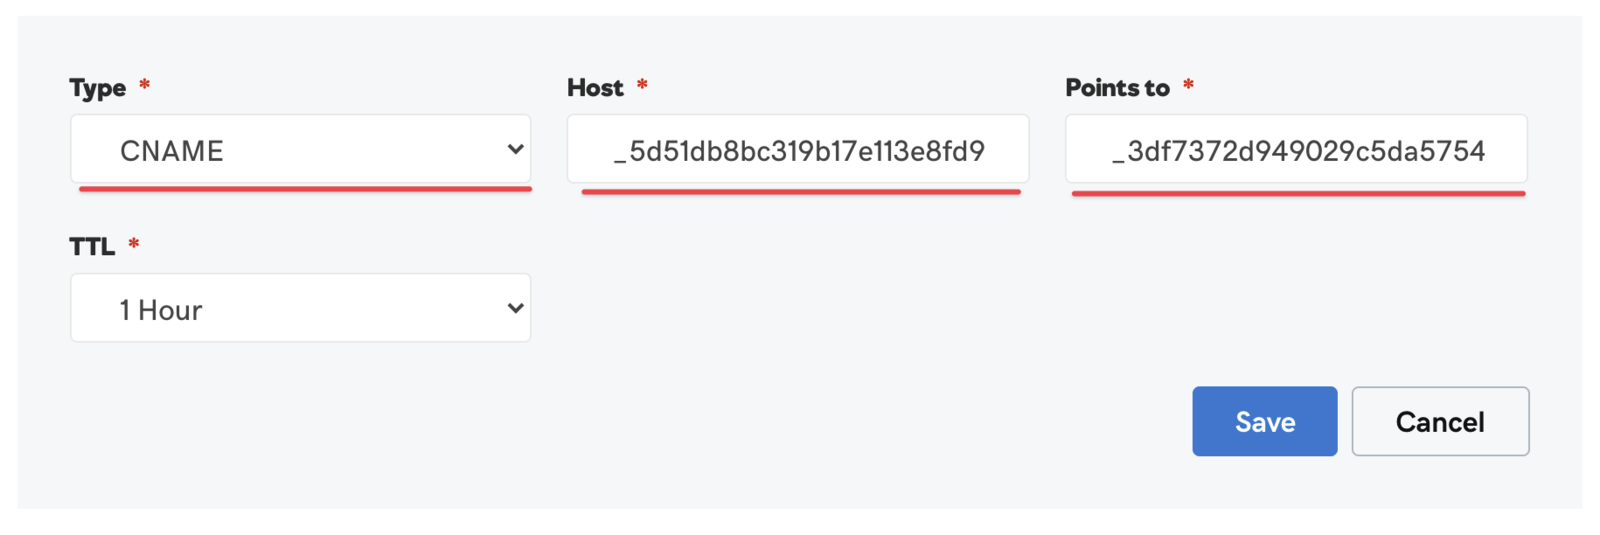

- Both records should be of
TypeCNAME - Replace
Hostby theNamevalue displayed in WeWeb - Replace
Pointsto by theDatavalue displayed in WeWeb
OVH
On your dashboard, go to Domain names, then click on the domain you want to link to WeWeb:

👉 Click on DNS Zone:

👉 Click on Add an entry to add two entries like the following images:

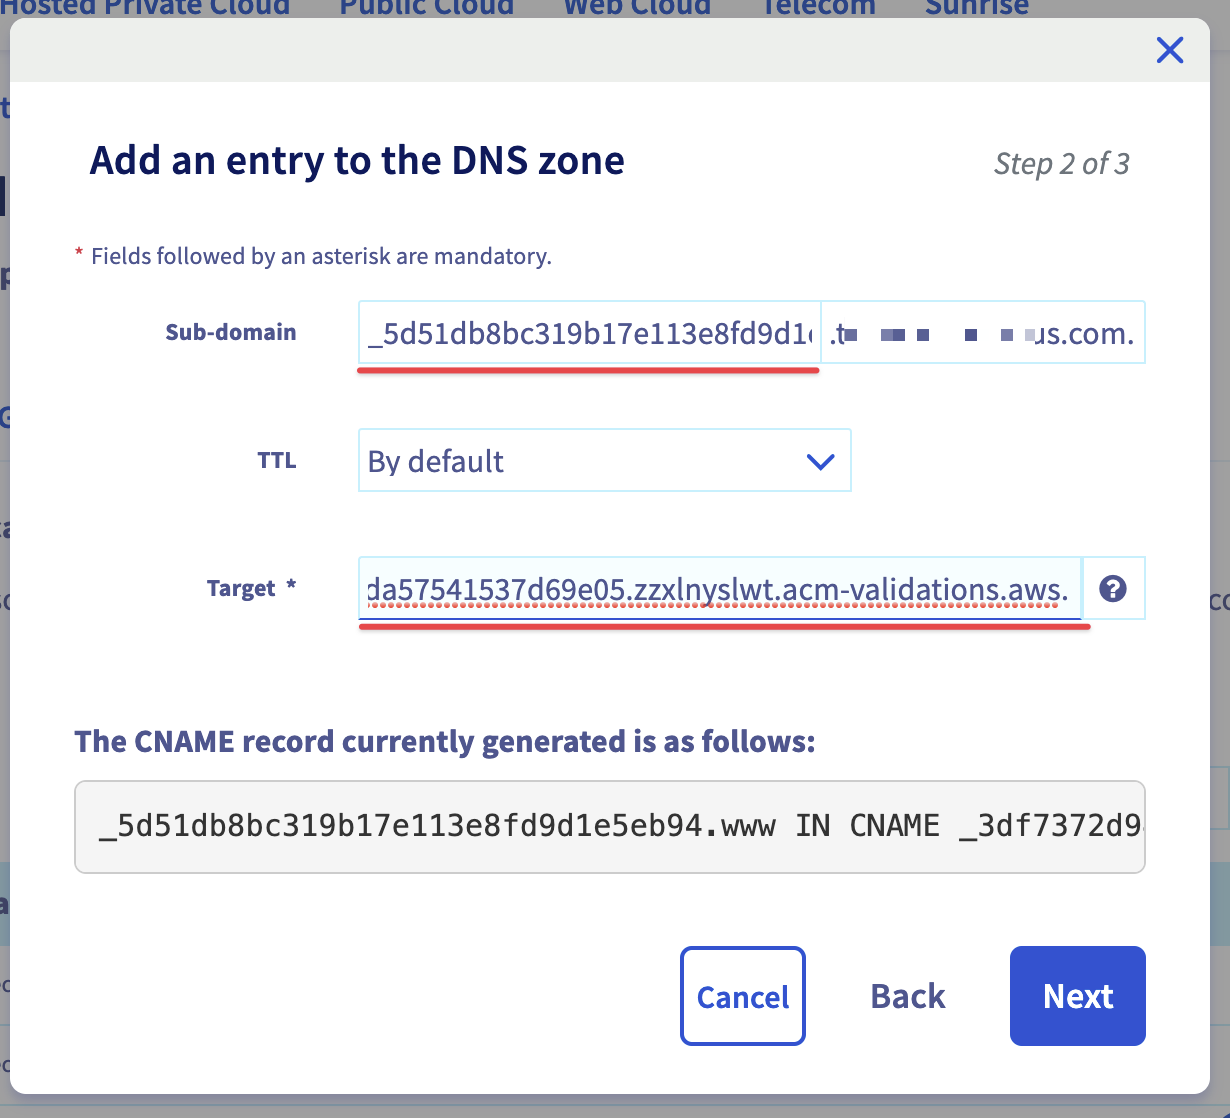
- Both records should be of
TypeCNAME - Replace
Sub-domainby theNamevalue displayed in WeWeb - Replace
Targetto by theDatavalue displayed in WeWeb
Google
Go to My domains in your Google domains dashboard, then click Manage next to the domain you want to add to WeWeb:

Click on DNS and scroll to Custom resource records:
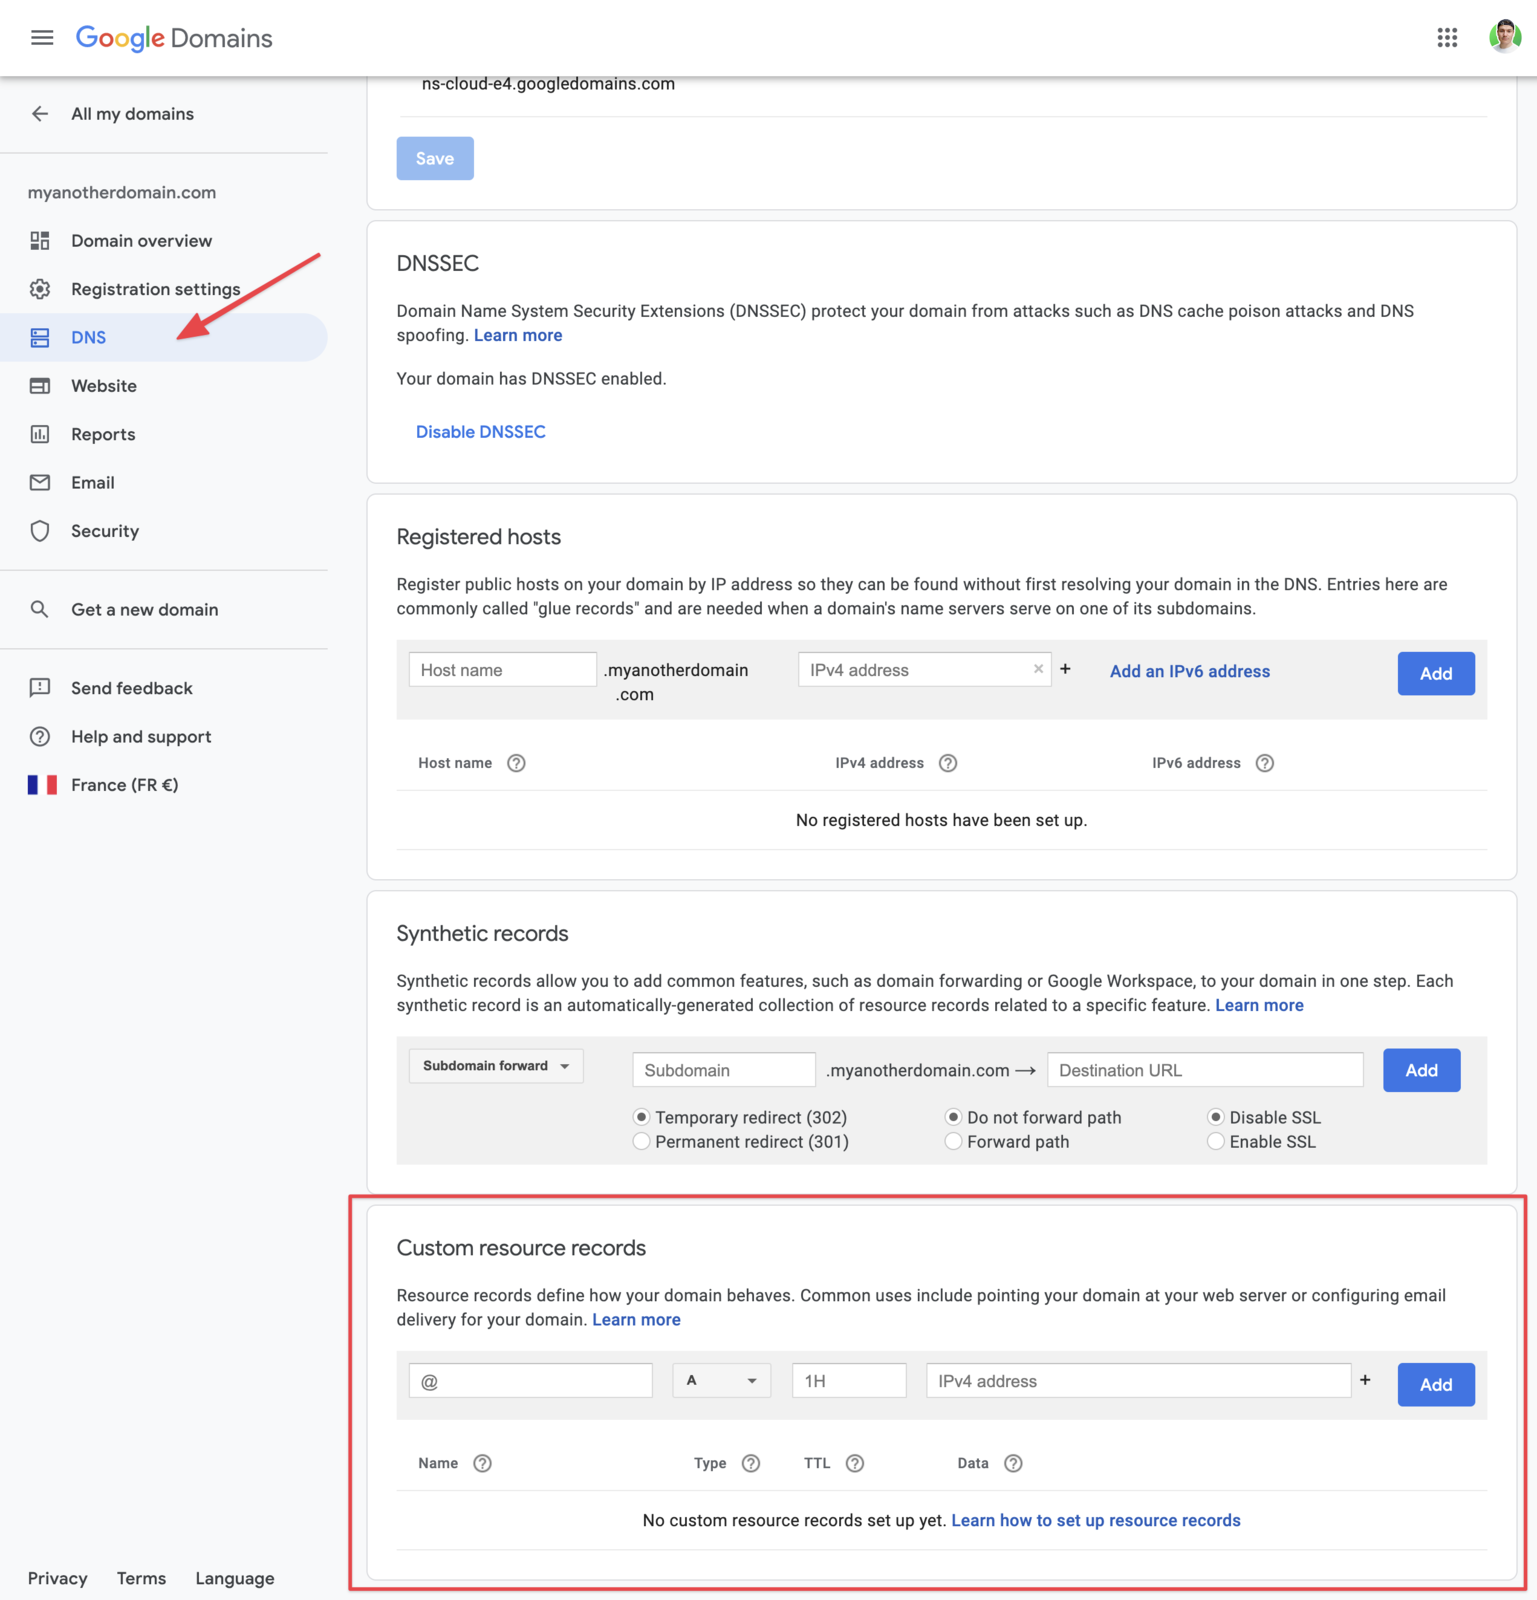
Add 2 records like the following image:
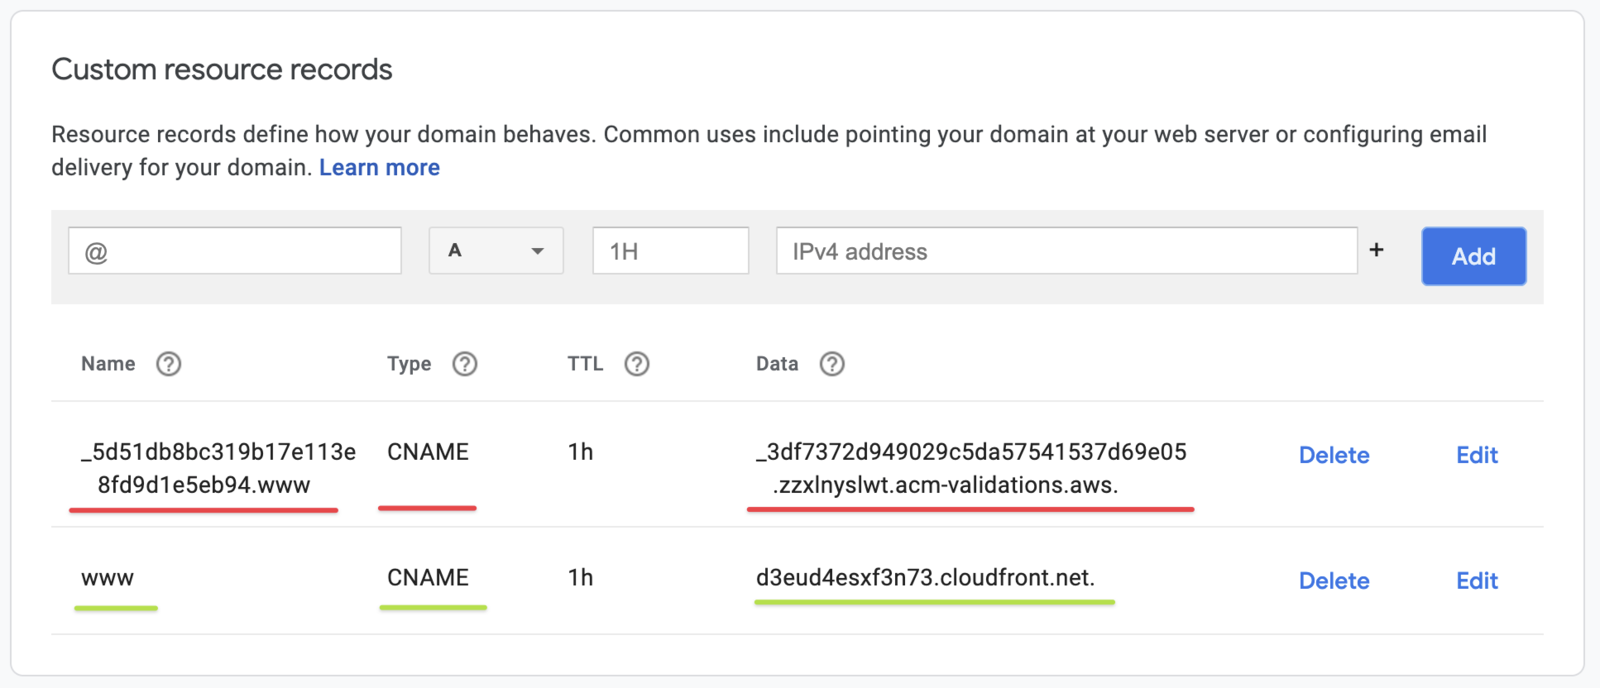
- Both records should be of
TypeCNAME - Replace
Name (@)by theNamevalue displayed in WeWeb - Replace
Data (Domain name)to by theDatavalue displayed in WeWeb
Gandi
Go to Domain in your Gandi dashboard, and click on the domain you want to connect to WeWeb:
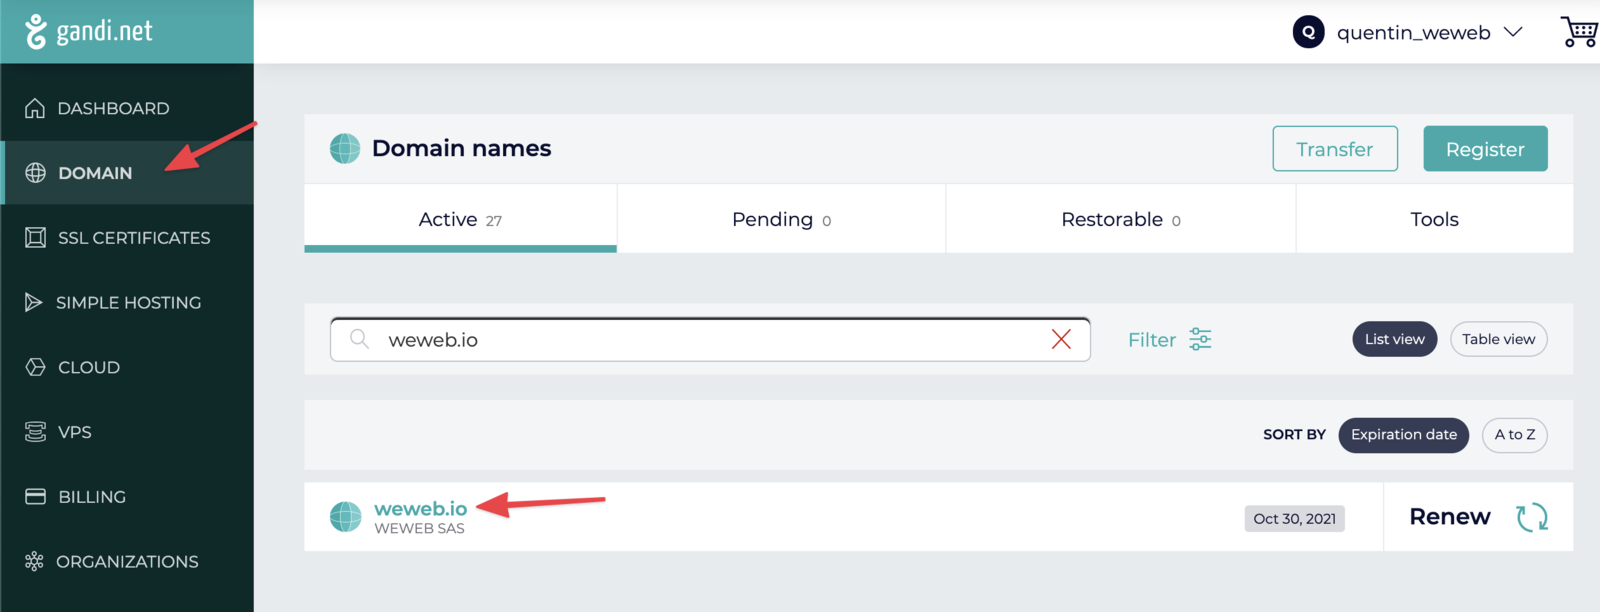
Click on DNS Records > Add:

Add 2 records like the following images:

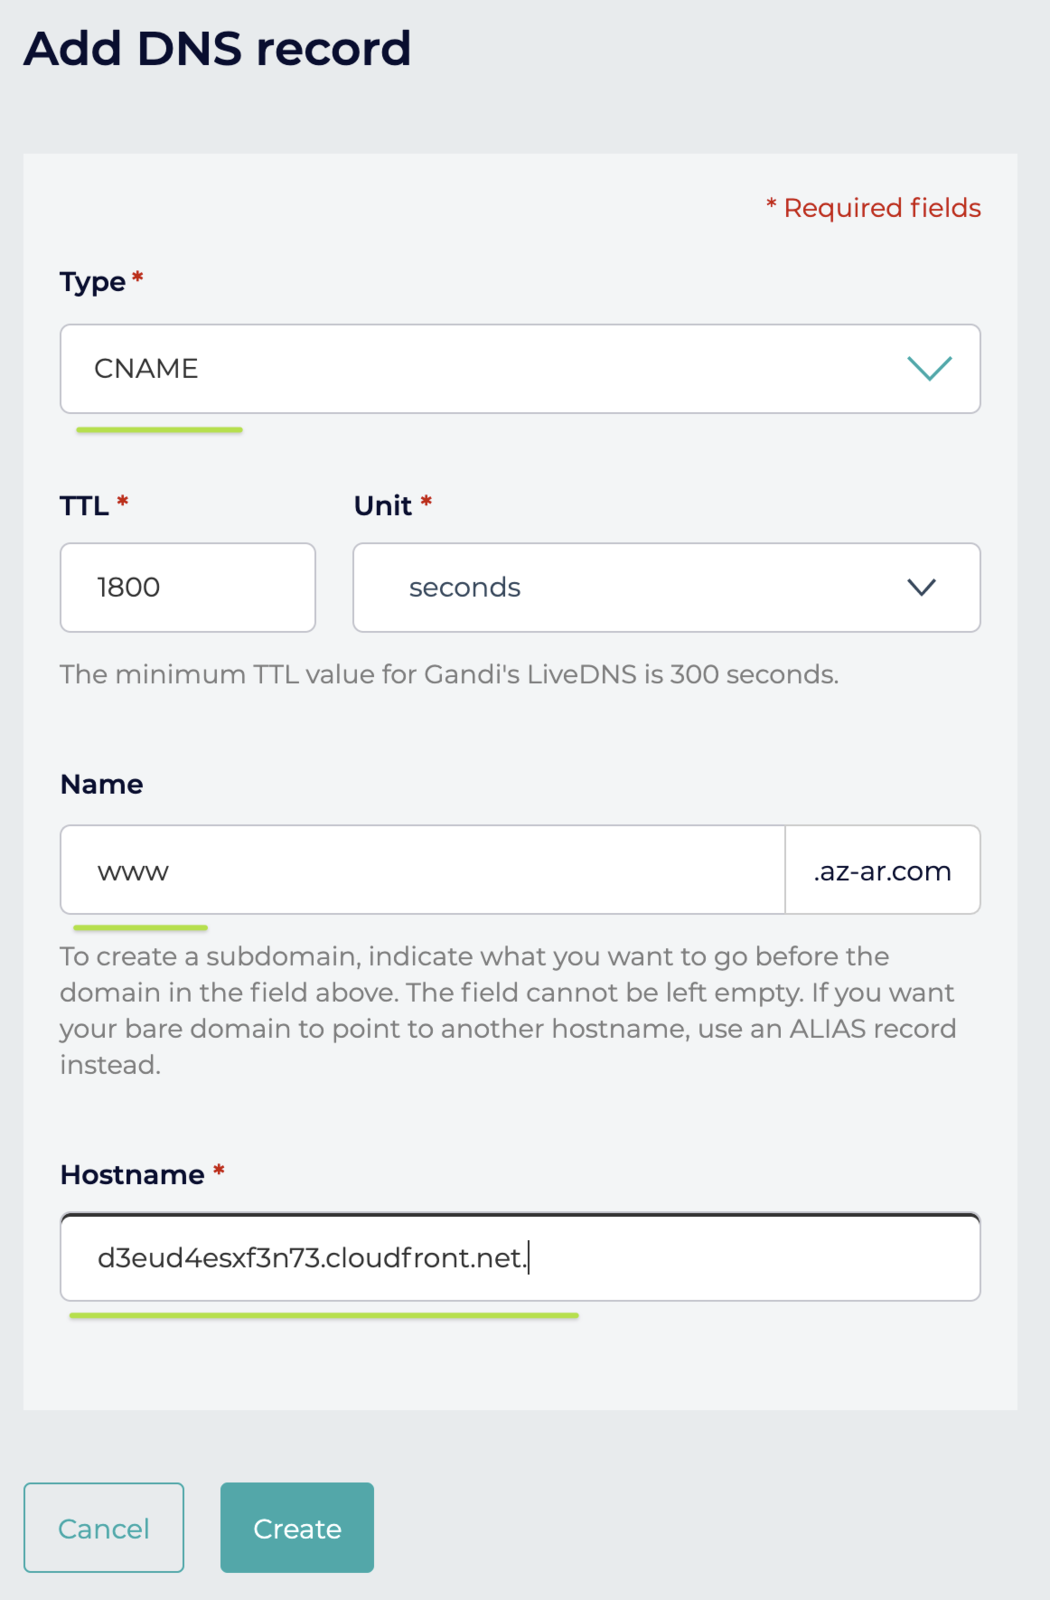
- Both records should be of
TypeCNAME - Replace
Nameby theNamevalue displayed in WeWeb - Replace
Hostnameto by theDatavalue displayed in WeWeb

