Appearance
OUTDATED PAGE
This page is outdated. Use Interface settings in the Settings tab, Assets, and the Workflows → App Triggers panel instead.
App settings
App settings are project settings used to build the application. For example, a custom domain is a project setting, but a On App Load workflow is an app setting.
To get to app settings, open the Settings tab in the top bar and click Interface Settings.
Mobile App (PWA)
In this tab, you can setup options so that your WeWeb app can be installed on a mobile device as a Progressive Web App.
Learn more about building and publishing a PWA in WeWeb.
App workflows
Here, you can execute workflows for some specific triggers:
On App Load (before fetching table views): Trigger a workflow when the app is loaded by a user for the first time (i.e. at the beginning of a user session), but before table views are fetched from your backendOn Page Load (before fetching table views): Trigger a workflow when a page is loaded by a user, but before table views are fetched from your backendOn App Load: Trigger a workflow when the app is loaded by a user for the first time (i.e. at the beginning of a user session), but after table views are fetched from your backendOn Page Load: Trigger a workflow when a page is loaded by a user, but after table views are fetched from your backendOn App Unload: Trigger a workflow when the app is unloaded by a user (i.e. at the end of a user session, when he's closing his/her browser's tab)
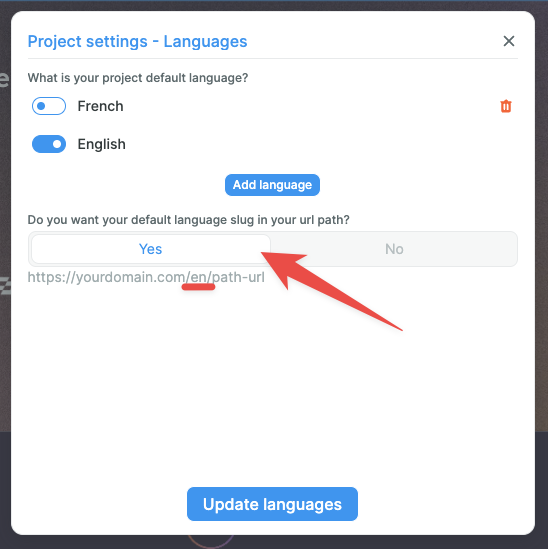
Page languages
Here, you're able to add new languages to your app, in addition to the default one that you selected when you created the app, by clicking the Add language button:

By using the toggle icons, you're also able to tell WeWeb which language should be your app's default one. Meaning that if a user lands on your live project and his/her browser's language doesn't match one of your app languages, the app will display in the default one.
In this example, if a user's browser isn't set to either English or French, the app will revert to English:

The last option tells WeWeb if your app's default language should be in your app's URLs paths.
By default, WeWeb creates URLs like this: https://{yourdomain}/{page-path}
But to navigate between languages, the lang code (ex: fr, en, es...) is added before the path, like so: https://{yourdomain}/{lang}/{page-path}
By setting this option to Yes, the lang code will also appear in the URLs for the default language:
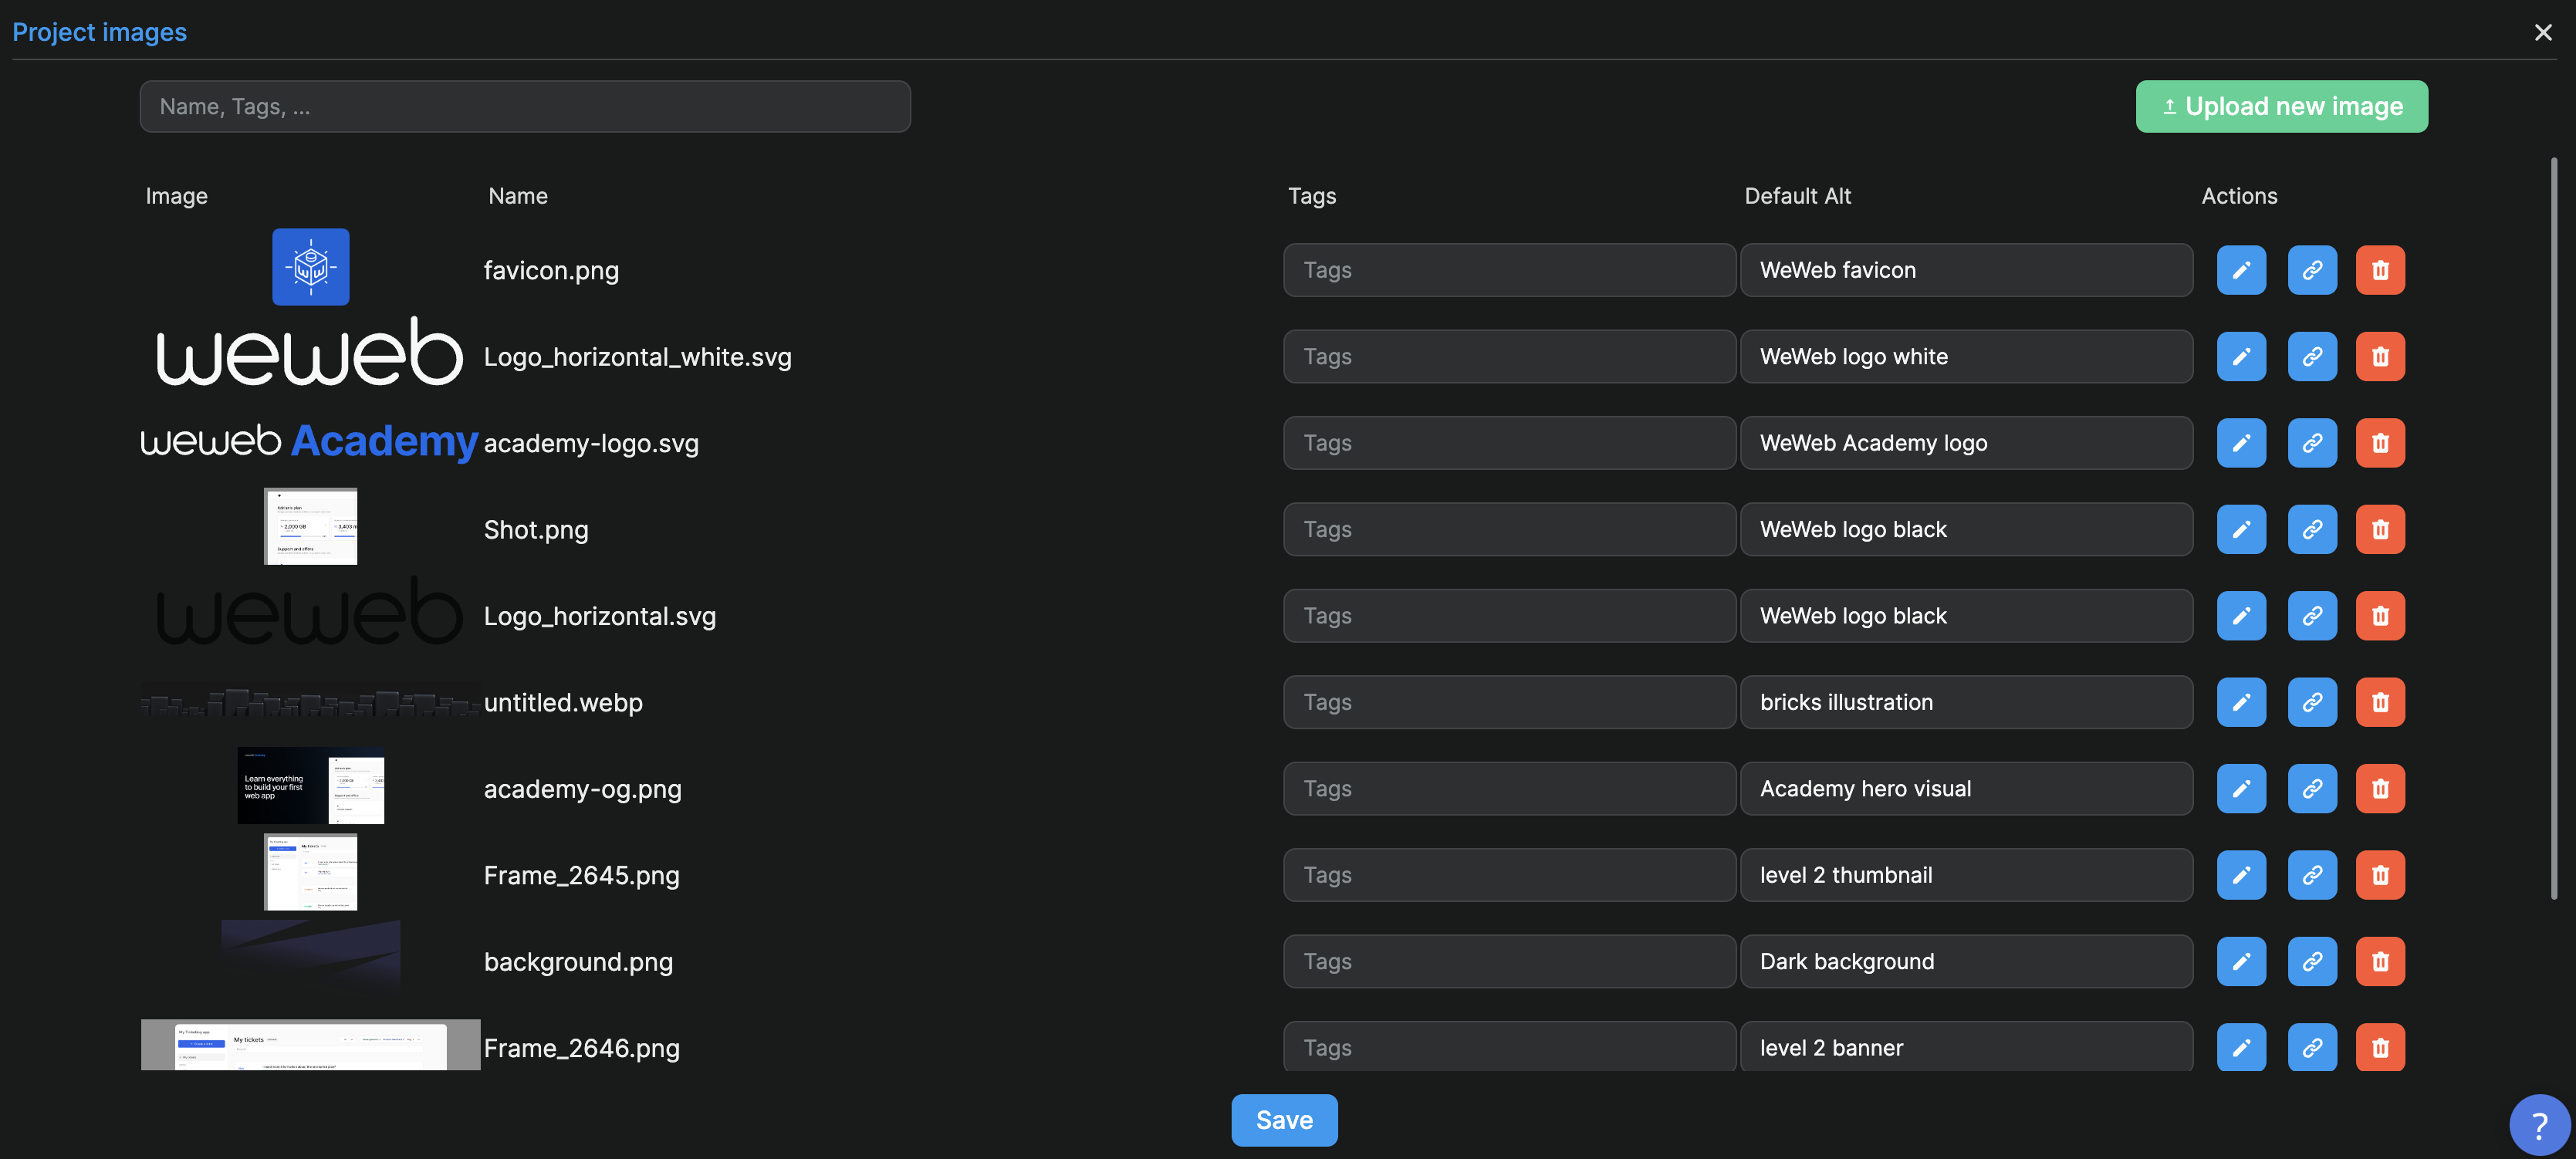
Images
In the Images sub-menu, you can find all the images that were uploaded into the project which are currently used to build the app, and hosted on WeWeb's servers:
Files
The Files sub-menu allows you to upload various types of files to WeWeb's CDN:

Common examples include but are not limited to:
- A custom sitemap, robots.txt file or PWA manifest,
- Verification files for third-party providers such as Apple Pay,
- Static files (e.g. PDFs and CSVs) to display in or download from the app.
Features of the Files Sub-Menu
- Set File Path: Define the file's path on your published app.
- Copy File Link: Quickly copy the link to any uploaded file.
- Download Files: Retrieve any file you previously uploaded.
- Remove Files: Delete any file from the WeWeb CDN.
Set file paths
When you set a path for a file, it becomes accessible at that location within your published project.
For example, if your WeWeb app is connected to mydomain.com and you upload best-sitemap-in-town.xml, setting its path to /sitemap.xml will make it available at mydomain.com/sitemap.xml. This action will override the default sitemap generated by WeWeb.
Removing Files
To remove a file from the published app's path, simply delete the set path and republish your app. Note that the file will still be available via its direct CDN link and should be manually removed from the CDN if no longer needed.
User files vs app files
While it is possible to store user files to WeWeb's CDN, it's best practice to store user-related data in a backend system. This approach offers greater flexibility for scaling storage solutions and ensures files can be secured with appropriate user access controls.
Fonts
In the Fonts sub-menu, you can:
- Find all the fonts currently used in your app,
- See or choose the default font of your app, and
- Add new fonts to your project.
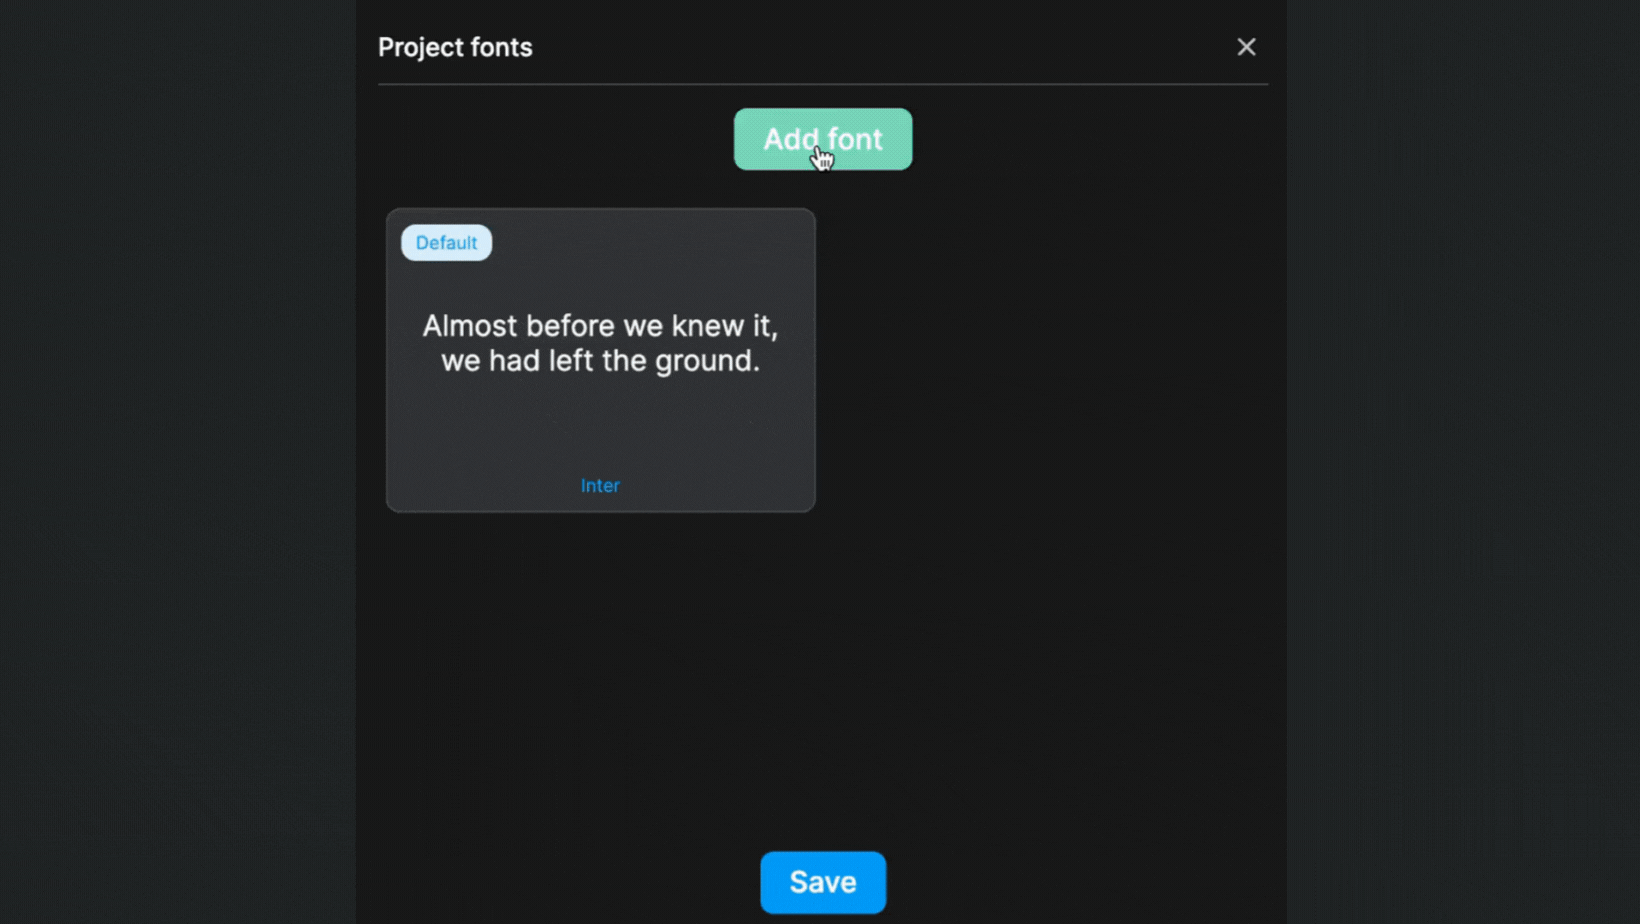
TIP
When you change the default font of your app, it will be reflected on all the text elements where the Font family is Default.
Font icons (deprecated)
In the Font icons (deprecated) sub-menu, you can find the icon sets that are active in your app. By default, you've got access to WeWeb regular icons, Fontawesome and Heroicons icon sets.
Deprecated
The font icons have now been deprecated.
For the new, updated way of adding icons, please refer to the icon element's documentation.
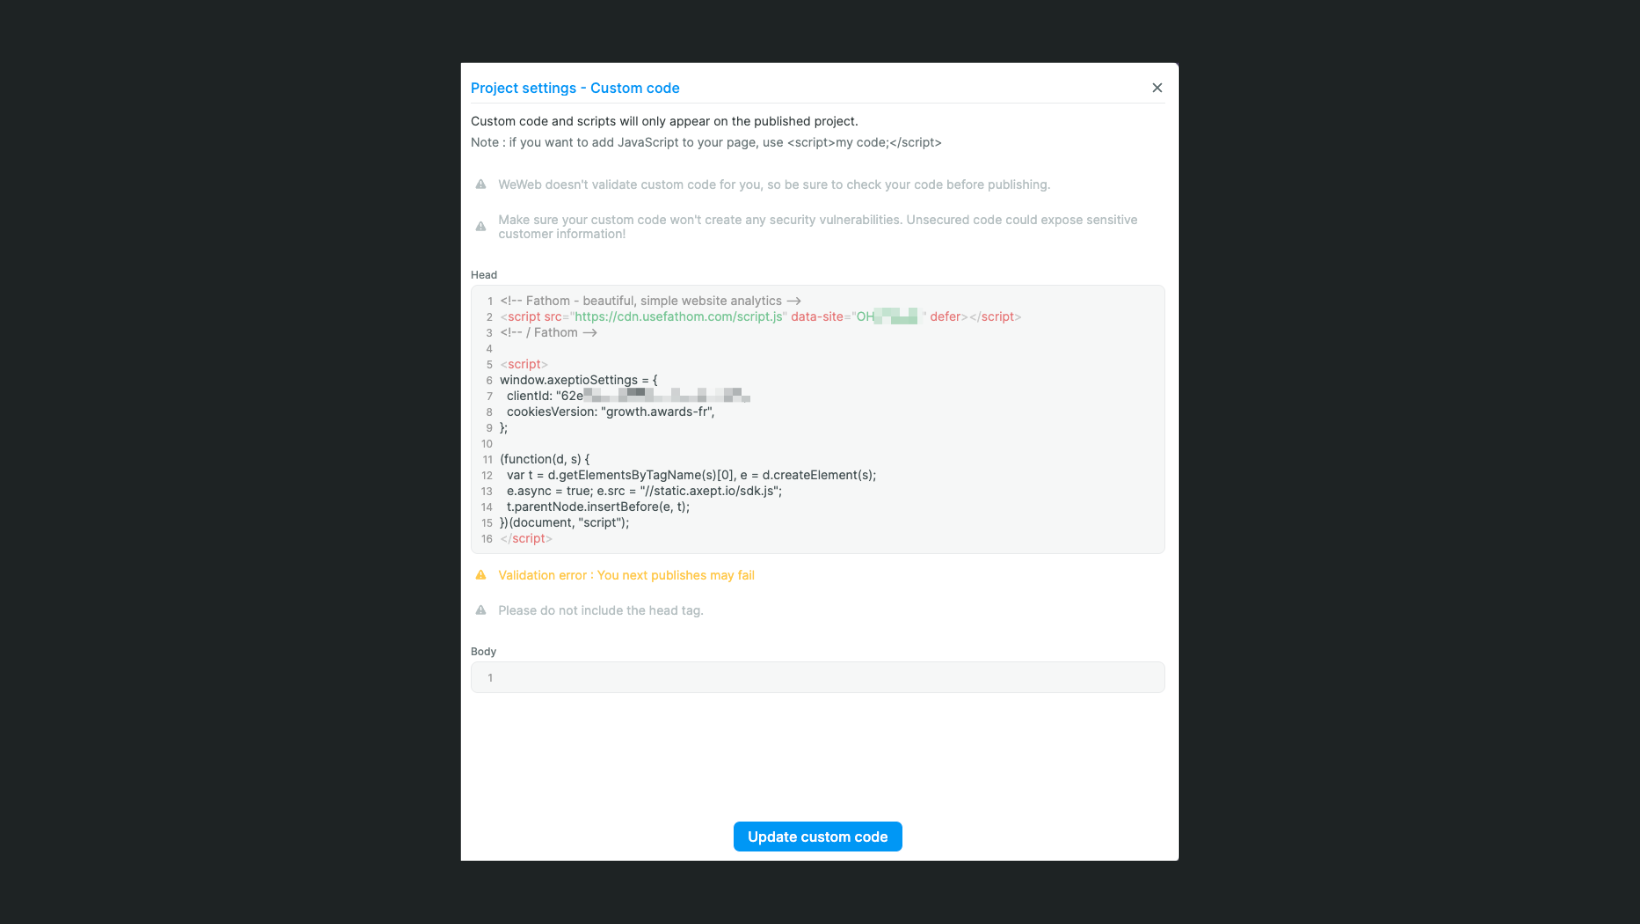
Custom code
Here you can add some custom code (HTML, CSS or JavaScript) that will be added to all your project's pages.
It's were you typically want to add a global CSS style or scripts from external tools like Google Analytics, Intercom chatbox, or Axeptio, to name a few.
You have the availability to add the scripts in the head or the body of the page:
TIP
Add the scripts in the header if you need them to be loaded before the rest of the page by the end user's browser. But add them in the body if they're not critical and to get better pagespeed, hence, better SEO performances.
WARNING
This is an advanced behavior. You can break your app if you don't know what you're doing or adding unknown scripts.
WARNING
When you add custom CSS to a page or project, you should not add any <head> or <body> tags. WeWeb handles those tags for you.
Redirections
Redirections are used when you want a path on your domain to redirect to another URL (be it on your domain or any other external URL).
It's especially useful for SEO, when you're switching from a former app/site to a WeWeb app.
Let's say that you used to have a page's URL at https://{yourdomain}/hello-world that you want to redirect to your WeWeb project's home page.
It would look something like this: 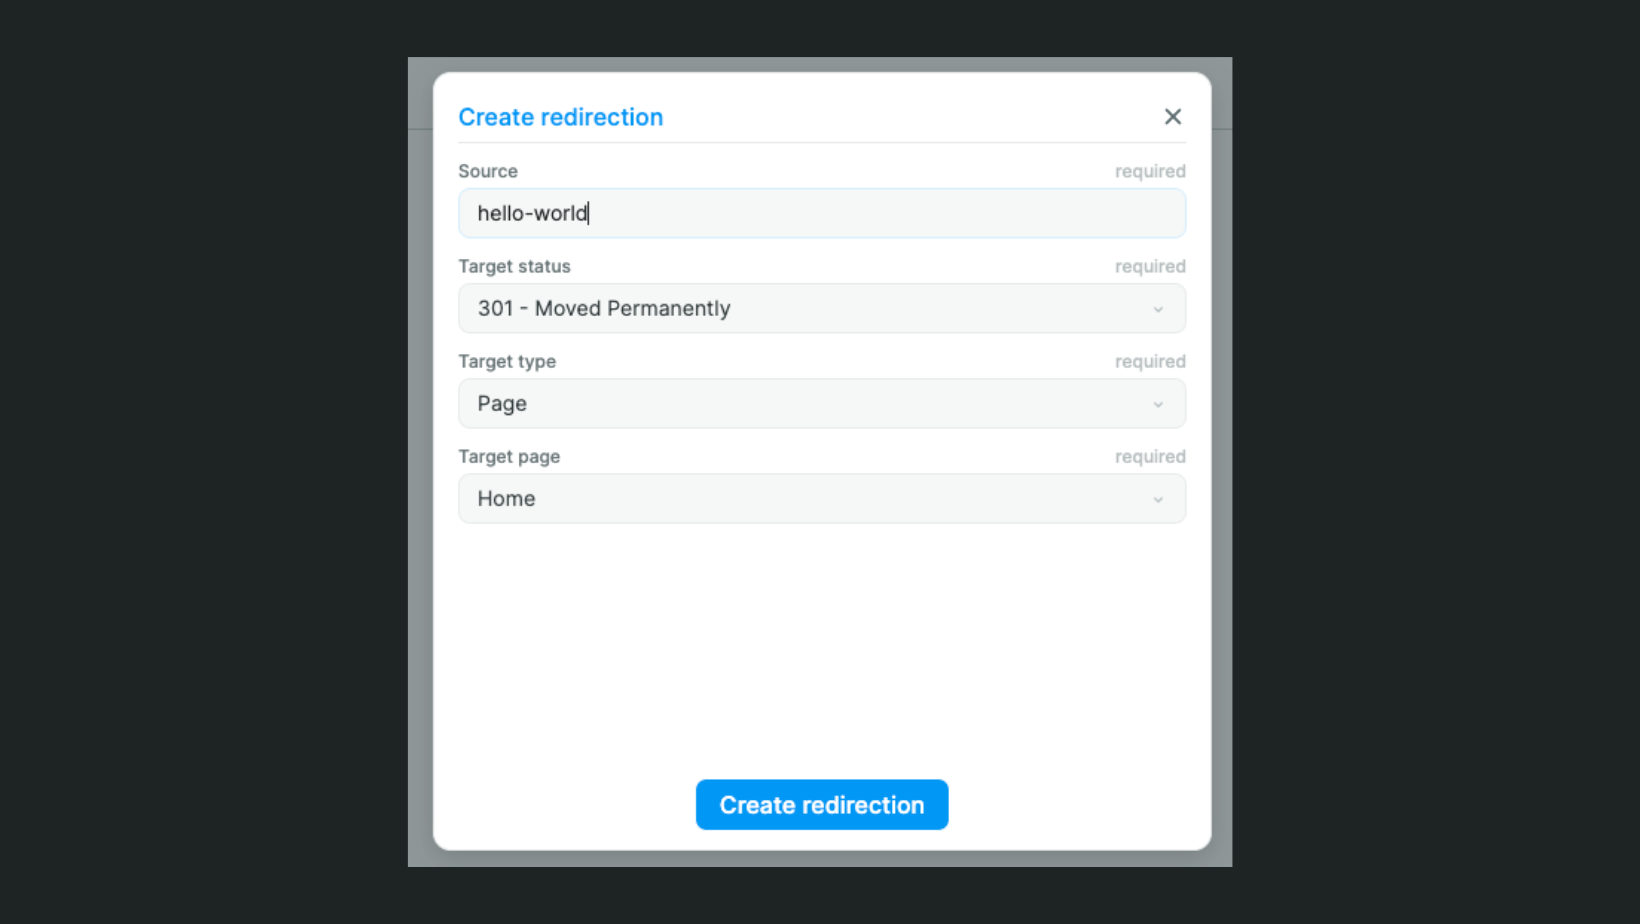
The Source is the path you want to redirect (not the full URL but the path after the domain name).
The Target status is the HTTP status code you want to trigger on redirect (you can refer to MDN docs for this).
The Target type is the Page to redirect to a page in your current app or External URL to redirect to any URL on the web.
The Target page or Target URL is the page in your WeWeb project or external URL you want to redirect to.
TIP
90% of the time, when you want to do an SEO redirect, use a 301 redirect to forward Google's page rank and link juice to the new URL.
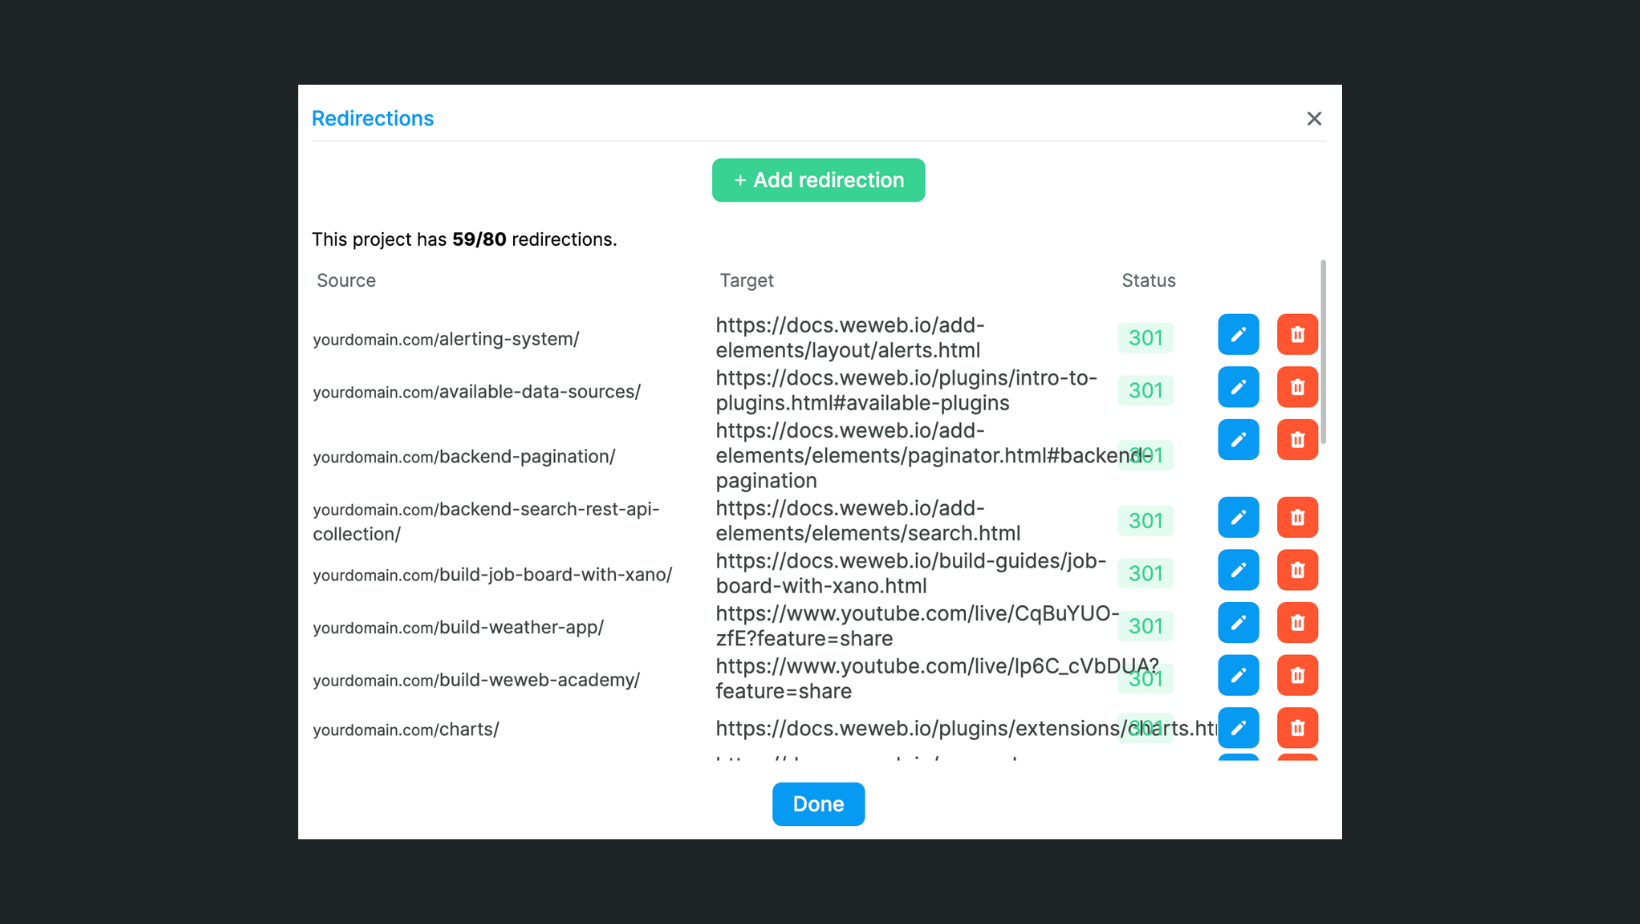
Once you added redirections in a project, they will be displayed in the Redirections tab:
Headers
In this section, you can:
- Control if & how your WeWeb app can be embedded in an iframe.
- Add custom headers to your published project.
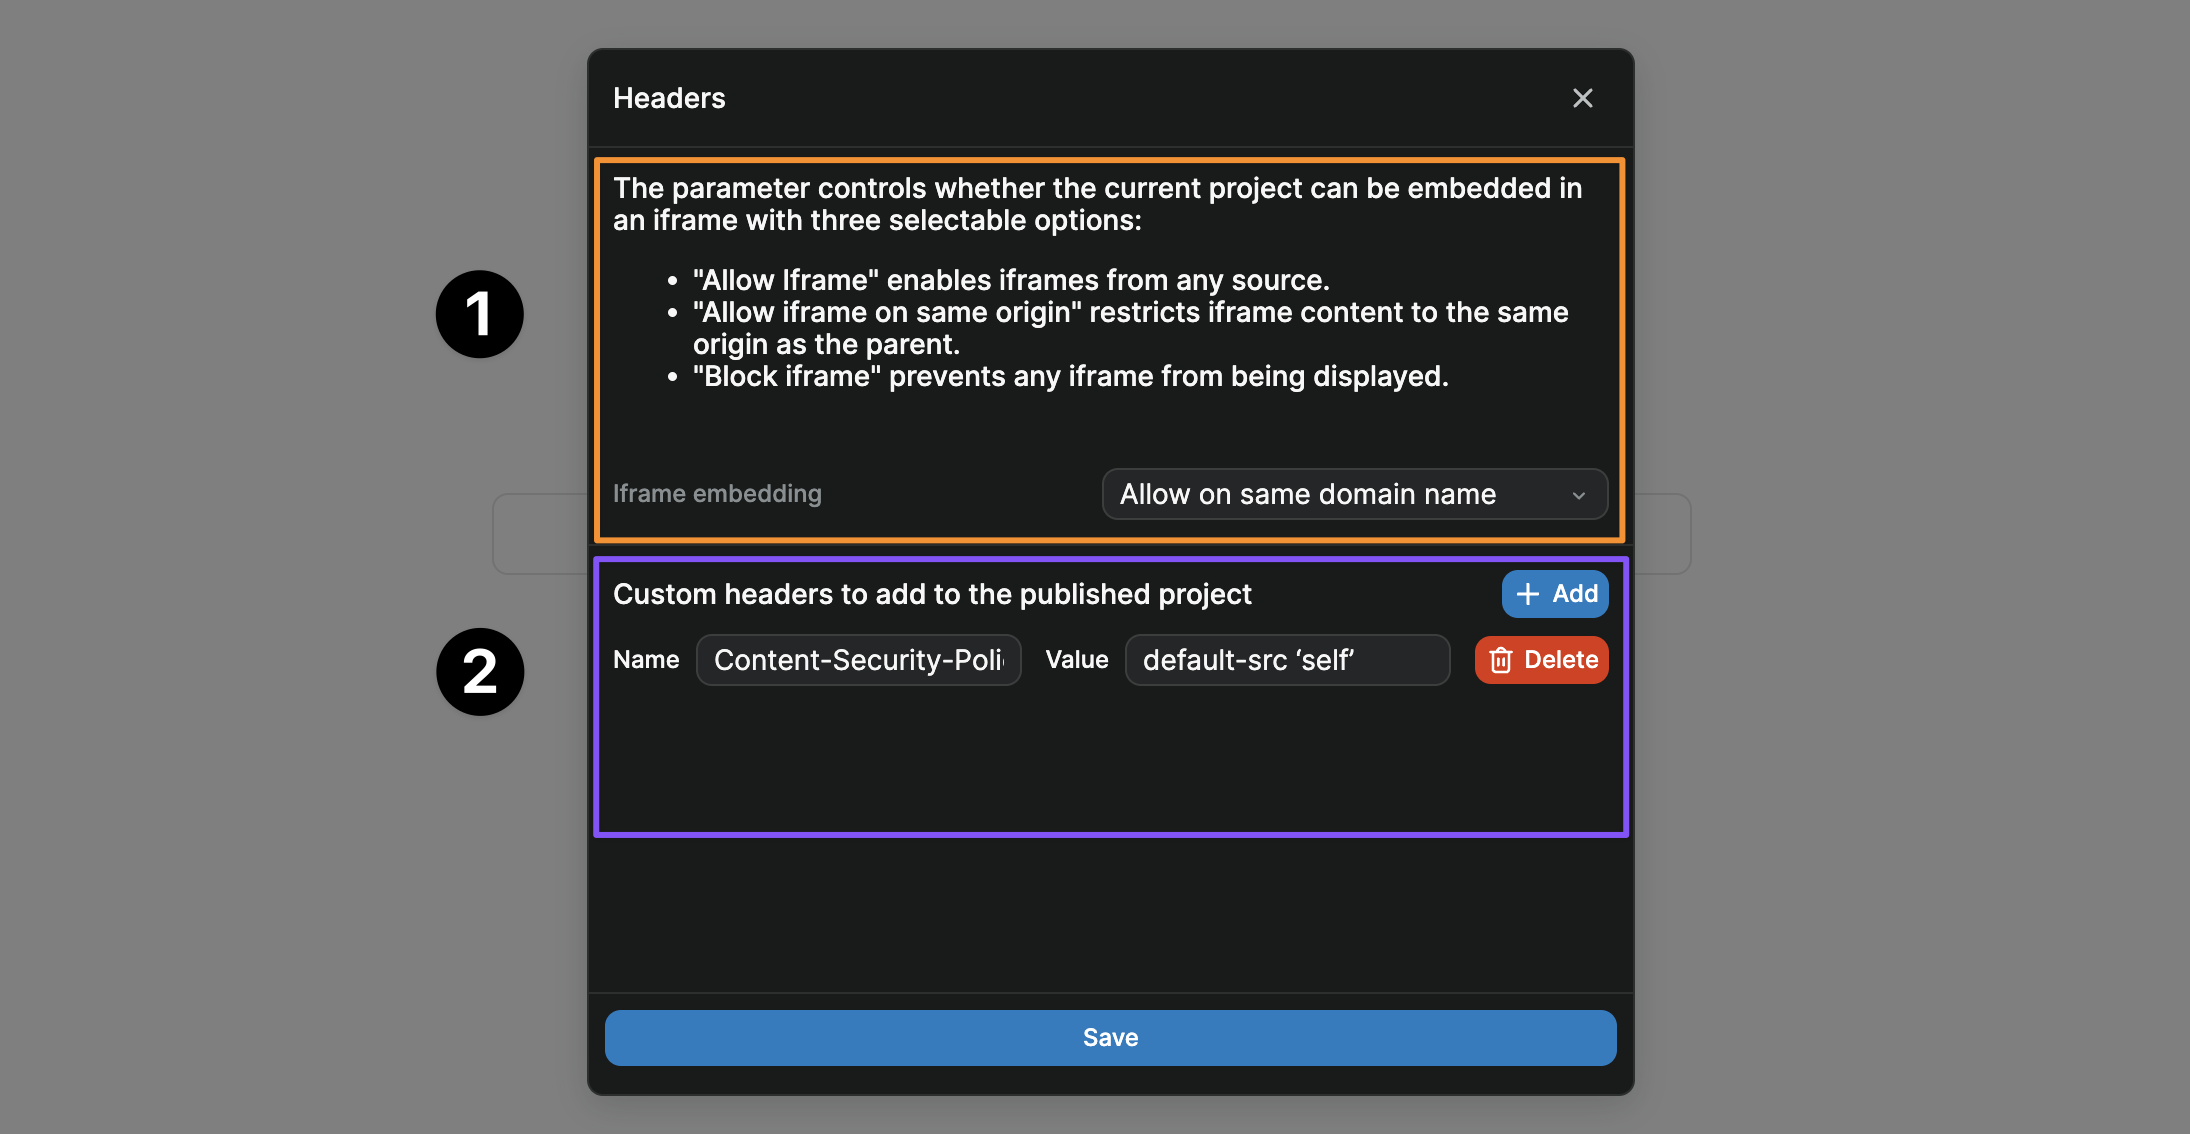
Iframe embedding
By default, once published, your WeWeb app can be embedded in an iframe.
Here, you can:
- Decide if you want to allow iframe embedding for your WeWeb app,
- Allow it only on the same domaine, or
- Block it.
Custom headers
Here, you can add custom headers to your WeWeb app. In the example above, we started configuring a Content Security Policy.
Base tag
WARNING
Changing the base tag is an advanced feature that should be used if you 100% know what you're doing. You can totally break your app by changing it.
Changing the base tag is useful when you're hosting your WeWeb app yourself, on a specific subpath.
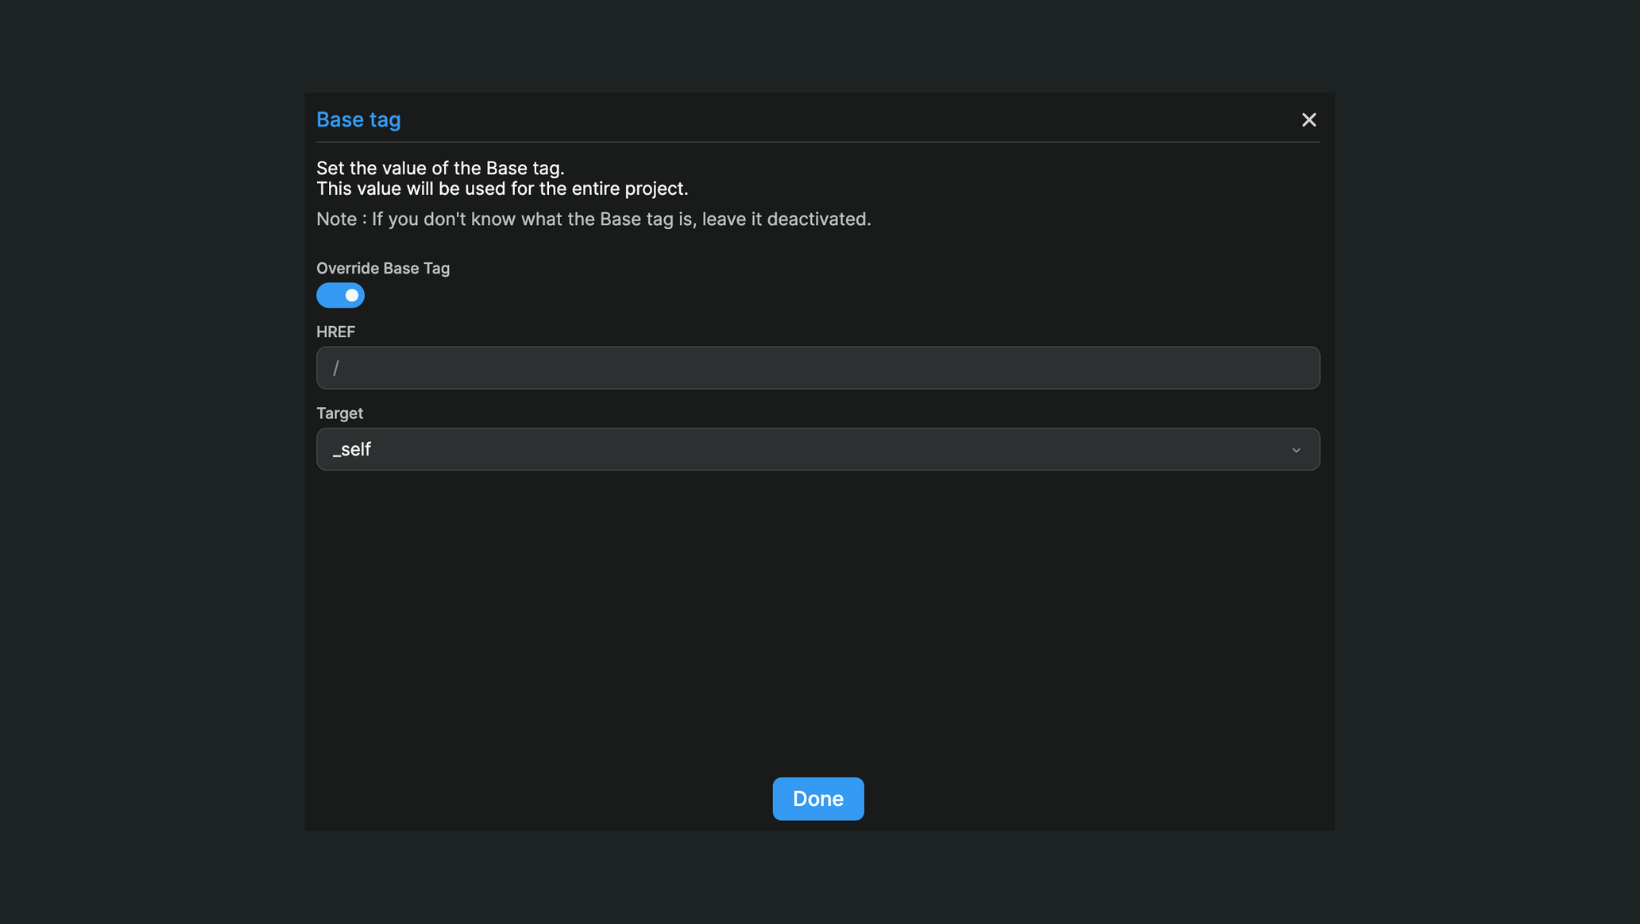
To learn more about base tags, please refer to MDN docs.
Project plans
This is will open the Project plans tab where you can choose a different project plan:

TIP
To switch to a different workspace plan, you'll need to go to the Members tab in your workspace dashboard:

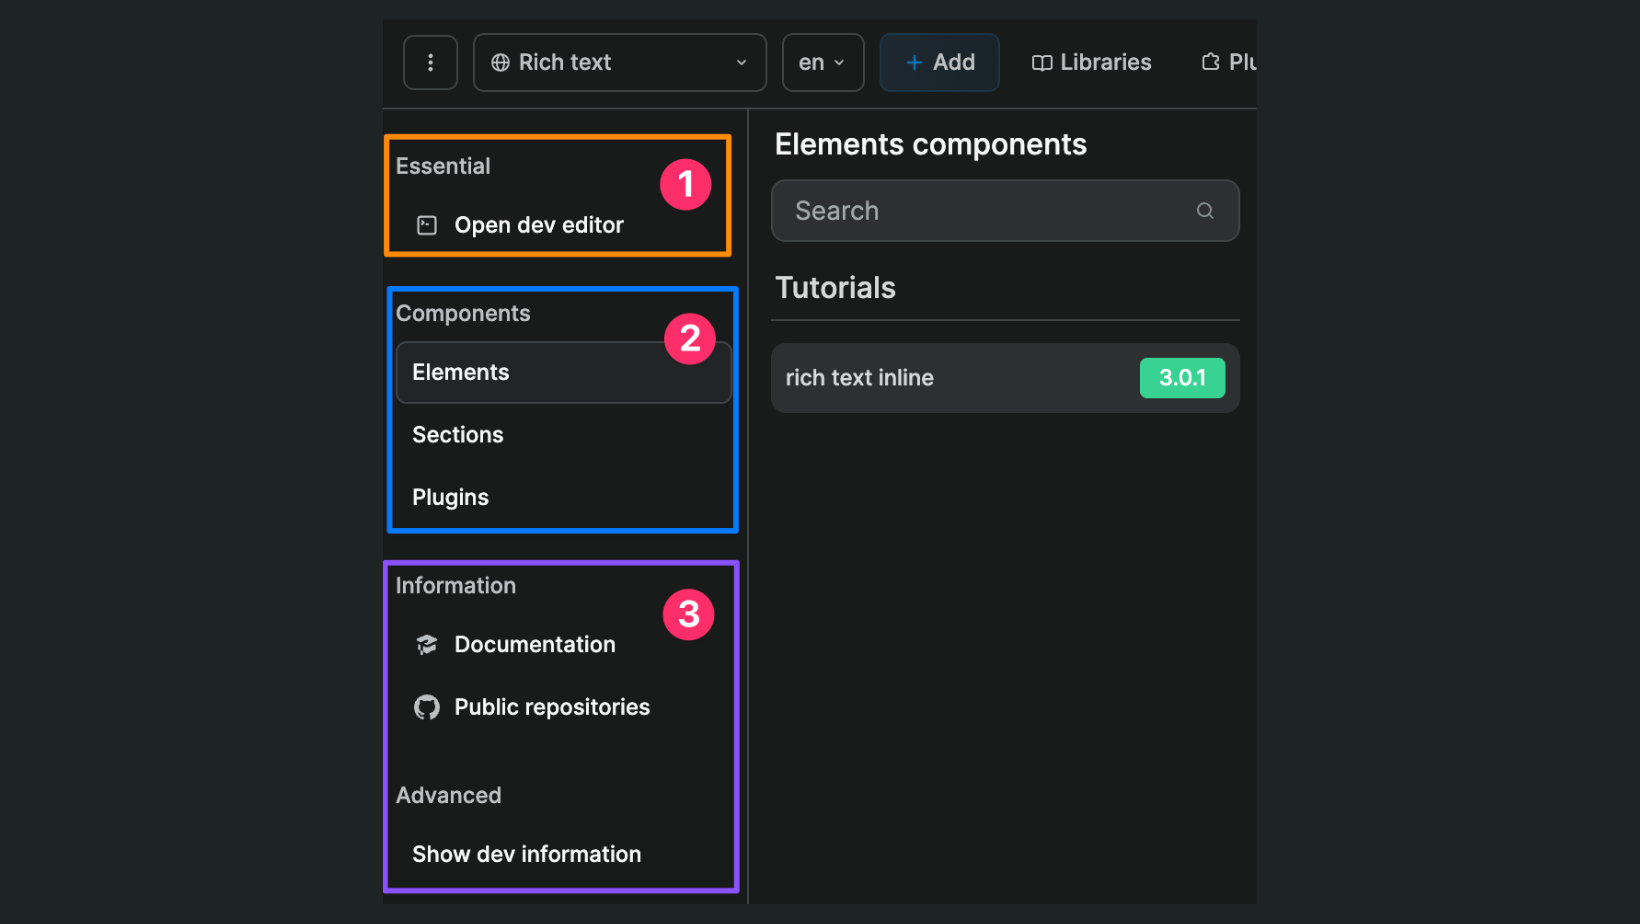
Development
This will open the Development panel where you can:
- Open the WeWeb dev editor,
- View the custom elements, components, and plugins you added to the project, and
- Learn more about developing custom components in WeWeb.