Appearance
USE THE CURRENT SUPABASE GUIDE
This page describes an older Supabase auth plugin flow.
For current projects using the Authentication subtab in Data & API, use Supabase (Authentication System) →.
Supabase authentication
WARNING
The video above was recorded before the latest WeWeb UI update but the logic remains the same. If you're unsure where to find something in the new interface of the WeWeb editor, you can see what changed here.
Plugin configuration
Supabase comes with an in-built authentication system which you can use in WeWeb.
To add the Supabase Auth Plugin in WeWeb, go to Plugins > Authentication:
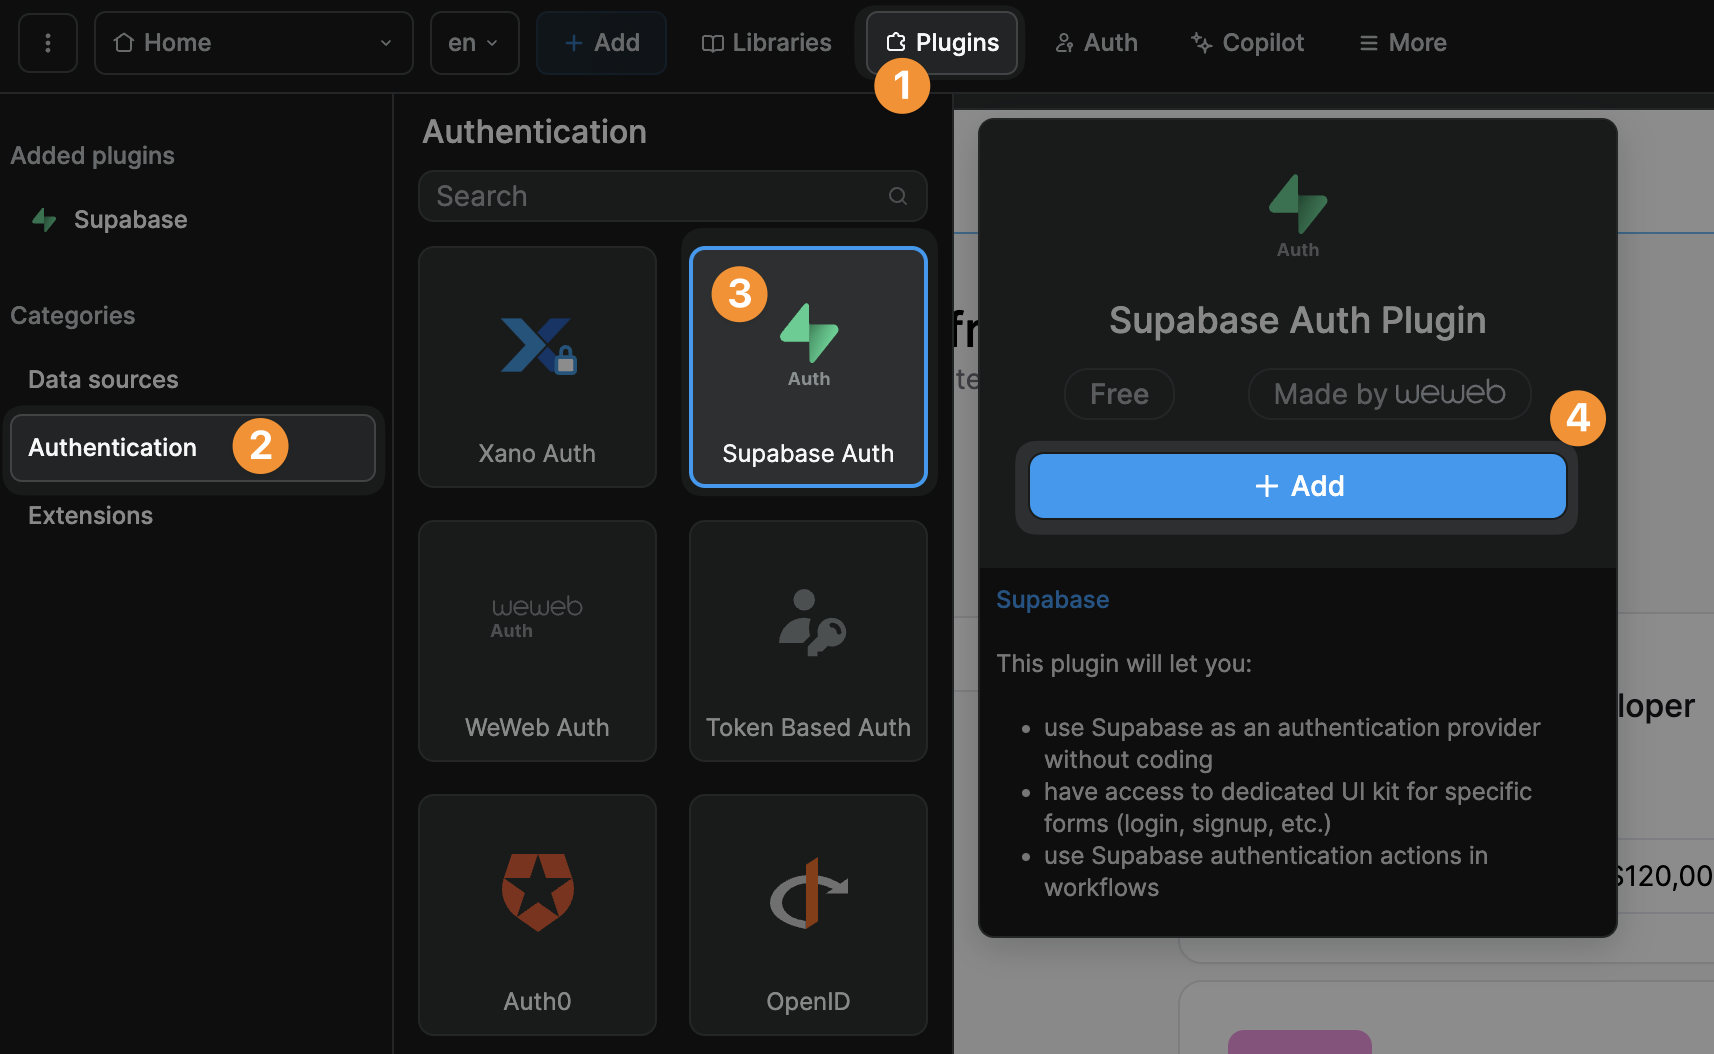
If you have already connected the Supbabase data source plugin, then your Supabase project will be connected for the auth plugin. However, if you have not, these are the steps:
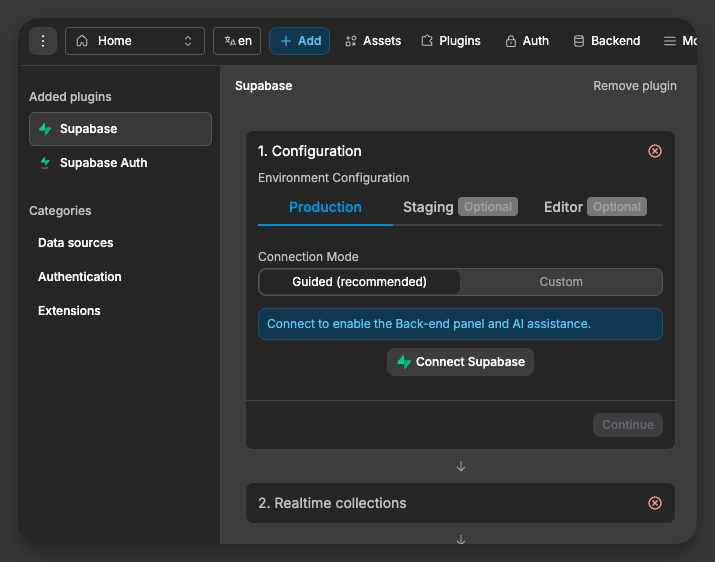
1) Choose your environment and connect
Start by selecting the tab in Environment configuration that you want to set up: Production, Staging (optional), or Editor (optional). This allows you to connect different Supbase projects for each environment if you wish.
Pick your Connection mode (Guided or Custom) and click Connect Supabase.
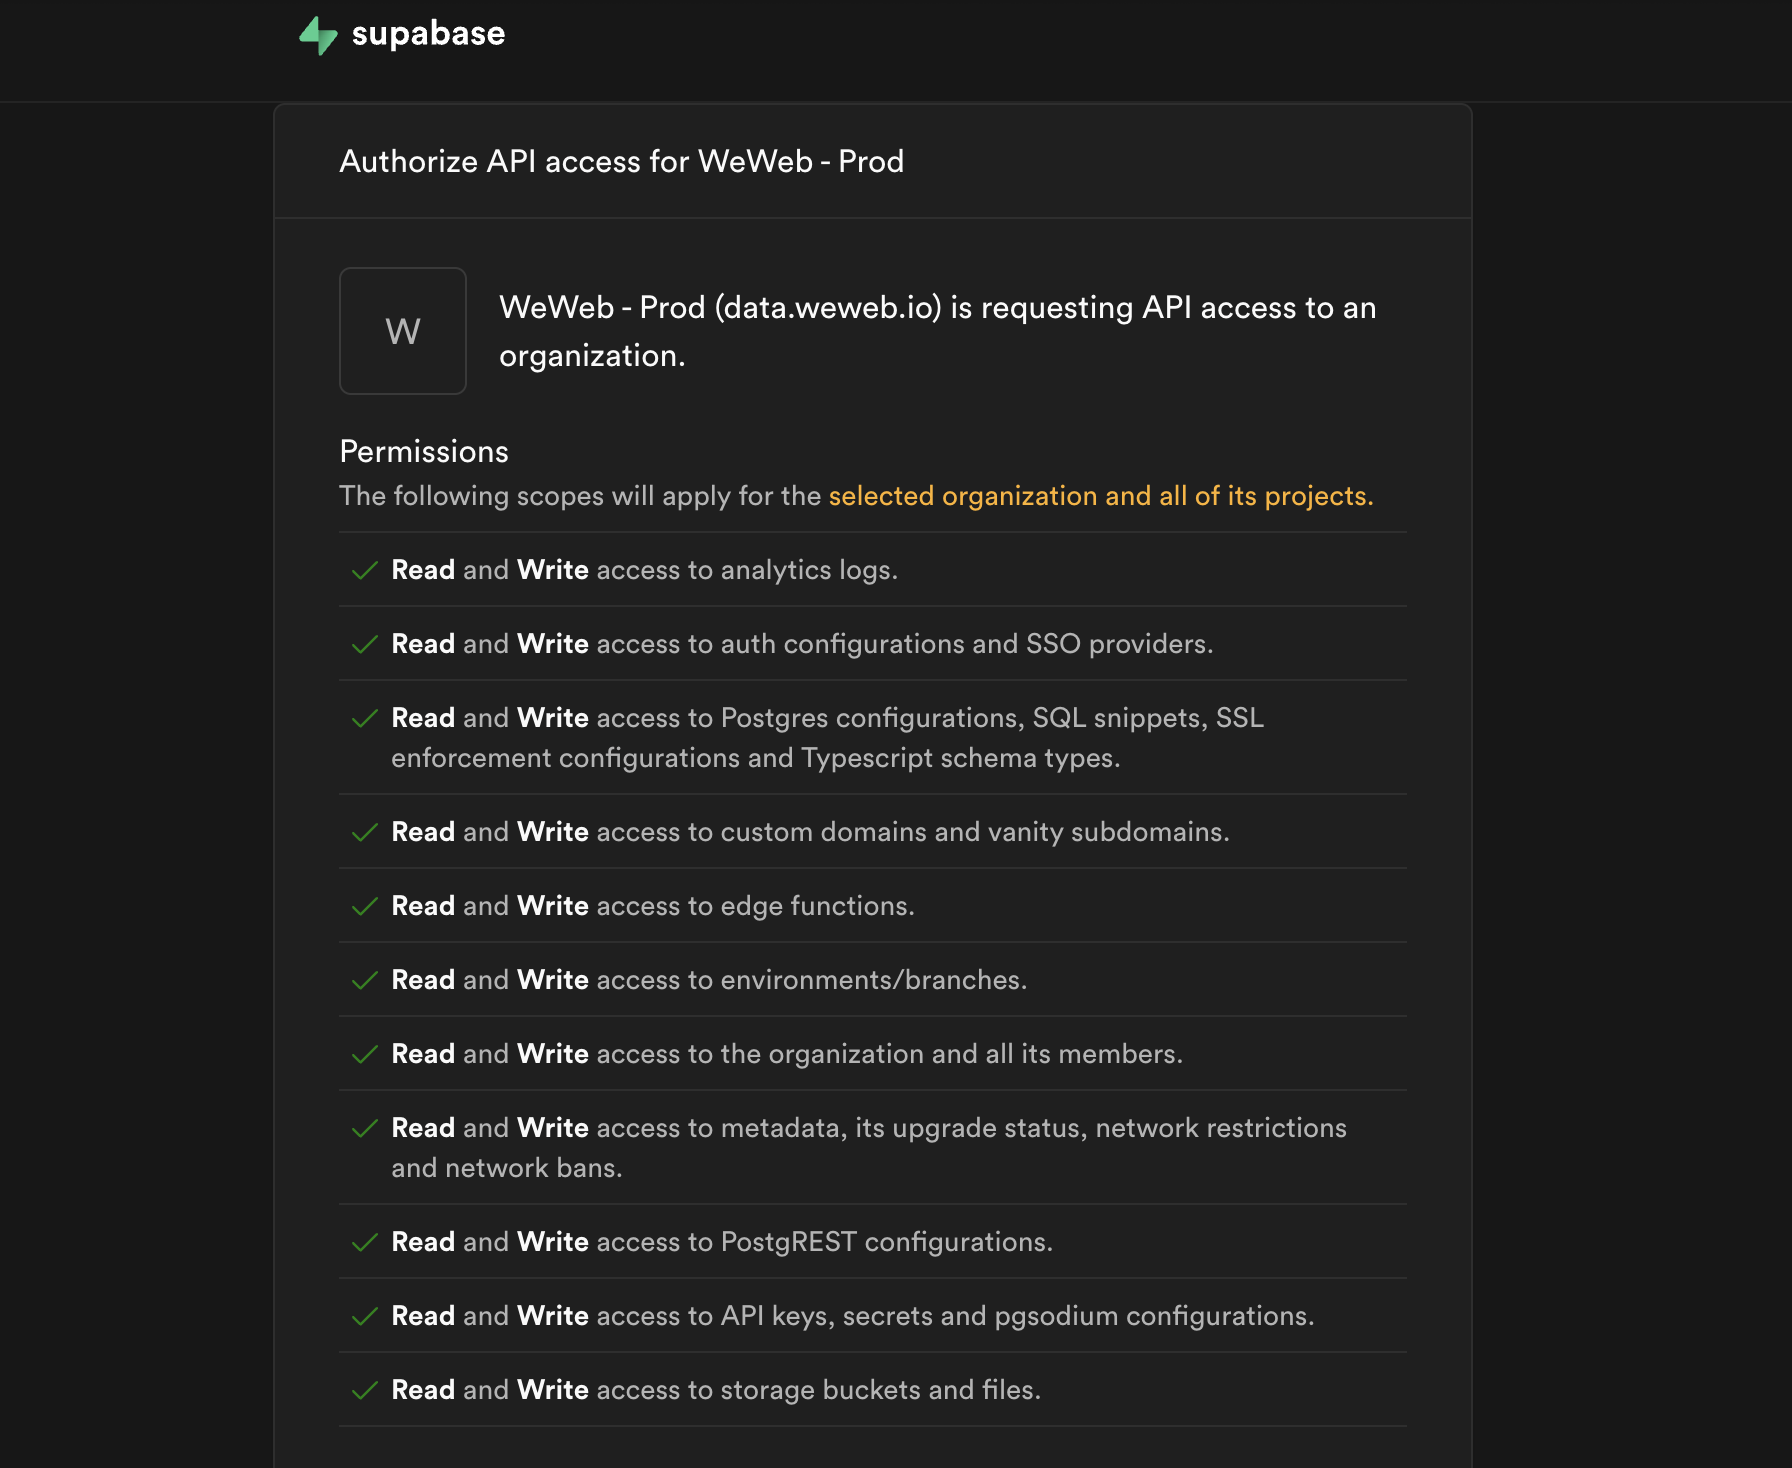
And then, when prompted, authorize WeWeb to access your Supabase account.
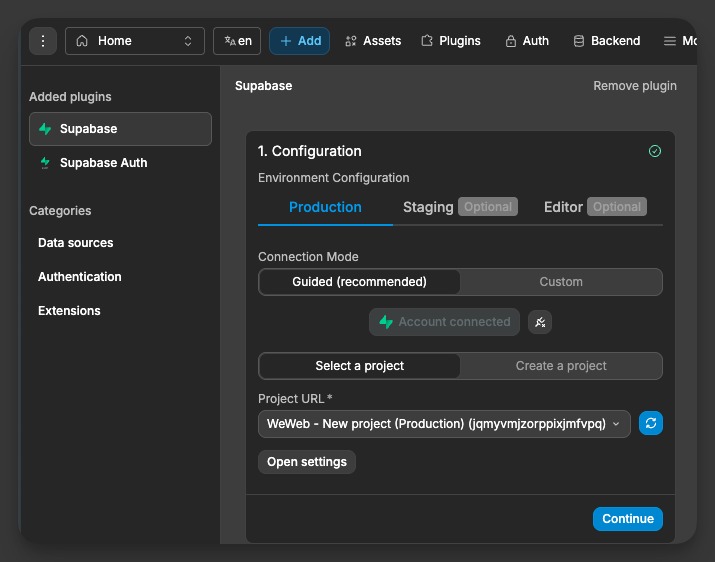
2) Select a project and open settings if needed
After connecting your account, select the Supabase project for the current environment.
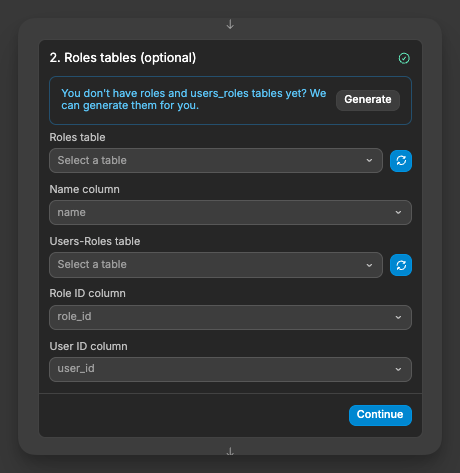
3) Define role tables
This step is optional. It lets you manage user roles from the Users tab in WeWeb and use roles to protect pages and actions.
TIP
If you don’t have these tables yet, click Generate. WeWeb creates a roles table with a name column and a users_roles join table with role_id and user_id, ready to use.
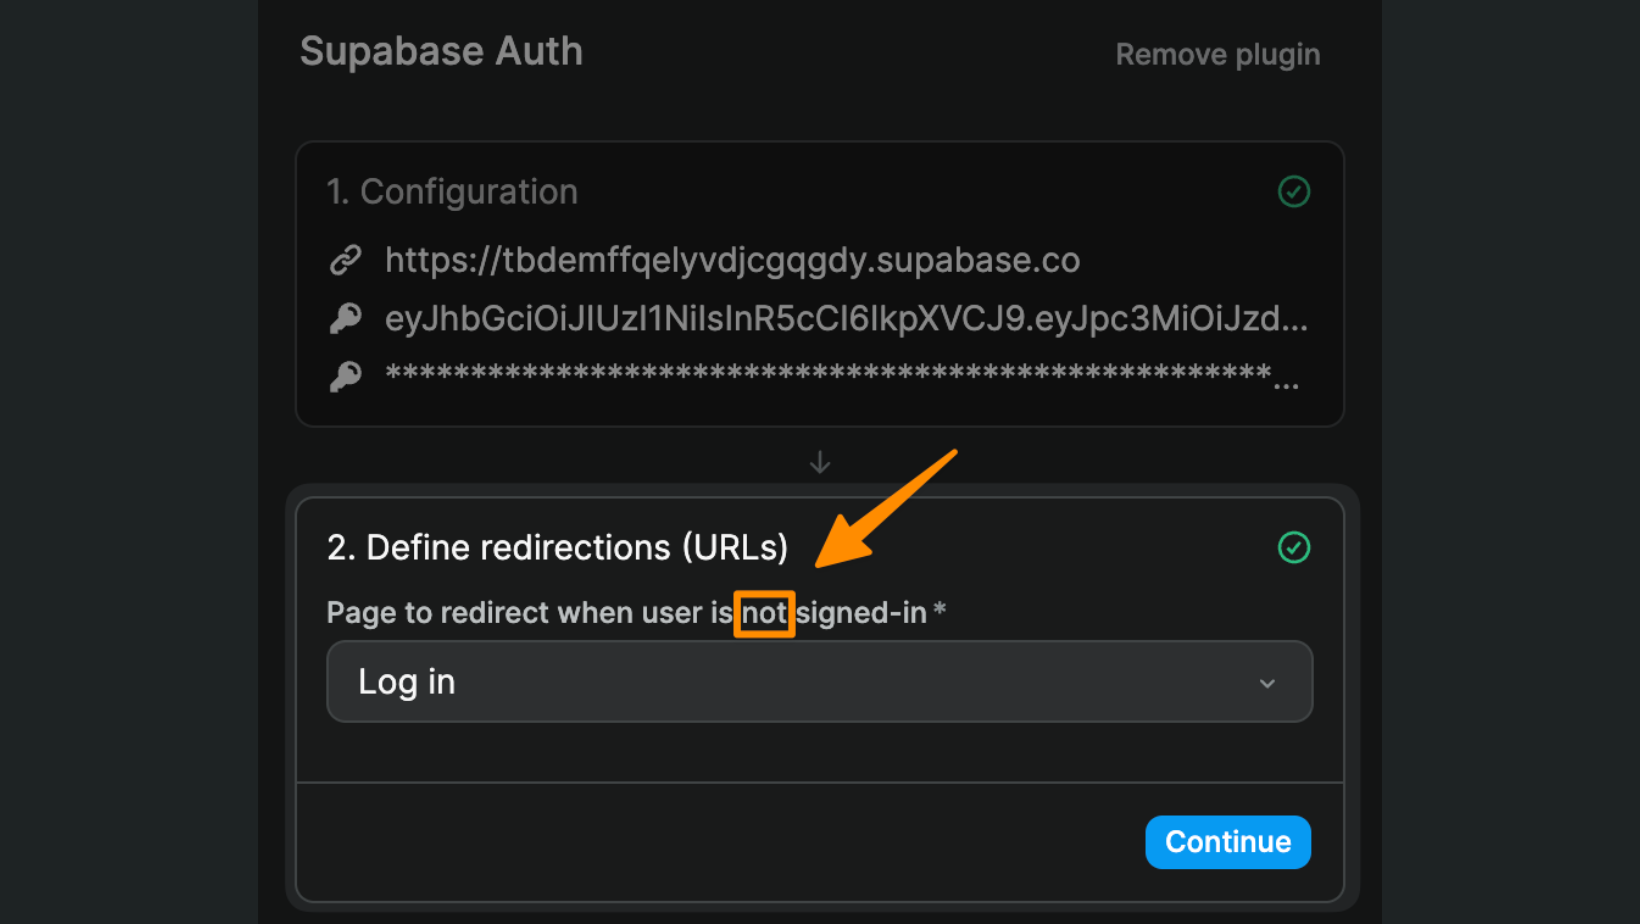
4) Select redirect pages
You will then be invited to choose a page to redirect unauthenticated users, i.e. users who are NOT signed-in:
WARNING
Make sure you redirect unauthenticated users to a public page. If you redirect unauthenticated users to a page that is only accessible to authenticated users, you'll be creating an infinite loop and your app will crash.
Sign up and log in flows
WARNING
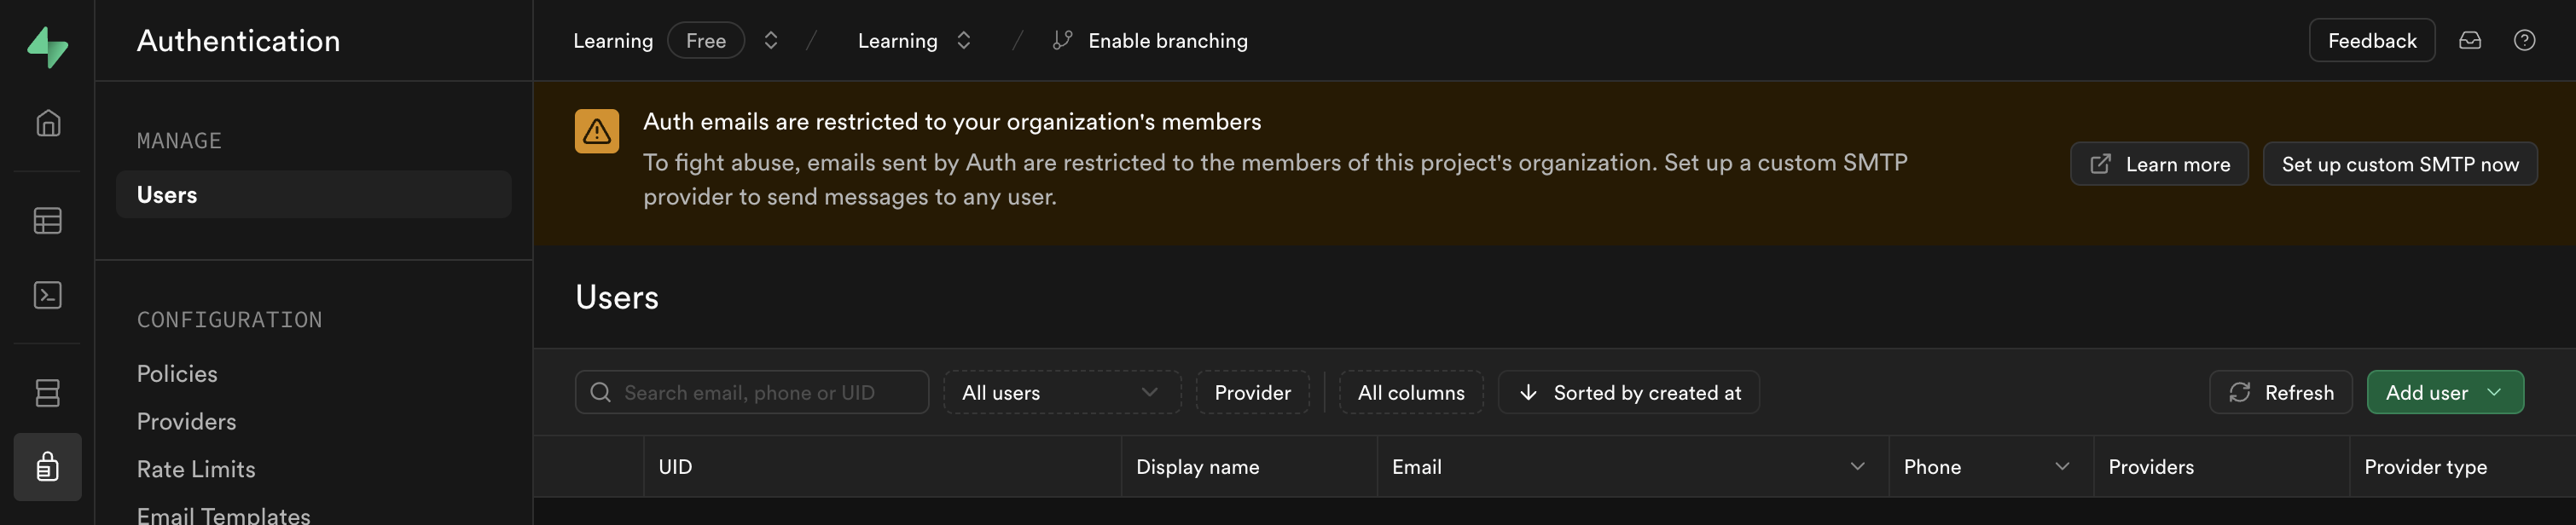
By default, Supabase restricts auth emails to your organization's members only. To enable sign-up functionality for all users, you must set up a custom SMTP provider in your Supabase project. Without this setup, new users outside your organization will not be able to sign up or receive auth-related emails.
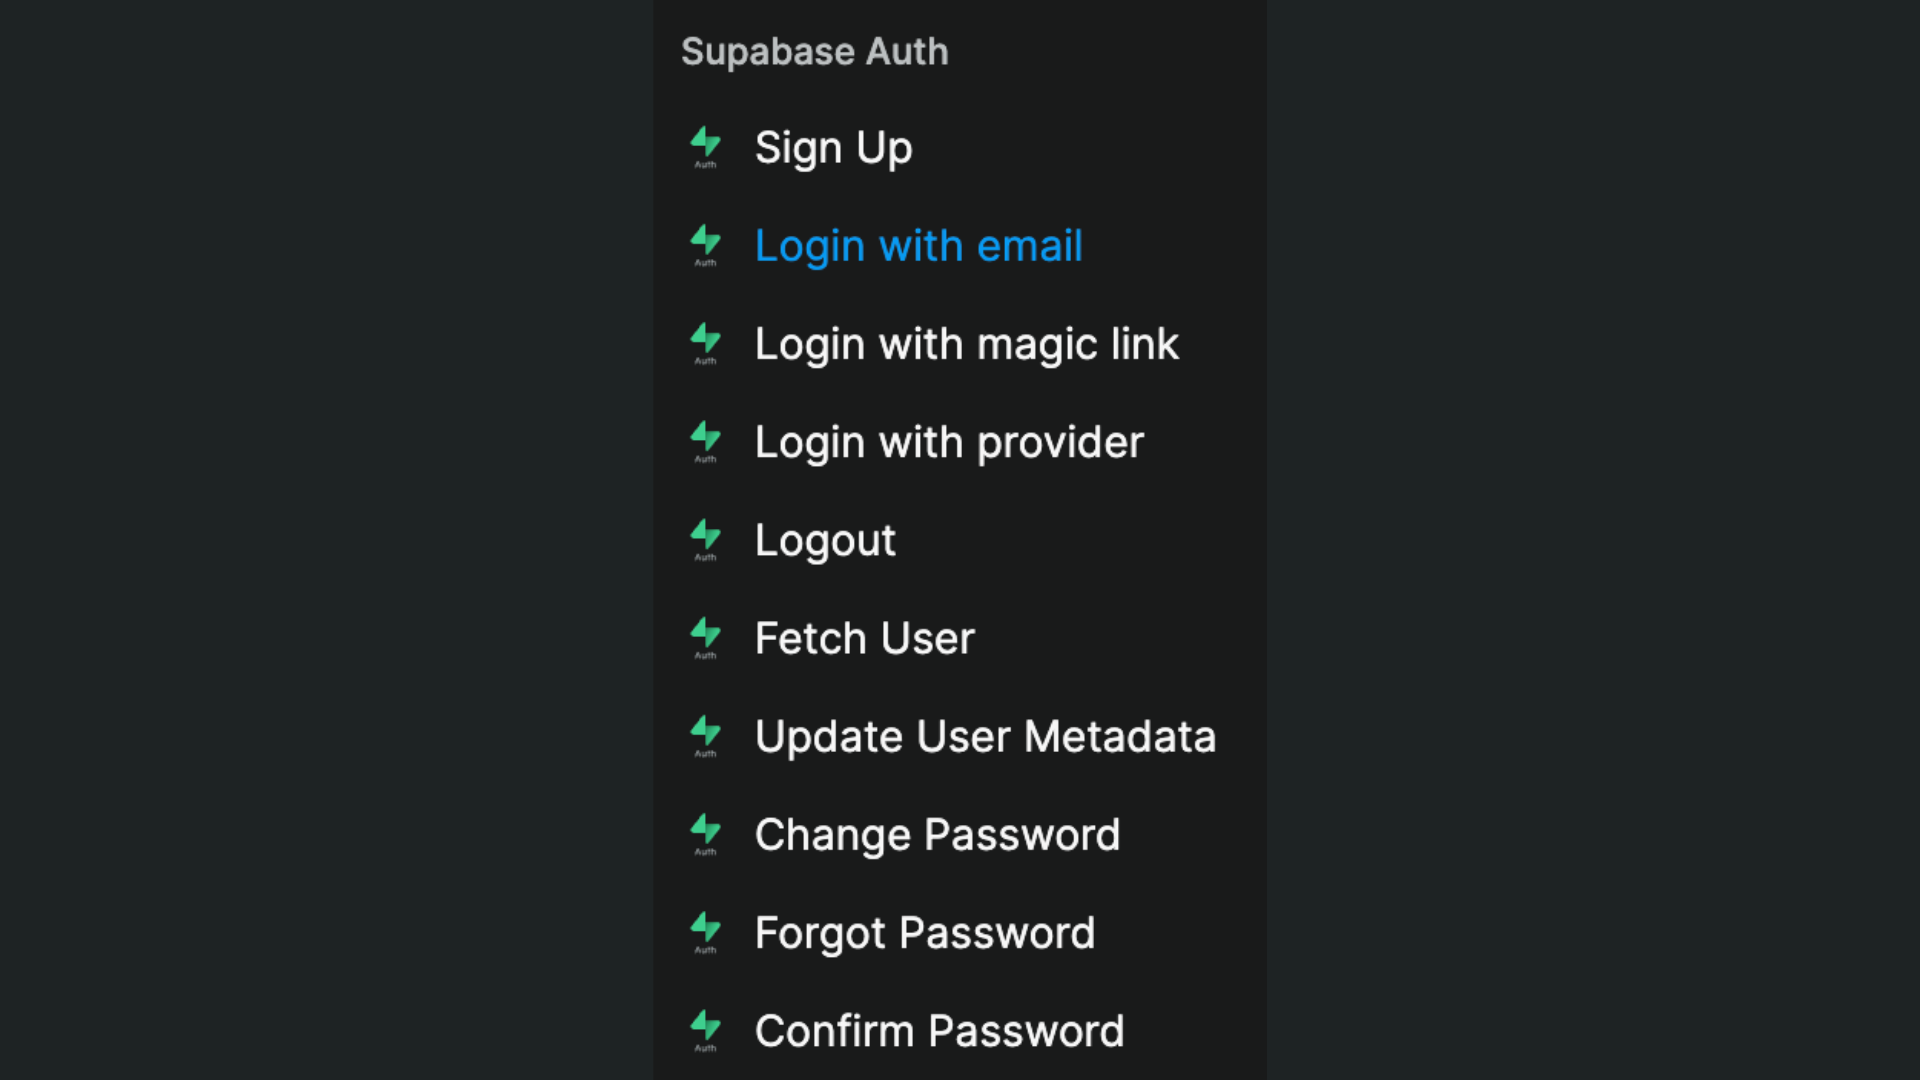
Once you have added the Supabase Auth plugin to your WeWeb project, you will get access to:
- Dedicated Supabase Auth actions in workflows, and
- Dedicated UI elements in the
Addmenu.
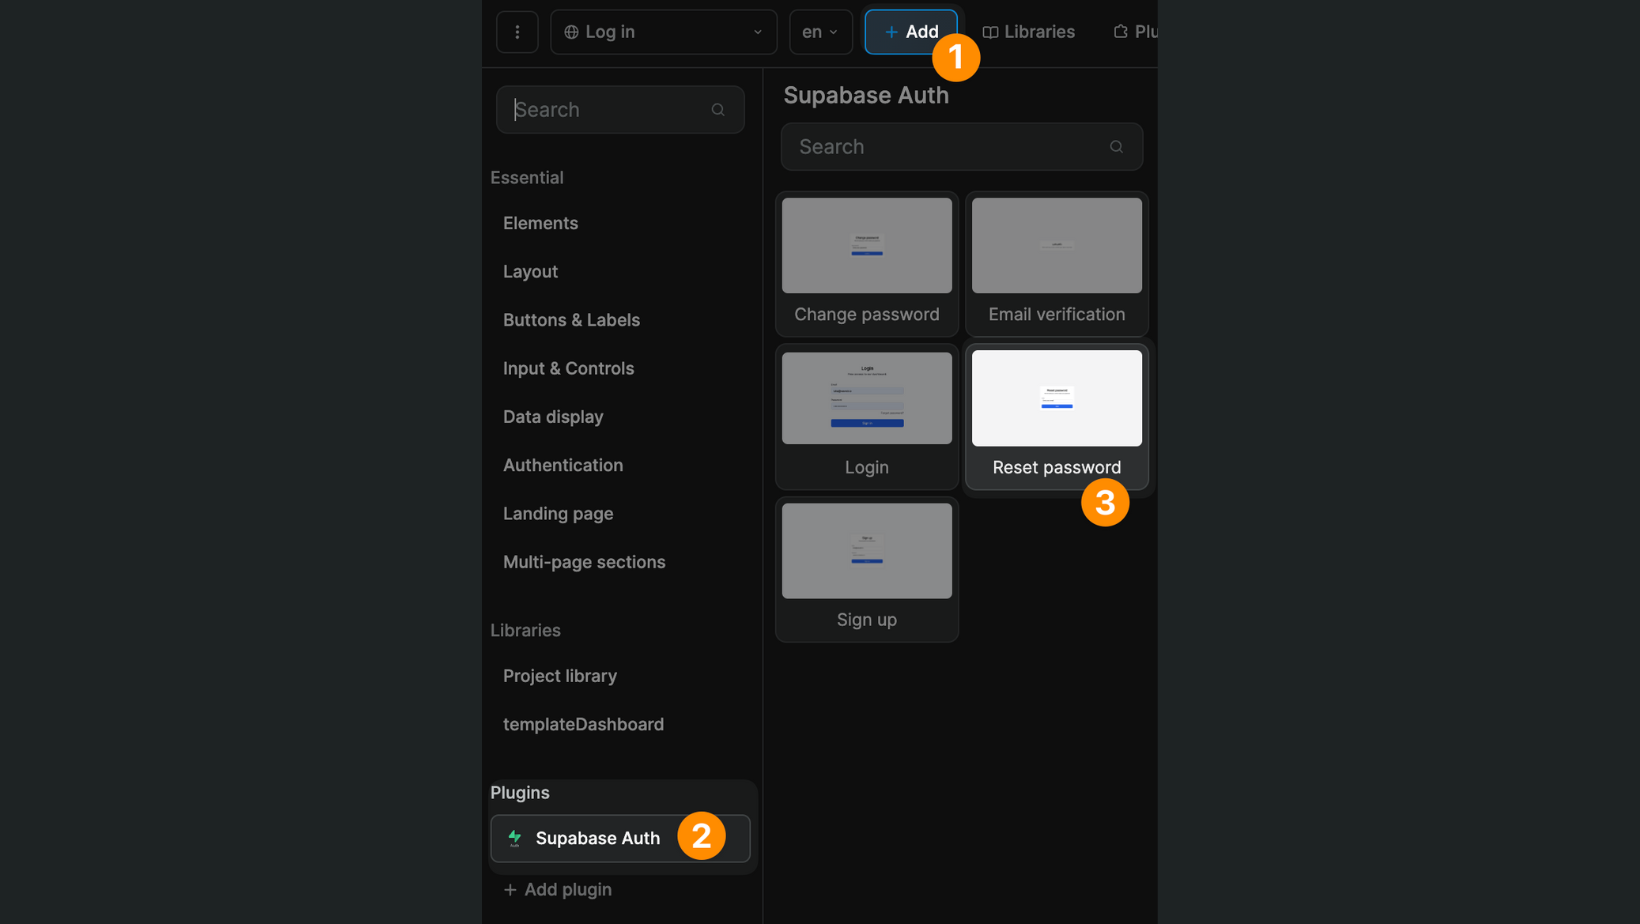
In the example below, you can see we added the Login UI element related to the Supabase Auth plugin:
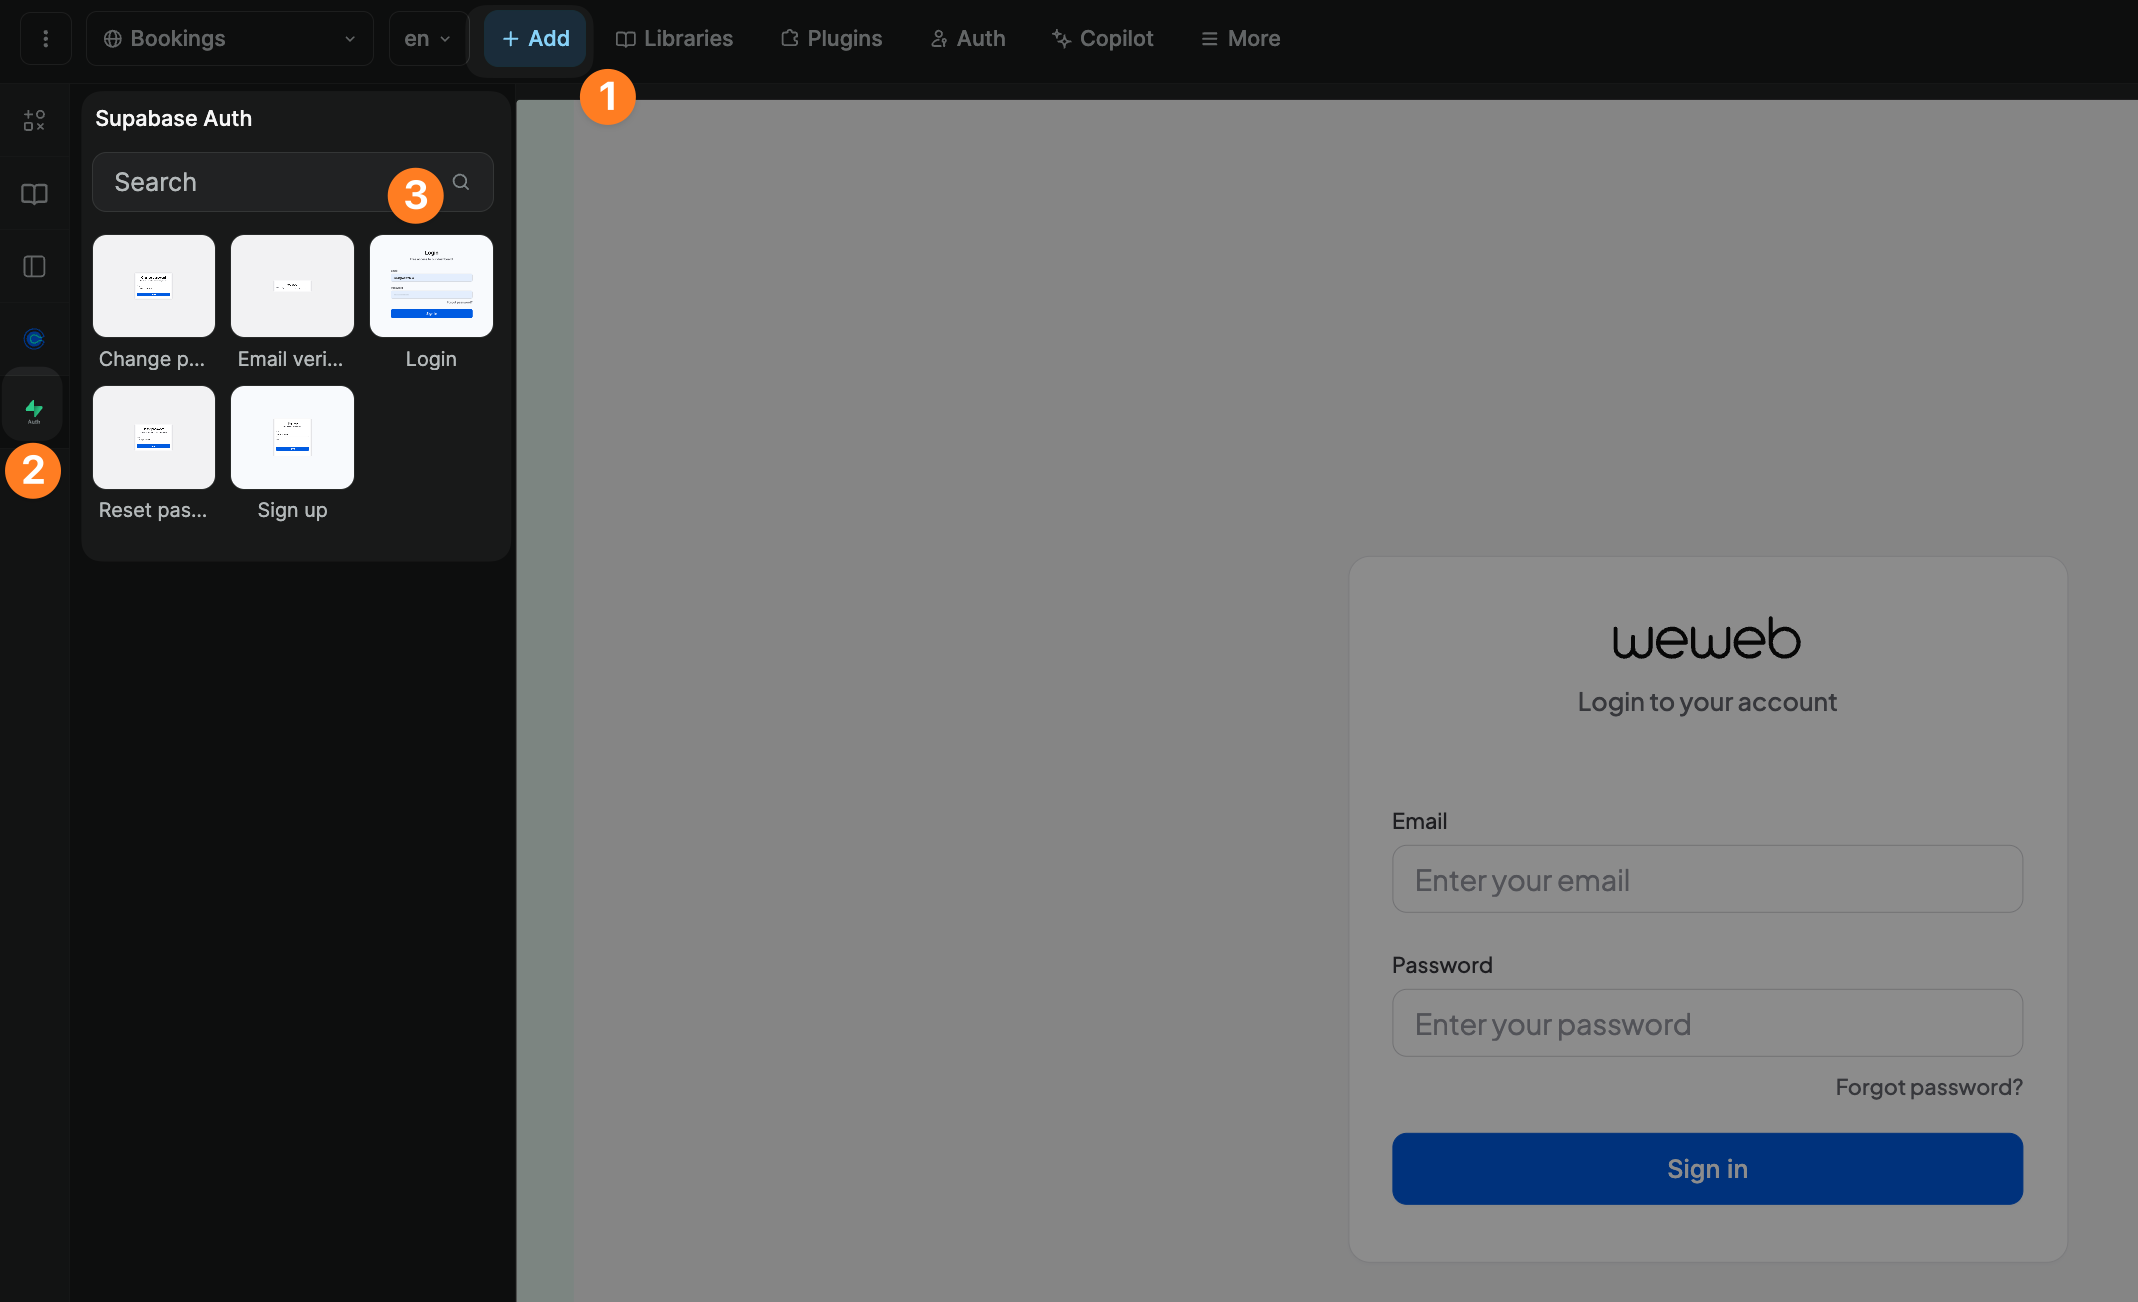
That UI element comes with a predefined workflow using the Login with email action but you have access to many more:
TIP
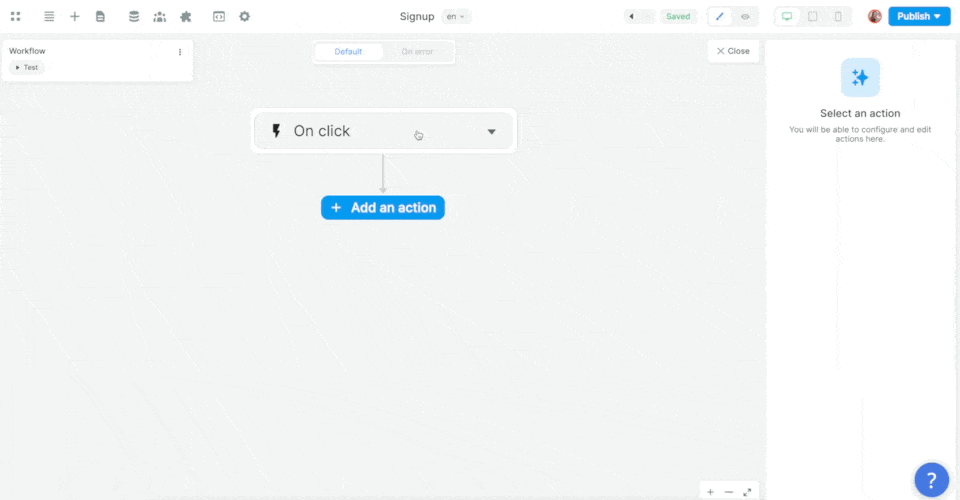
If you choose to design your own forms, remember to place the workflow on the form container and trigger it On submit if you want to validate the fields of the form when users submit it (as opped to triggering the workflow On click of a button).
Sign up workflow
In the example below, we added a workflow on a sign up form, chose the On submit trigger, and added the Supabase Sign up action:
Then, we mapped the email, password, and metadata information in the form to the email, password, and metadata in Supabase before choosing what page the new user should be redirected to:
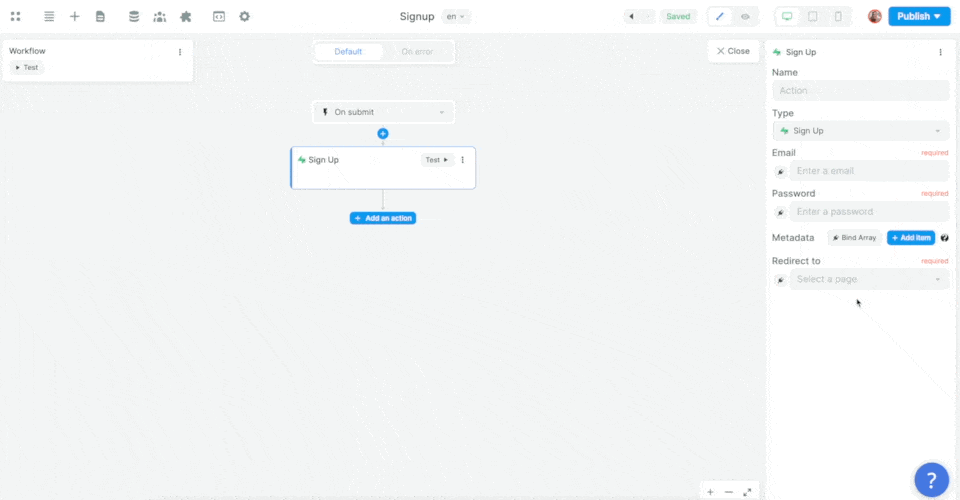
In the example above, we made sure to add the user's name as an item in that user's metadata.
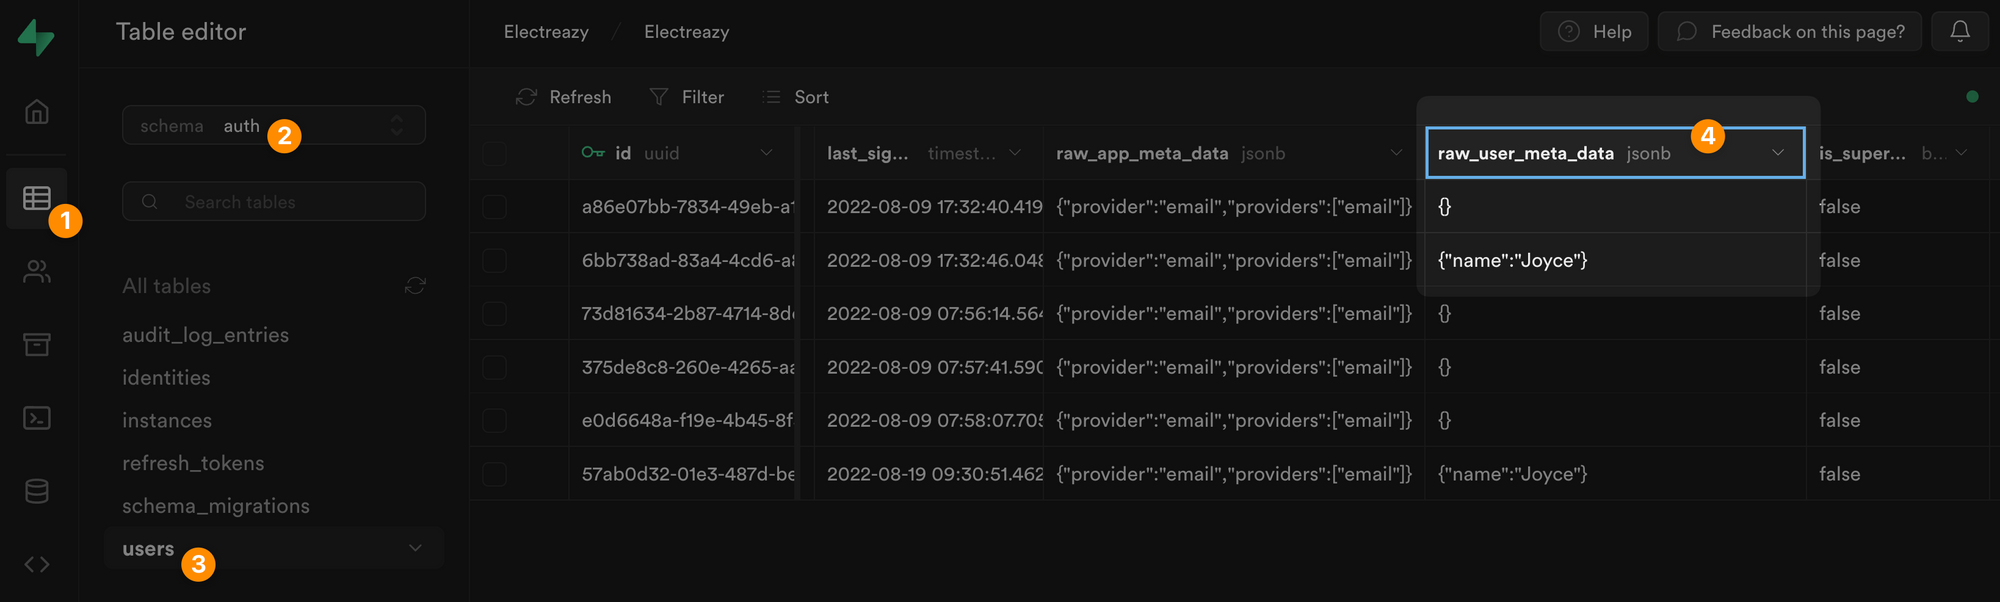
In Supabase, you can find the user's metadata in JSON format in a dedicated field of the users table, named raw_user_meta_data:
The same logic will apply to any Supabase action you want to trigger.
Reset password flow
You'll need three things to allow users to reset their passwords:
- A WeWeb page where users type in their email address and submit a password reset request
- The URL of your website and an email template properly configured in Supabase
- A WeWeb page where users are redirected when they click on the link in the email sent by Supabase
1. Forgot password page
In WeWeb, you'll need to create a page where users can make a request to reset their password.
That page needs to include:
- An email input field, and
- A workflow with the Supabase Auth
Forgot passwordaction.
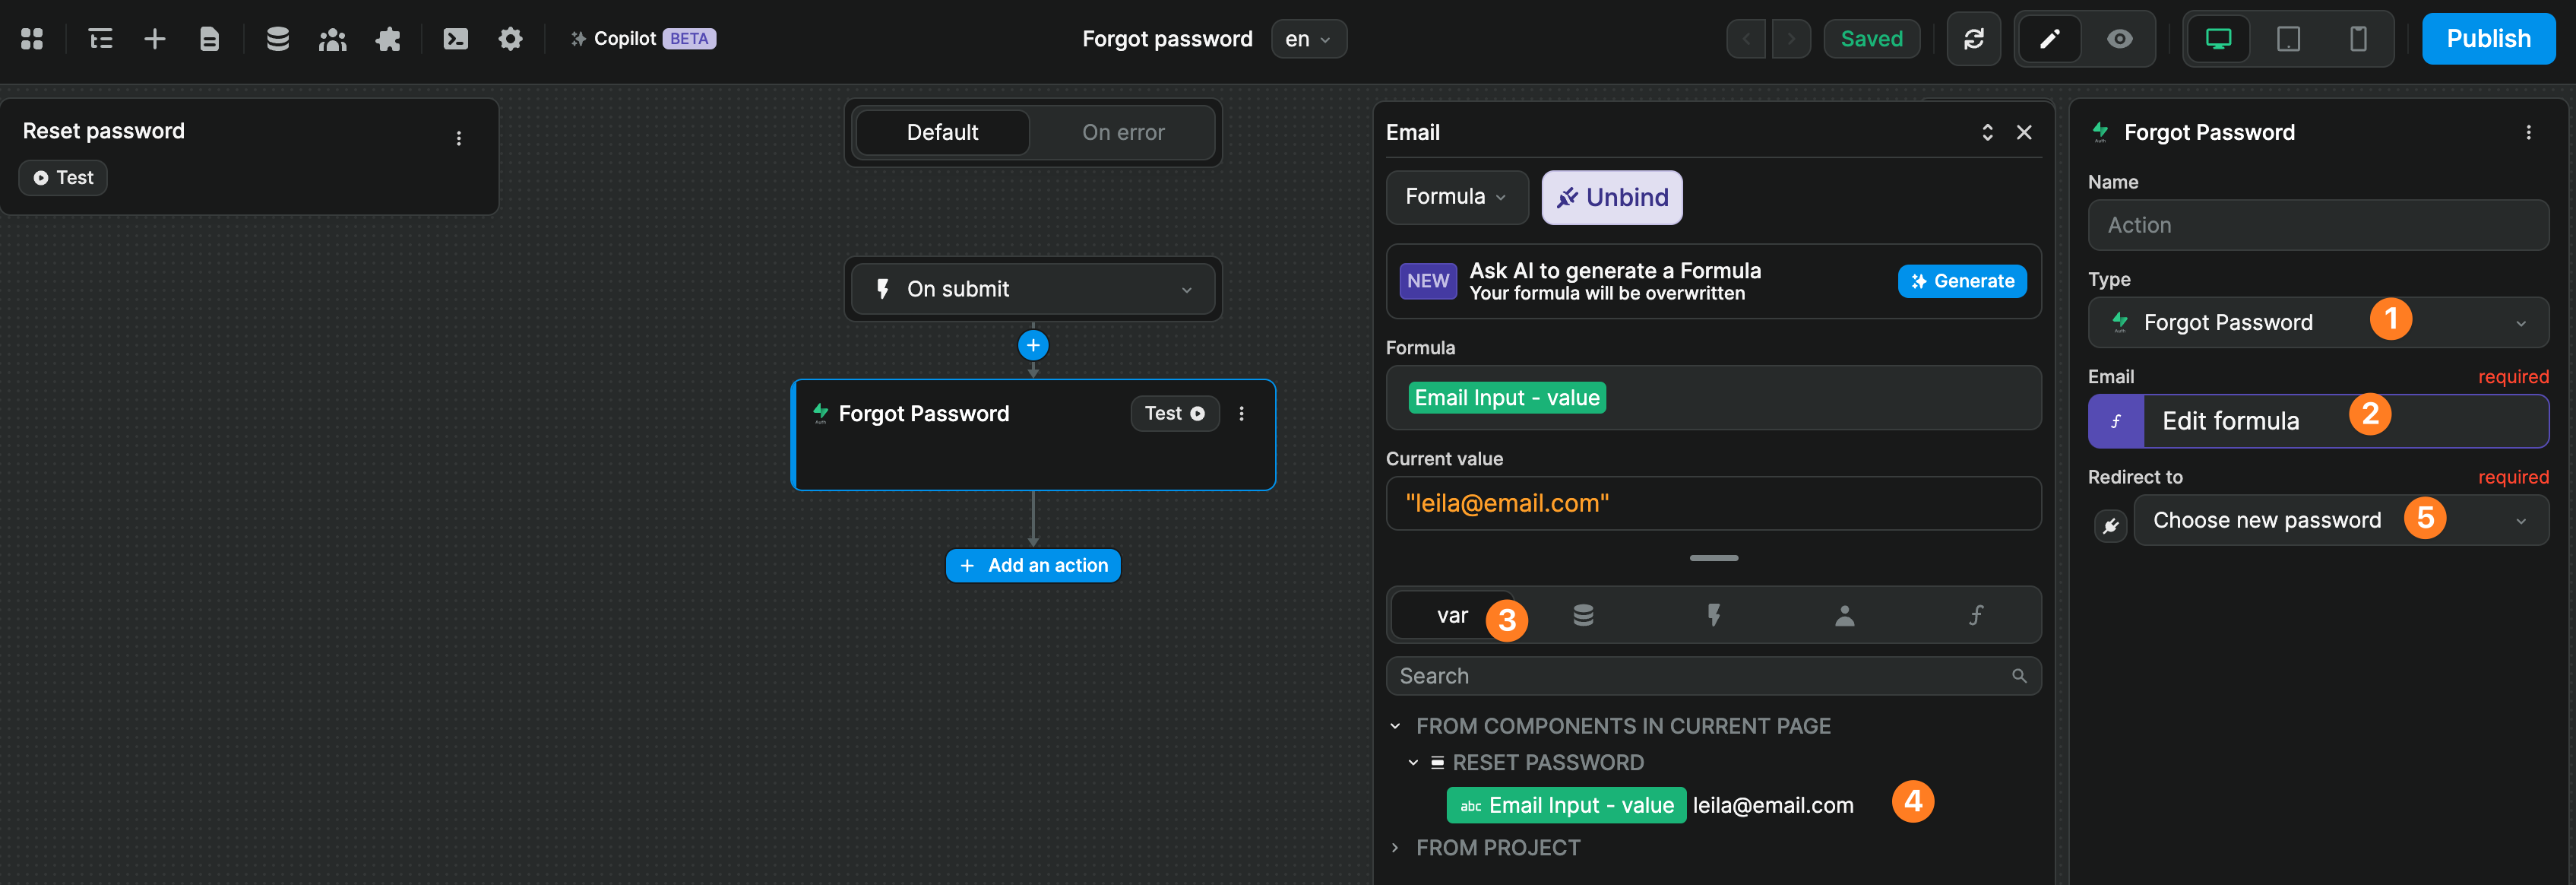
You can design your own custom page or simply use the Reset password UI element that comes with the Supabase Auth plugin:
In the example below, we trigger a Forgot password action on form submit, tell Supabase where it should send the reset password email, and say we want the user to be redirected to the Choose new password page when they click on the link in that email:
2. Supabase configuration to send password reset email
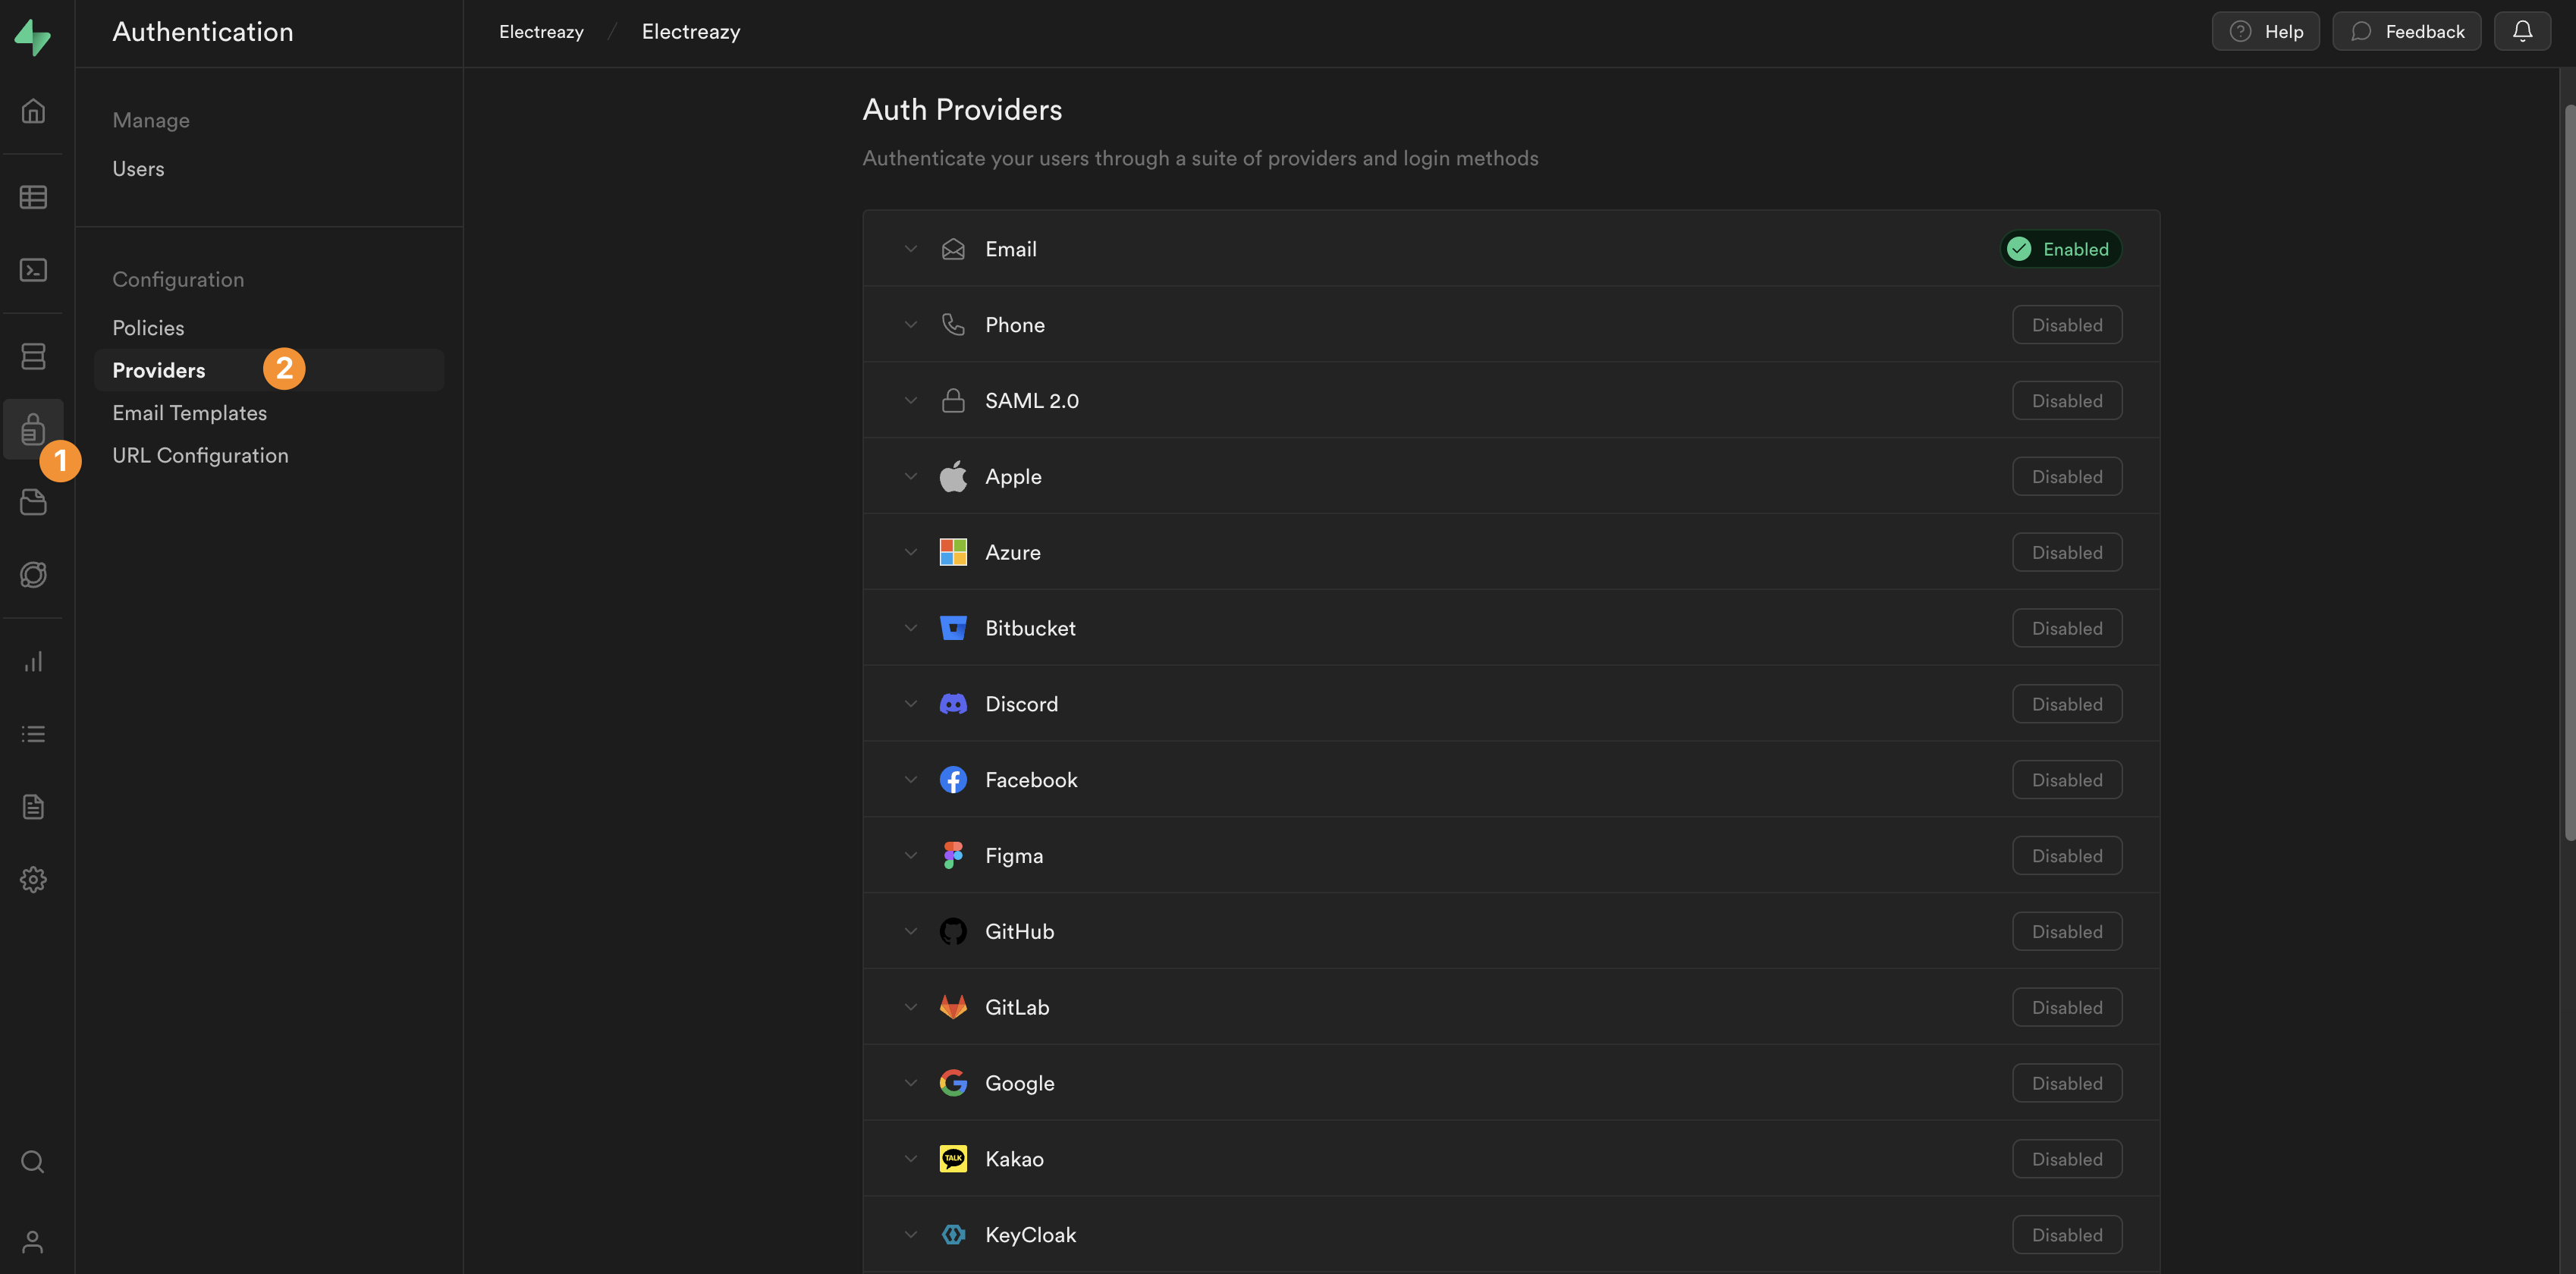
In Supabase, you'll need to add the URL of your live app by going to Authentication > URL Configuration:
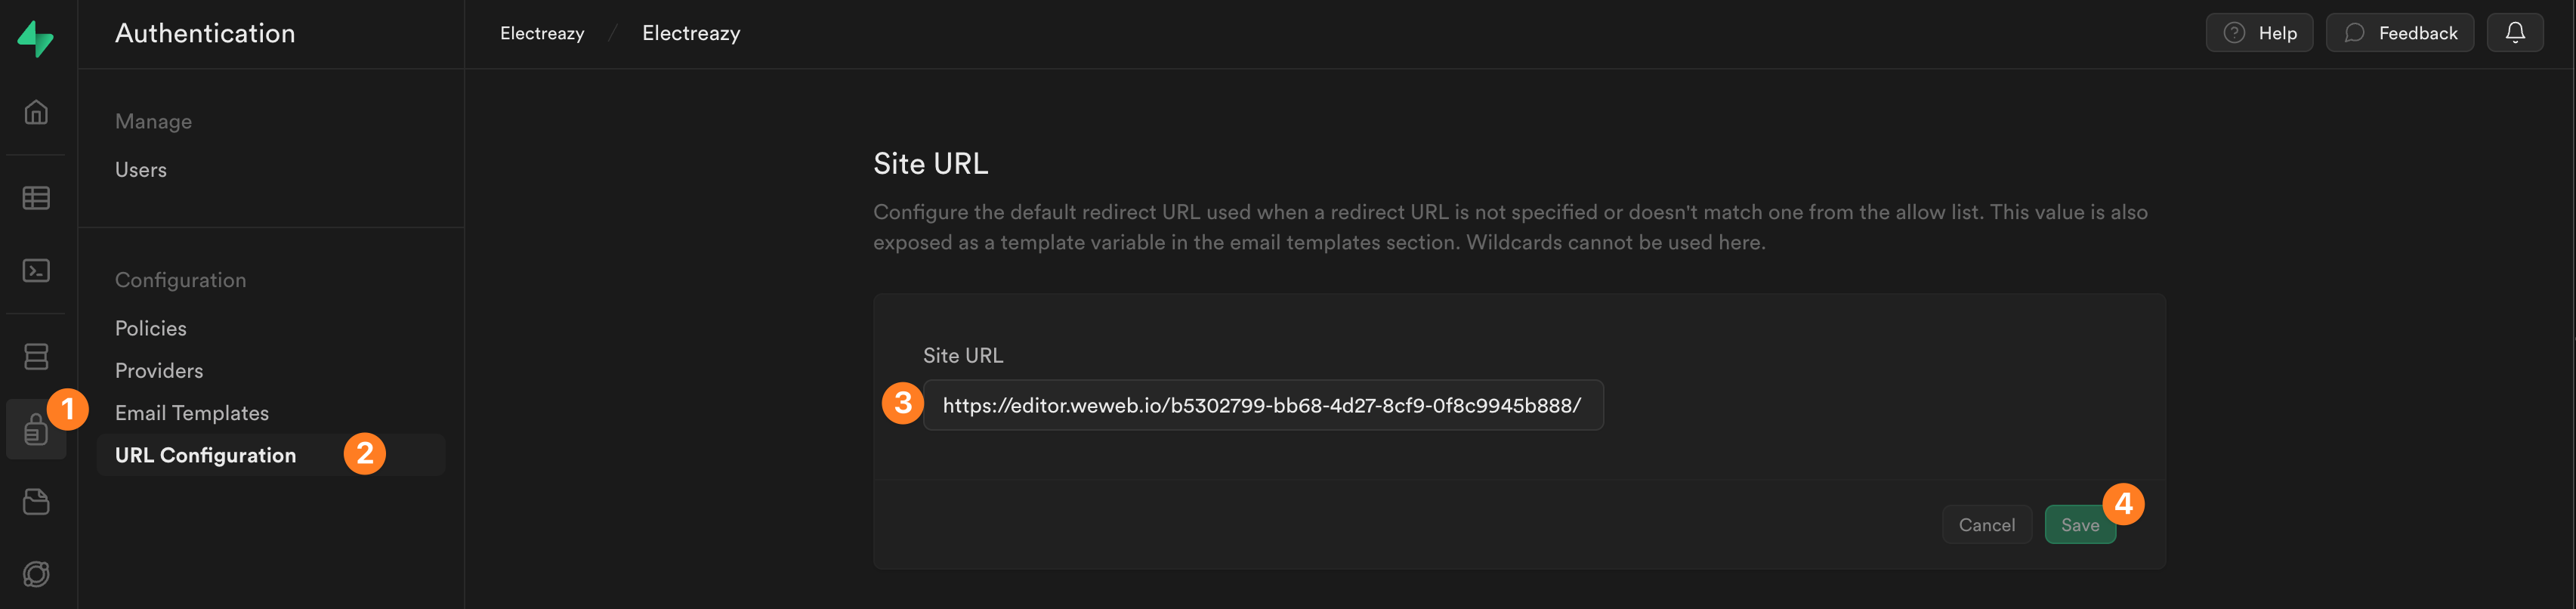
In the example above, we added the URL of our project in the WeWeb Editor because we are still building the app but we would change it to the URL of our staging website or live website as we progressed through the building and publishing process.
WARNING
The URL should not reference a specific page.
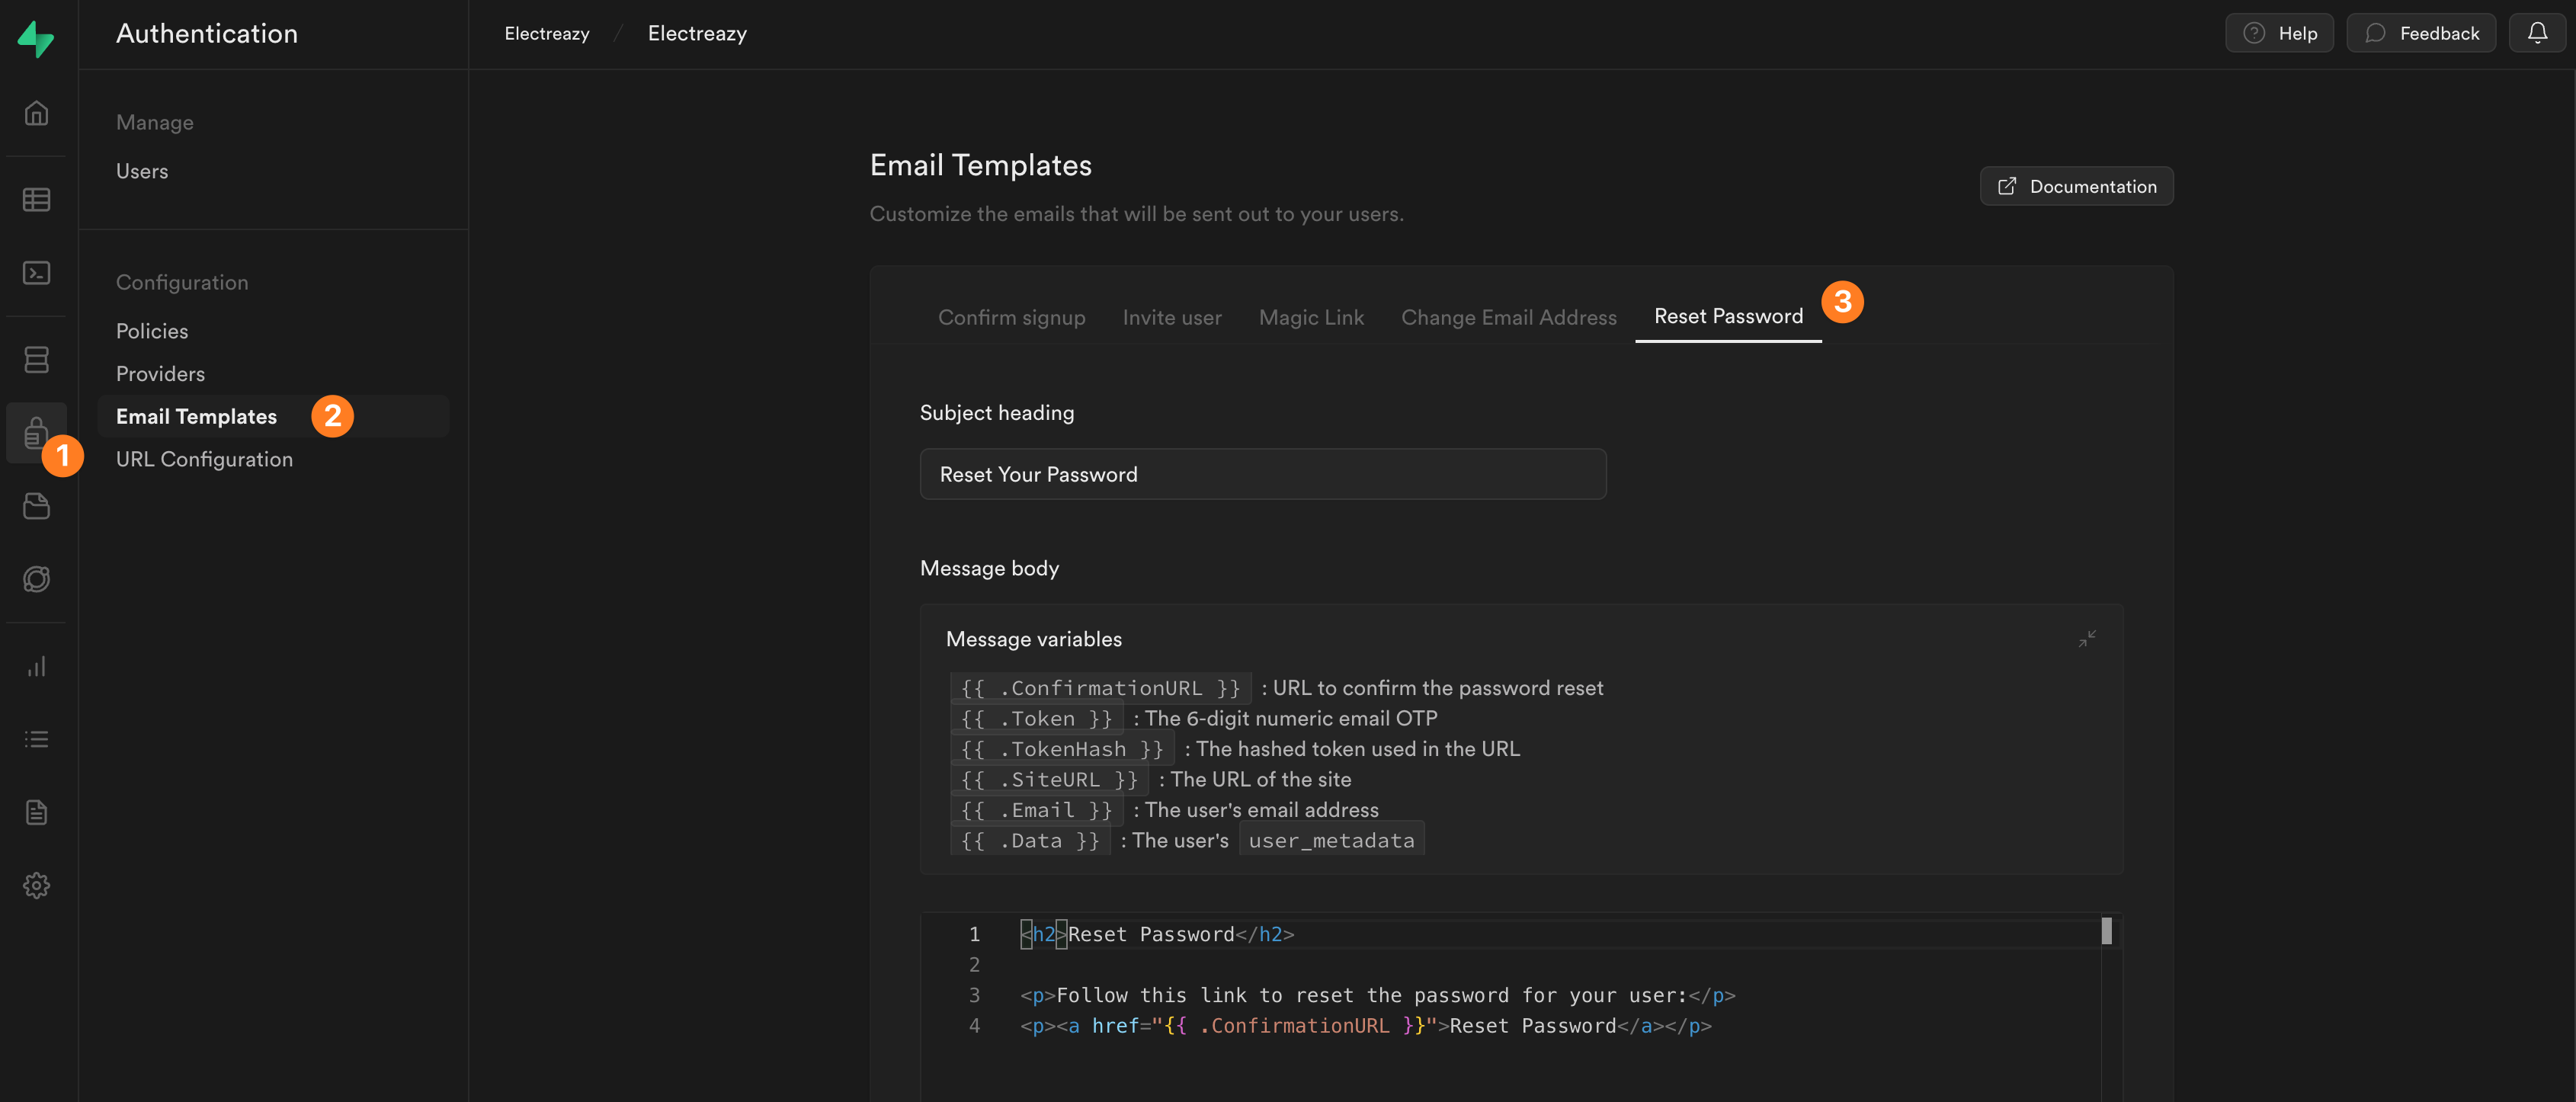
You can personalize the email Supabase sends by going to Authentication > Email Templates > Reset password:
WARNING
The {{ .ConfirmationURL }} variable in the email template will automatically refer to the page you chose to redirect users in step 1. Do NOT modify it.
TROUBLESHOOTING TIPS
If you are not receiving the reset password email as expected:
- Check if the the email was sent to your spam folder
- Experiment with and without a
/at the end of the URL - Check that the URL corresponds to the environment you made the reset password request in (for example
<your-project-id>-editor.weweb.io,<your-project-id>-staging.weweb.io, or your live custom domain) - If testing with the WeWeb Editor URL, make sure to include only the first part of the URL. Do not include the page id after the second
/
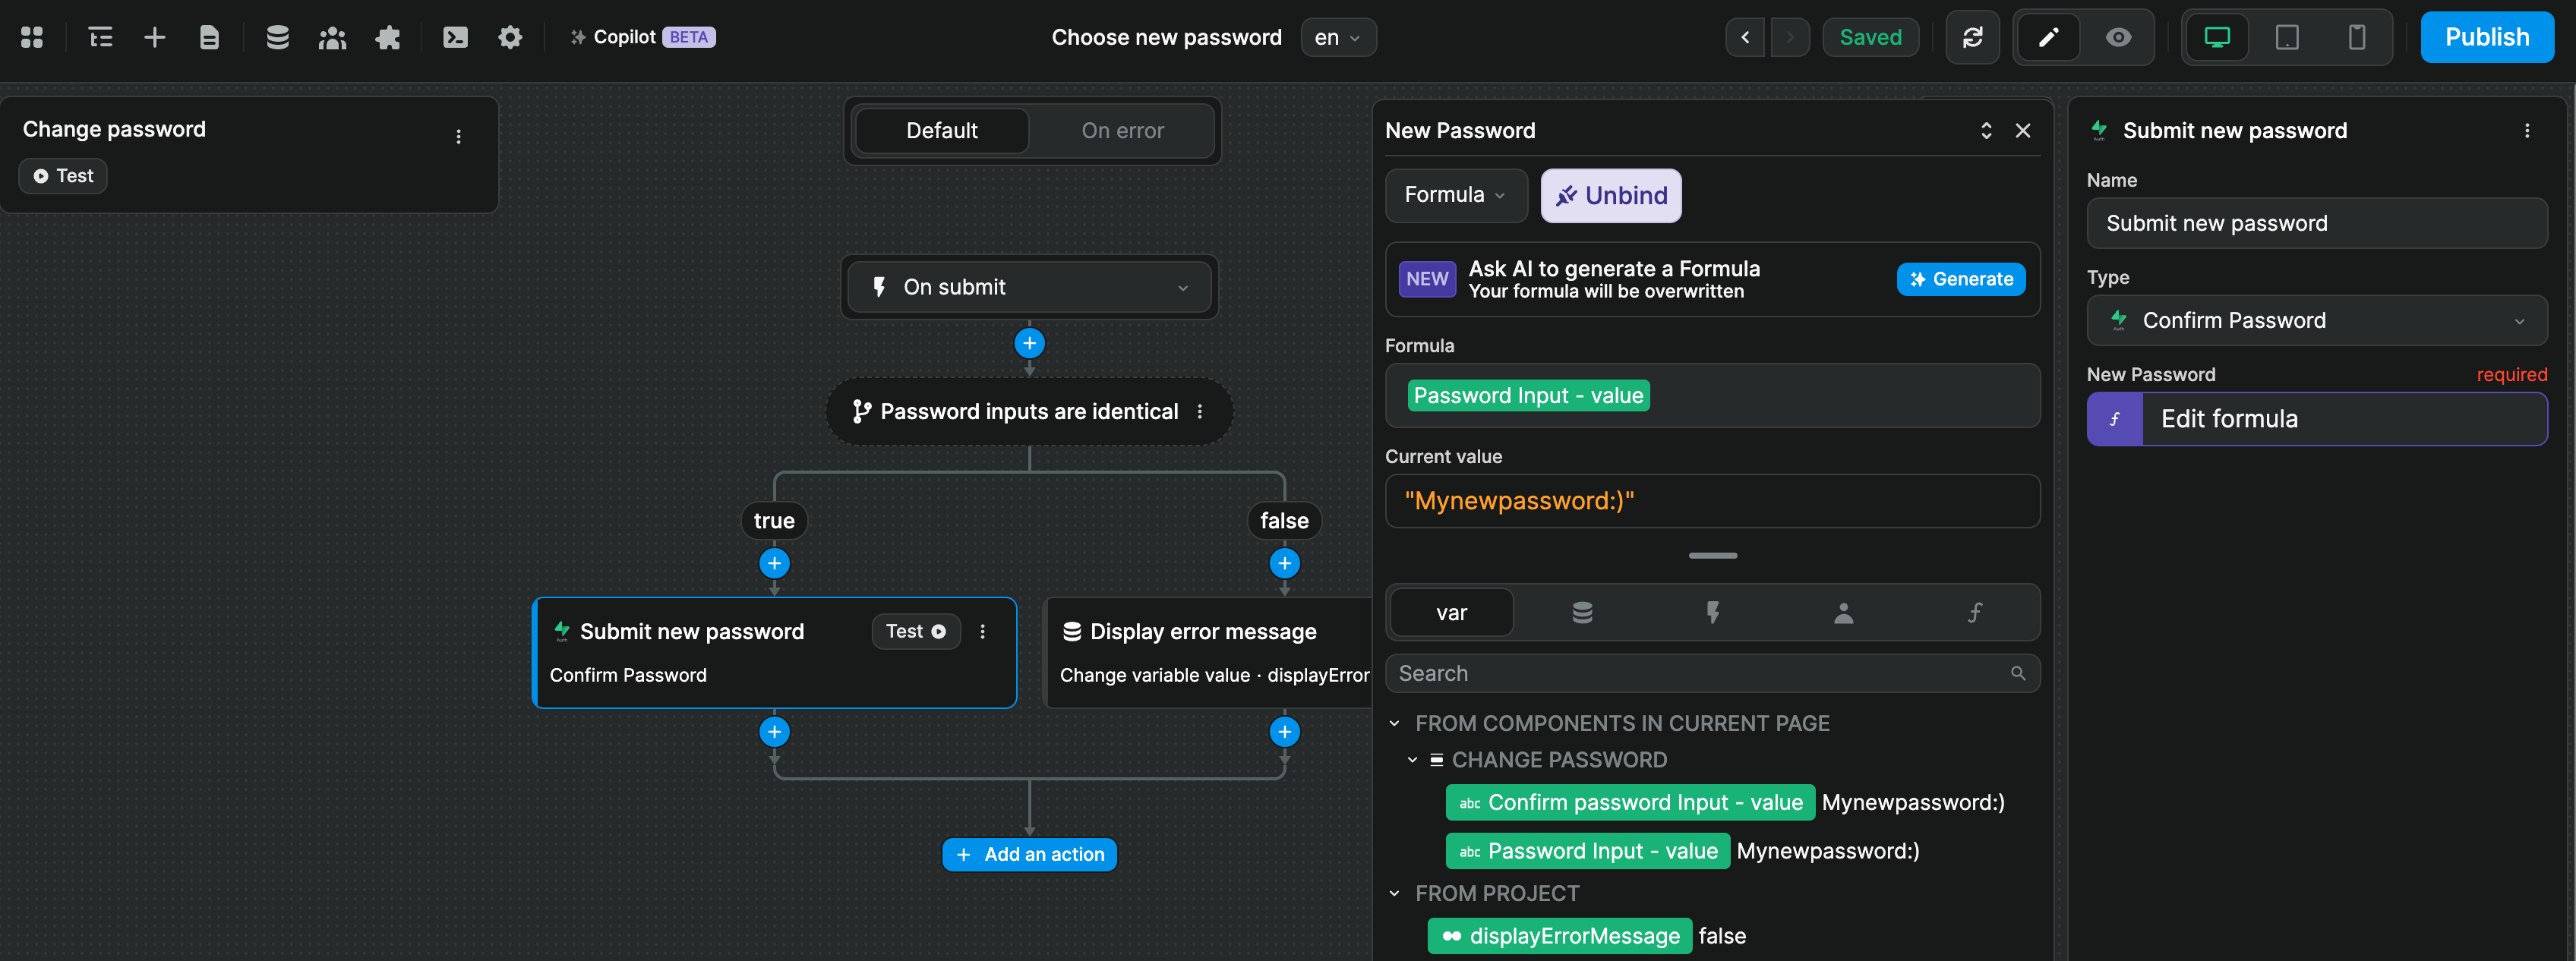
3. Confirm password page
Back in WeWeb, you will need to create a page where users can type in and submit their new password.
You can design your own custom page or use the Change password UI element that comes with the Supabase Auth plugin.
In the example below, we triggered a workflow on a form submission and:
- Check if the two password input values are identical
- If they're not, we display an error message
- If they are, we use the
Confirm passwordaction to send the new password to Supabase
OAuth with providers
When using Supabase for authentication, sign up and login with an email address is enabled by default but you can also enable other methods of authentication, including but not limited to Google OAuth, Azure, GitHub, LinkedIn, and Slack:
Each provider will have their own configuration steps which you'll need to work out using their documentation.
Broadly speaking, it will look something like this:
In the provider's interface
- Create the project
- Add authorized domains
- Create OAuth credentials
- Define redirect URLs
In Supabase
- Save the OAuth credentials of the provider
- Add the base URL of your website
- Define one or more URLs where users can be redirected after logging in
In WeWeb
- Trigger a workflow with the
Login with provideraction - Select what provider's consent screen you want to display
- Select which page users should be redirected to after they successfully log in
WARNING
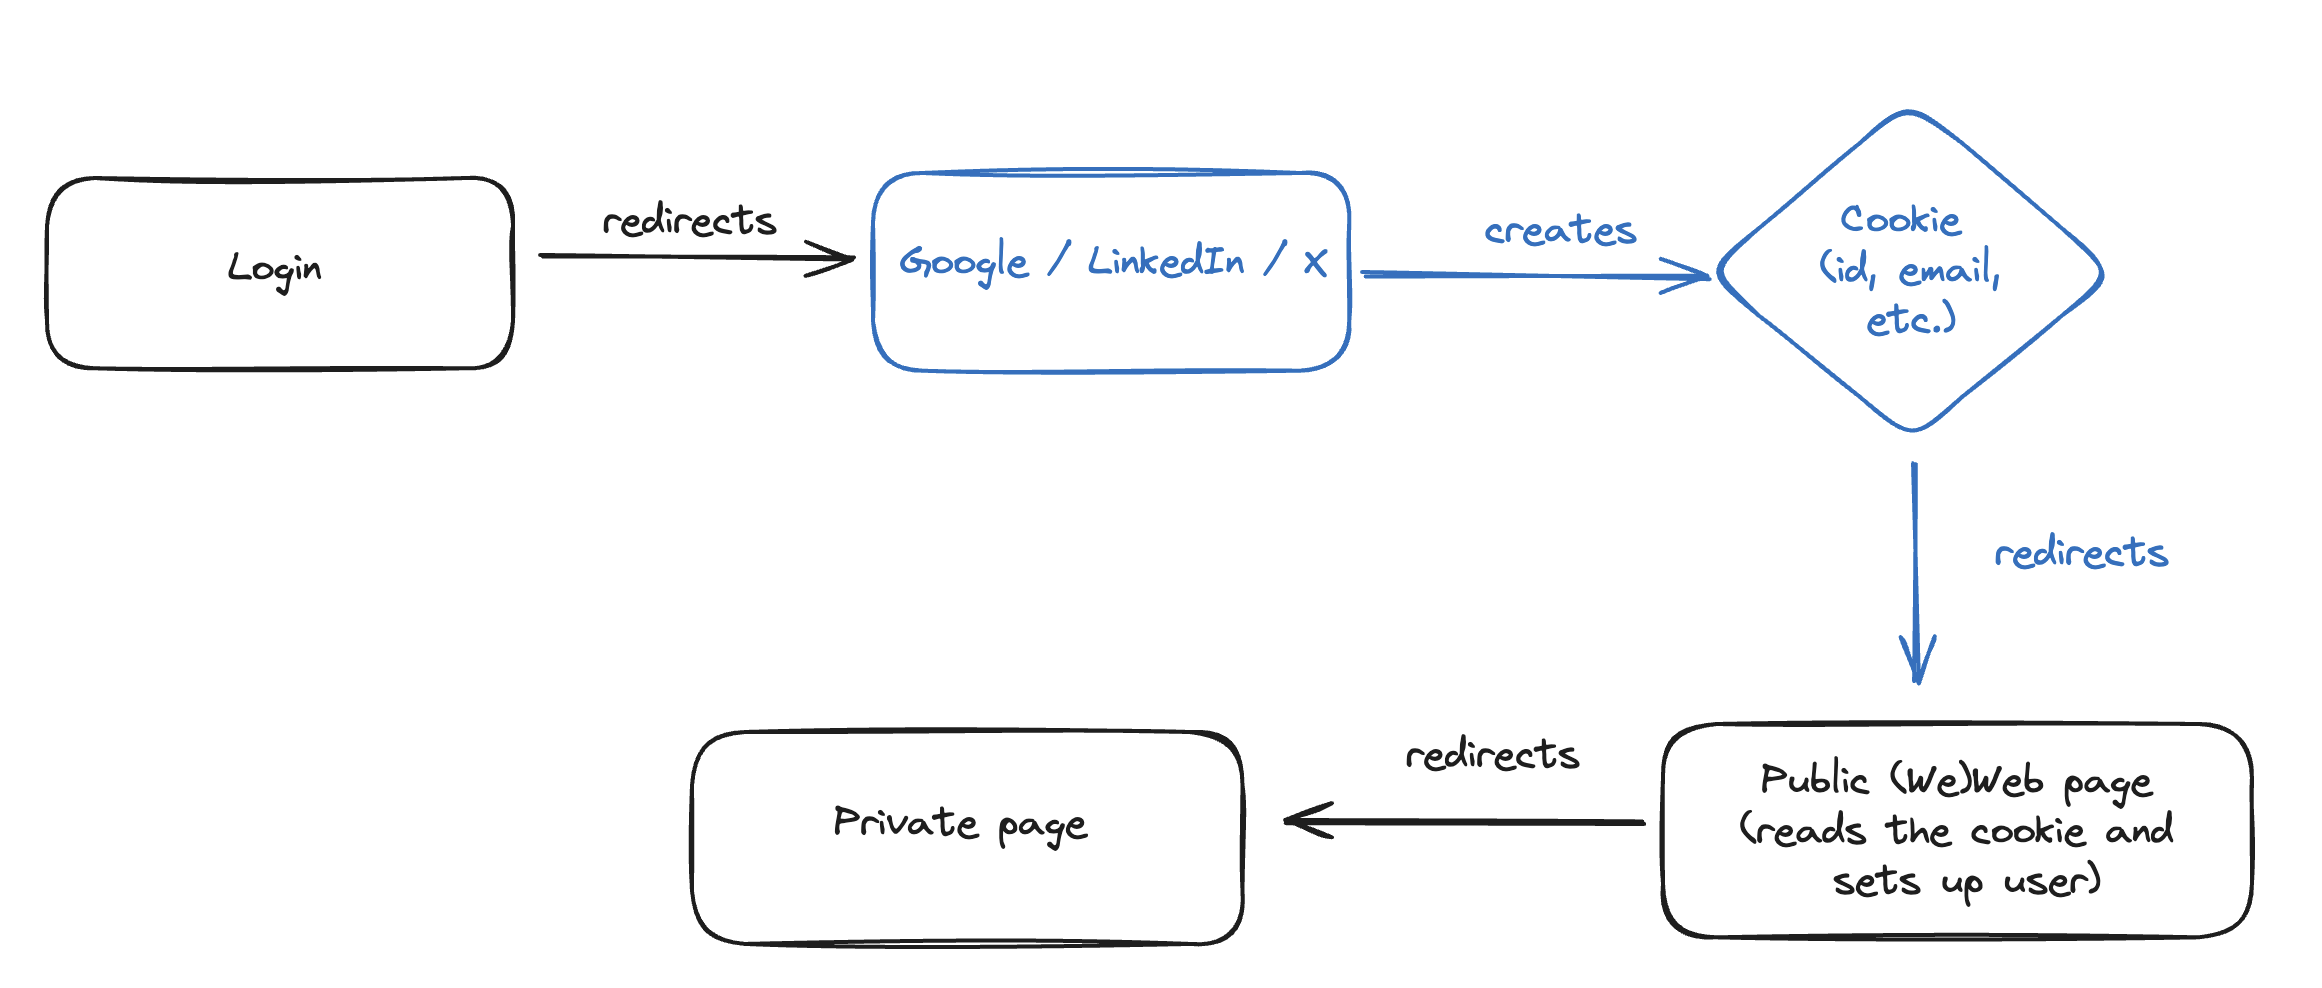
When you use the Login with provider action with the Supabase Auth plugin, it's important to redirect to a public page to read the cookie from the external provider with the user information. This will allow you to then move on to a private page without any errors.
This is not WeWeb or Supabase specific, it's part of a standard OAuth flow:
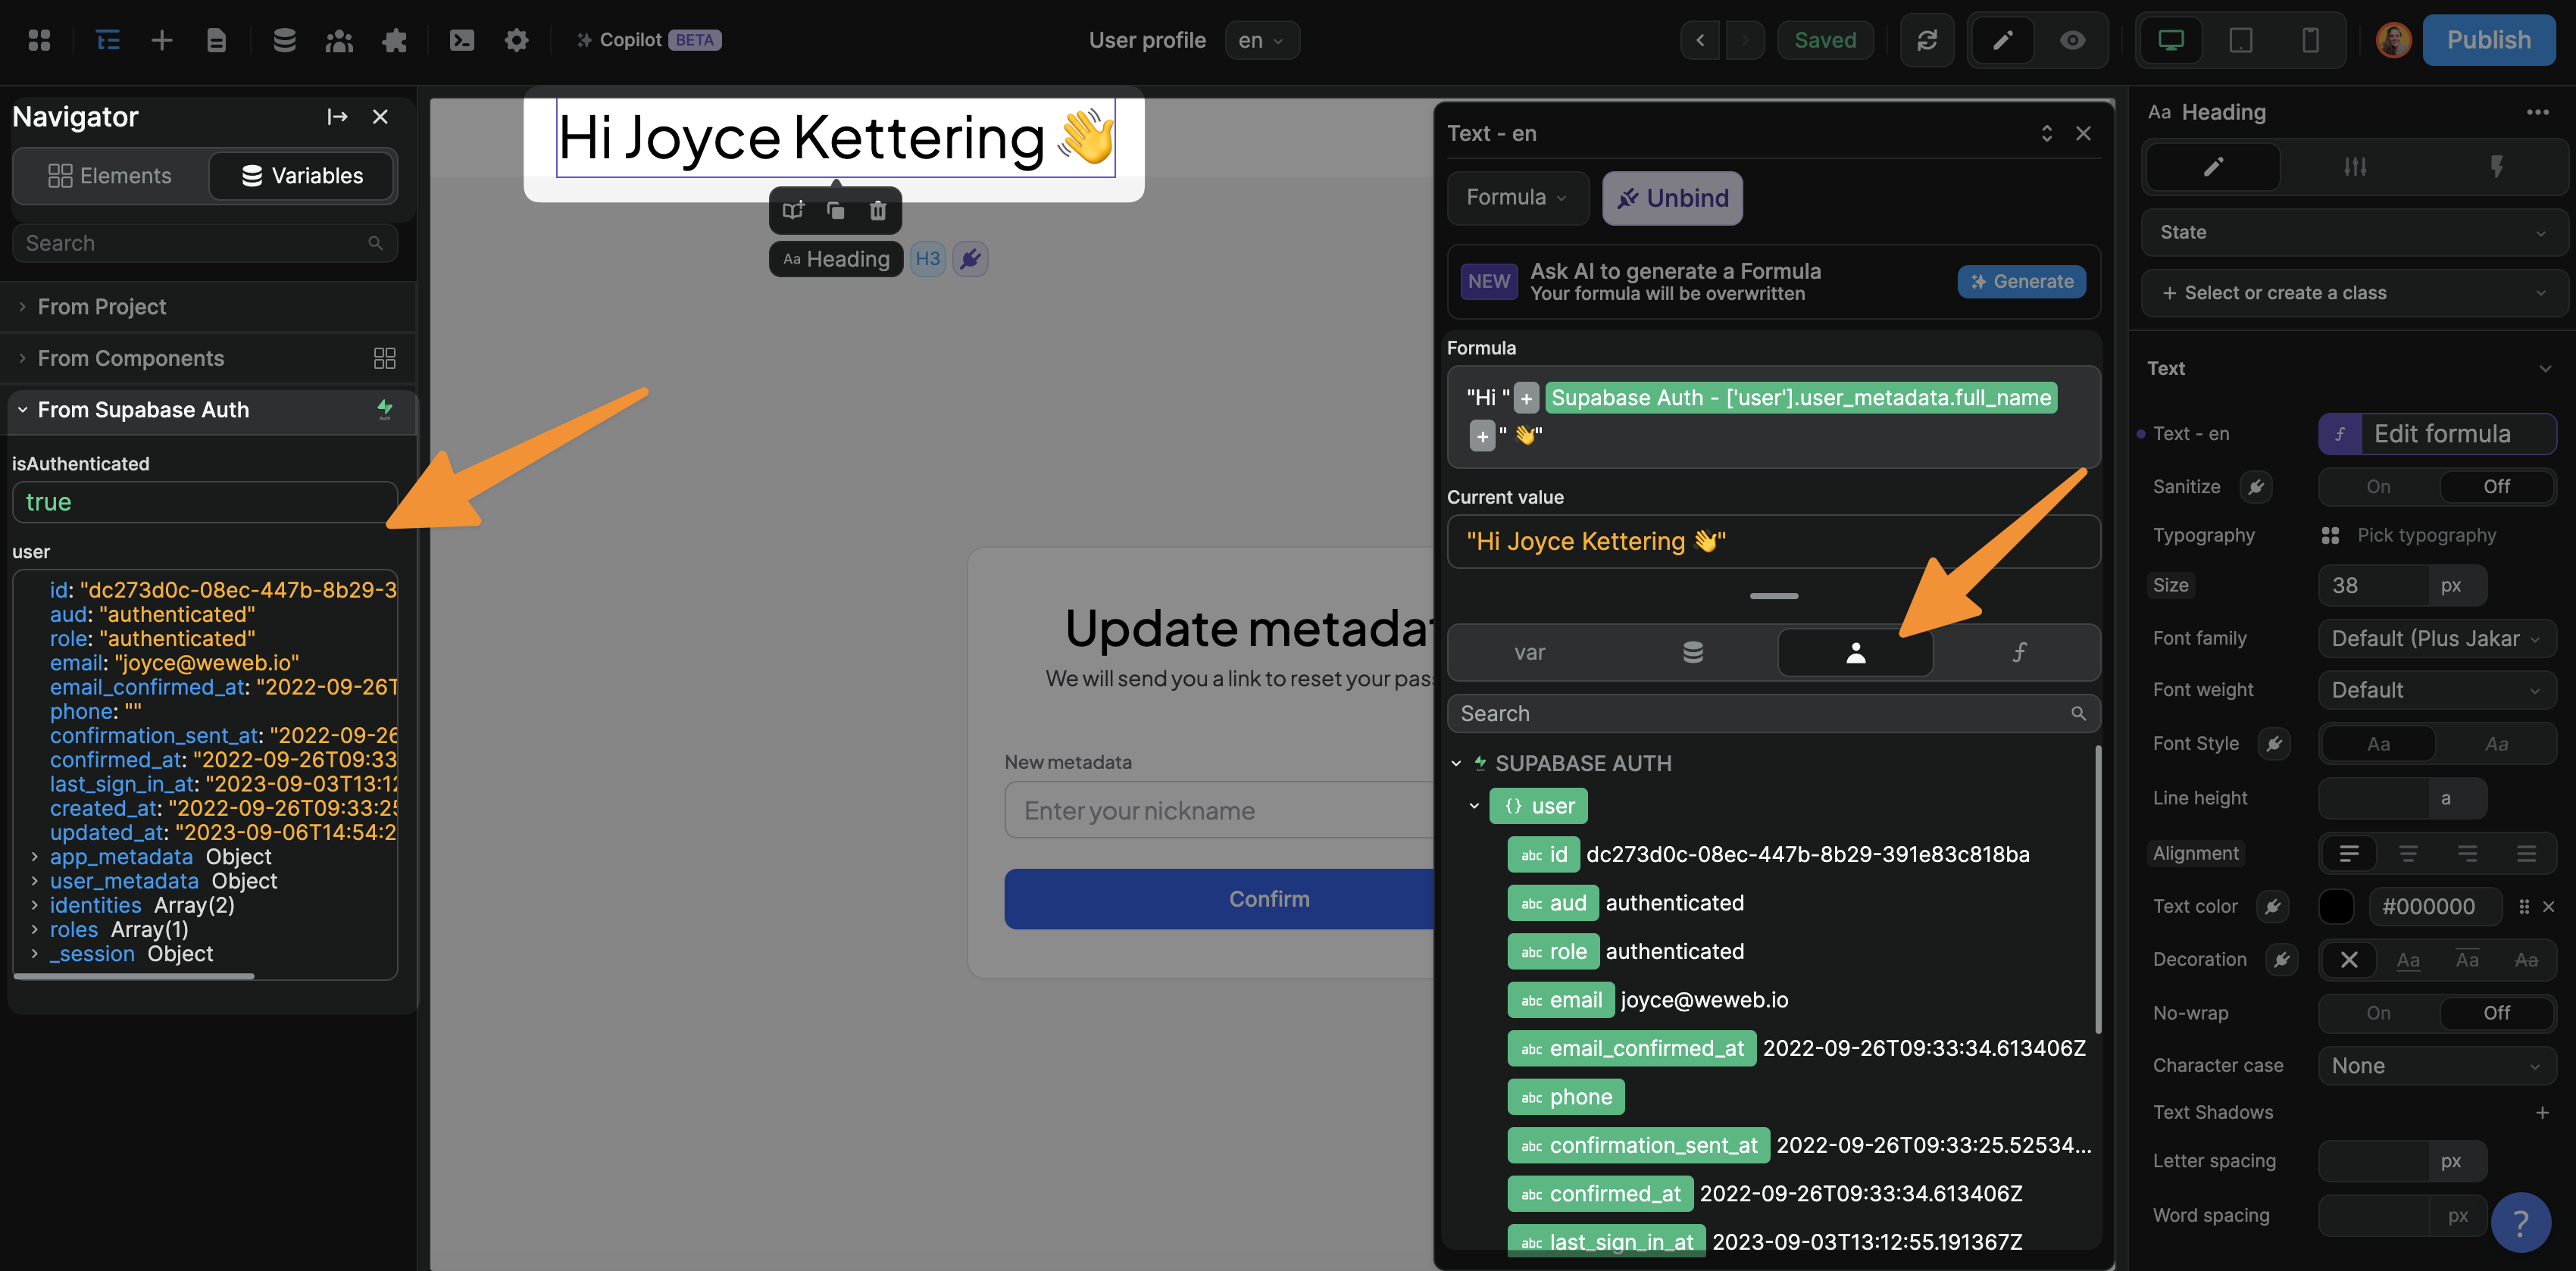
Update user metadata
In the default users table of a Supabase project, you can add user metadata in the raw_user_meta_data column which expects a JSON.
To pass user metadata from WeWeb to Supabase, you have two options.
1- select a key in the Metadata dropdown when using the Sign Up or Update User Metadata action in a workflow
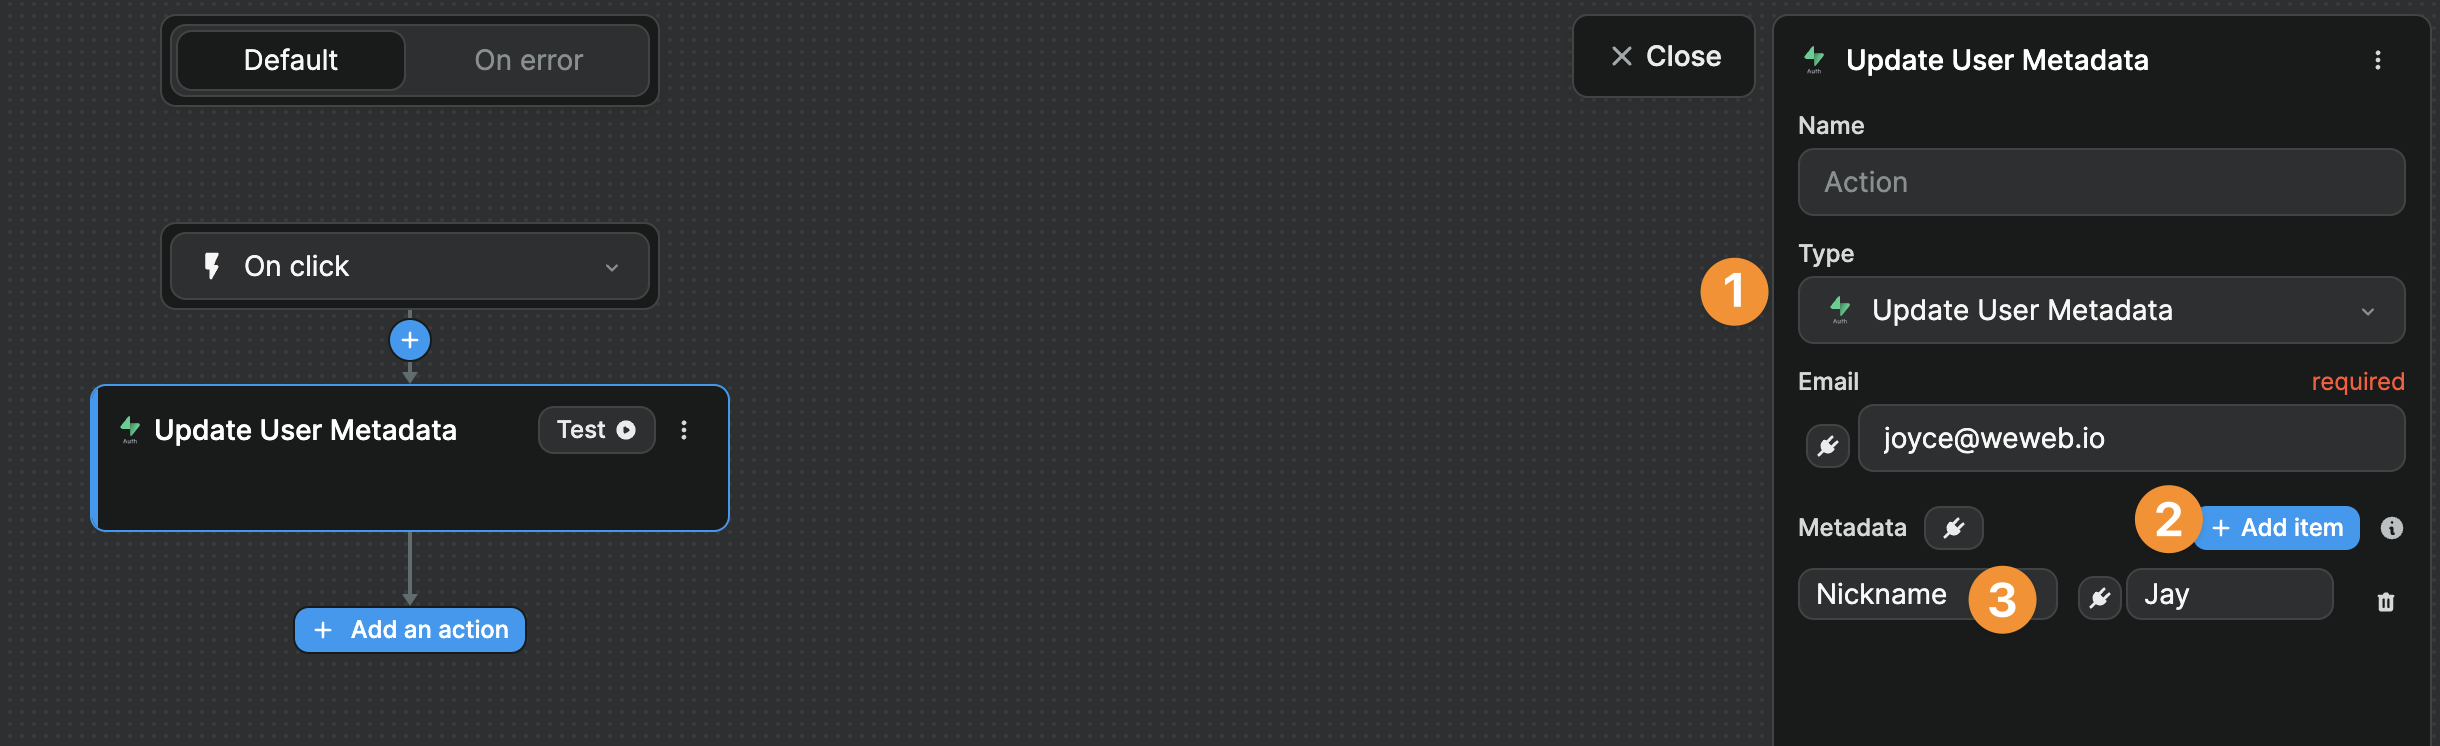
2- bind the Metadata field to update Supabase with custom metadata.
This fields expects an array of objects where, for each object, you explicitly say this is my key and this is the corresponding value for this item. For example:
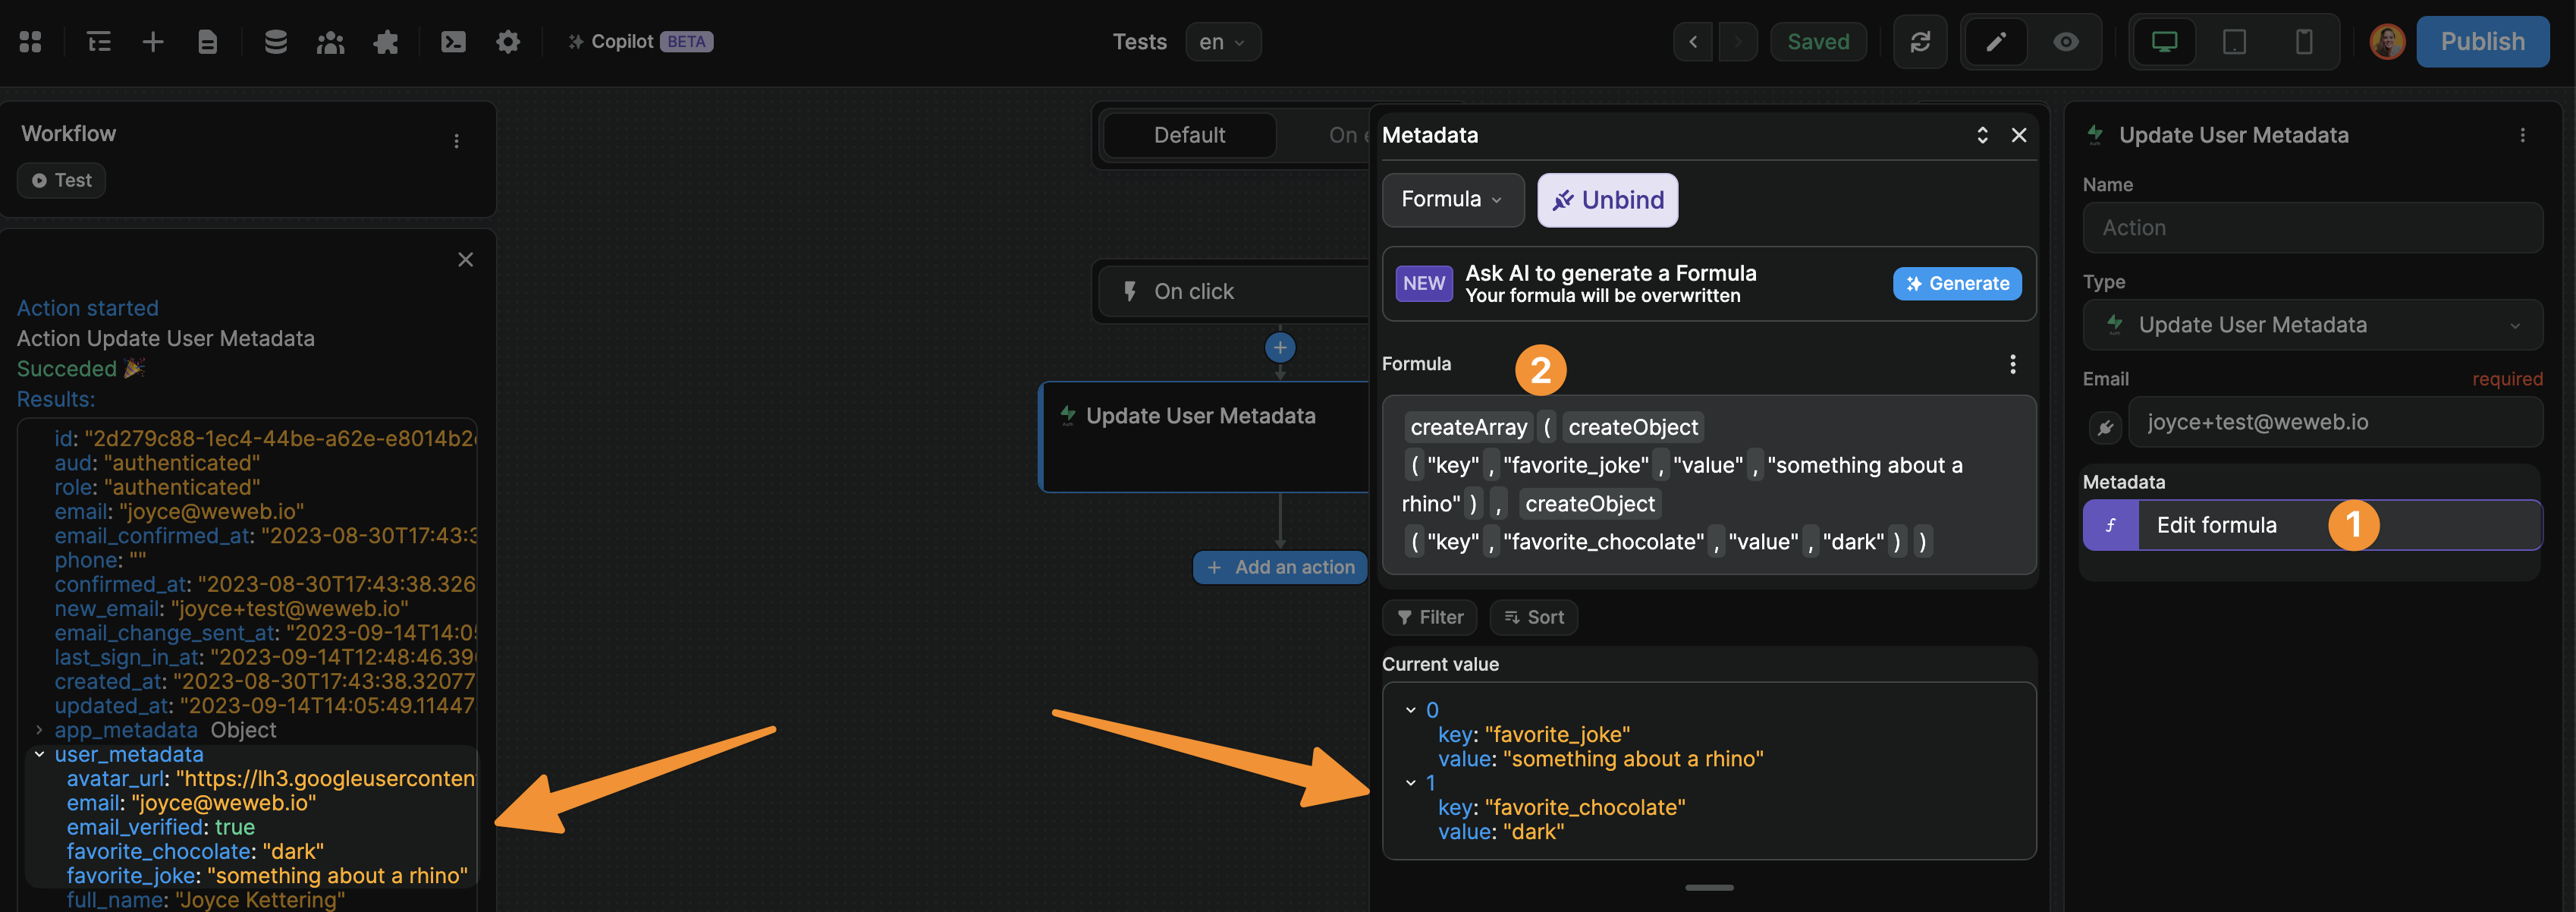
In the example above, we used a no-code formula to create the array of objects but, if you're used to the syntax, it can be easier to write in JavaScript:
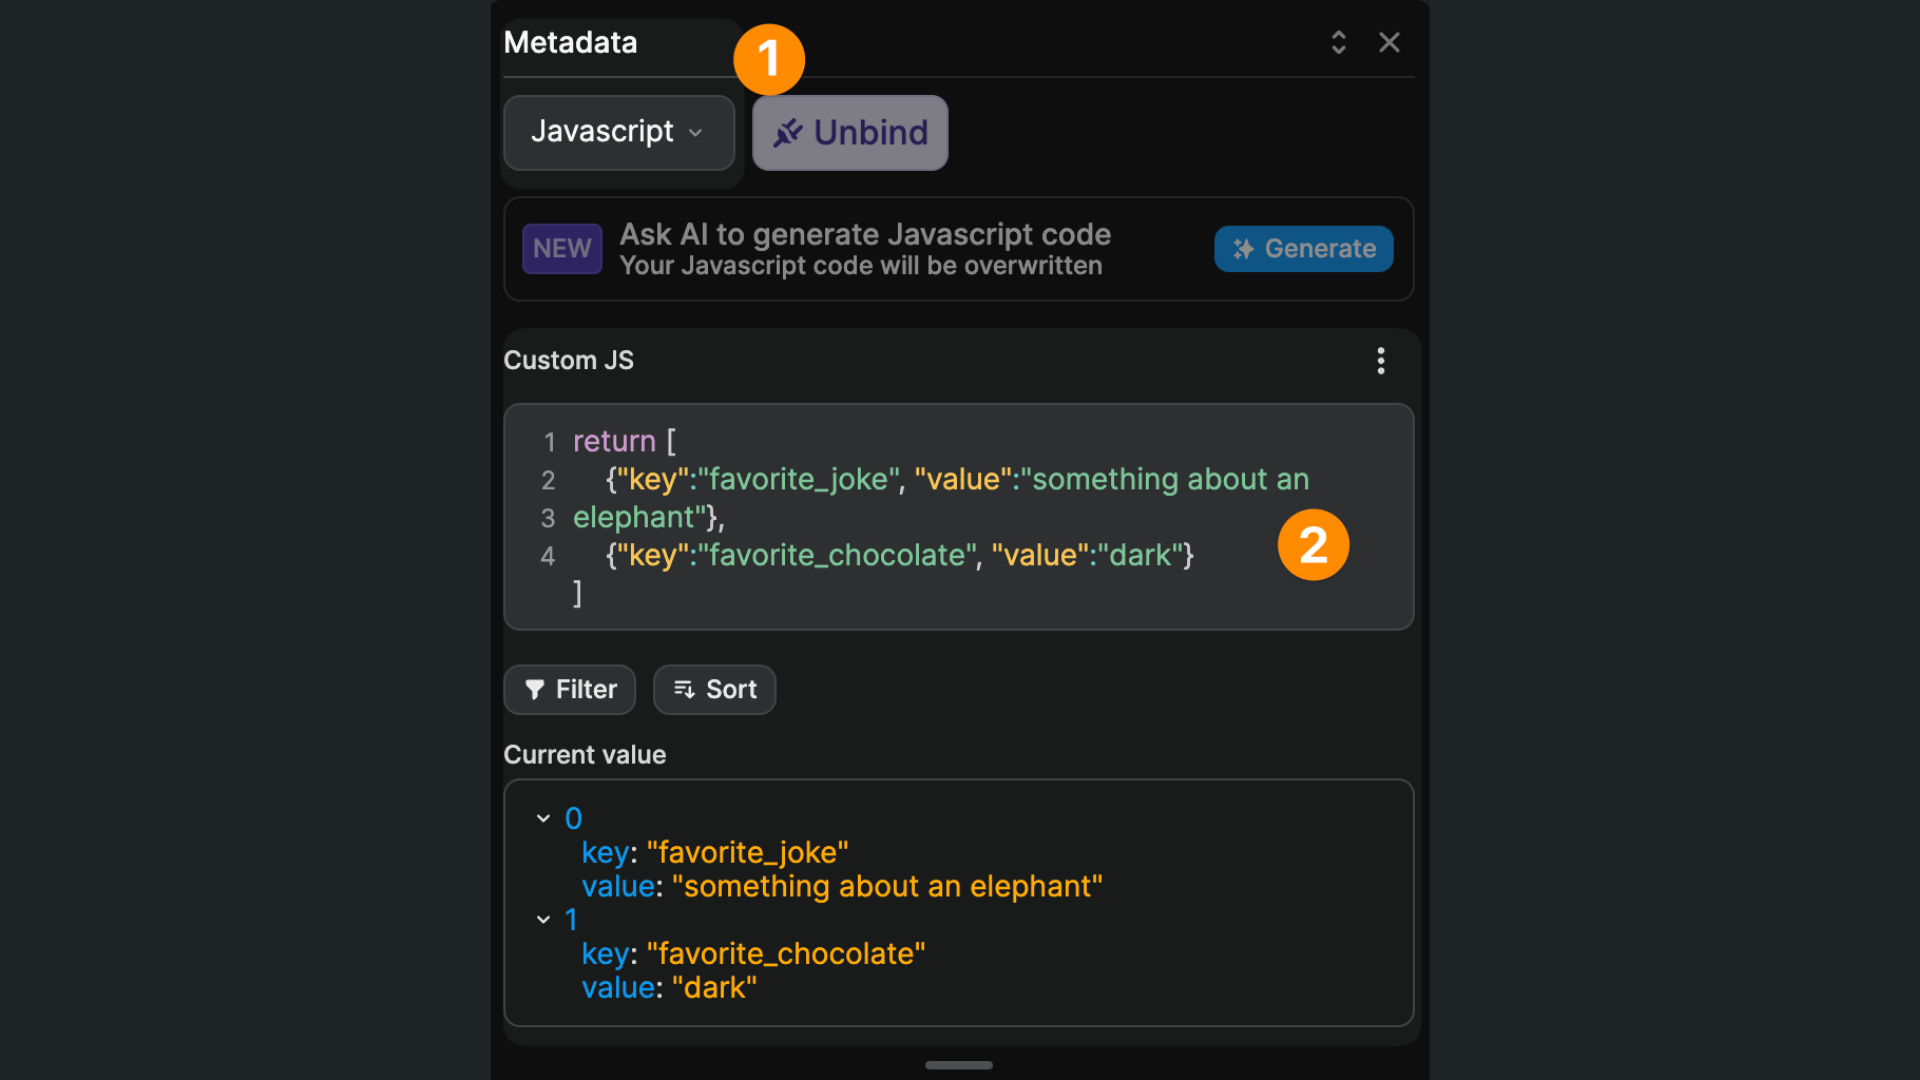
Here's a code snippet you might find helpful to avoid typos:
js
return [
    {"key":"favorite_joke", "value":"something about an elephant"},
    {"key":"favorite_chocolate", "value":"dark"}
]
WARNING
You will not be able to update the user metadata of users who are logging in through a third-party provider because their metadata is related to the OAuth provider they are authenticated with.
If you wish to request further information from these users, we recommend creating a profiles table in the public schema of your Supabase project that is synced to your users table.
Learn more about working with user profiles in Supabase.
User roles & permissions
Now let's say we want to gate content and set different permissions based on a user's role. We will need to:
- Create a
rolestable in Supabase with the list of available roles - Create a join table in Supabase that maps the users with a role
- Tell the Supabase Auth plugin in WeWeb where it can find the information
1. Add roles in Supabase
In Supabase, we'll need to create a roles table with a list of roles and a join table that links the roles table with our users table.
First, let's create a roles table with three roles and make sure that each role had a UUID and a name:
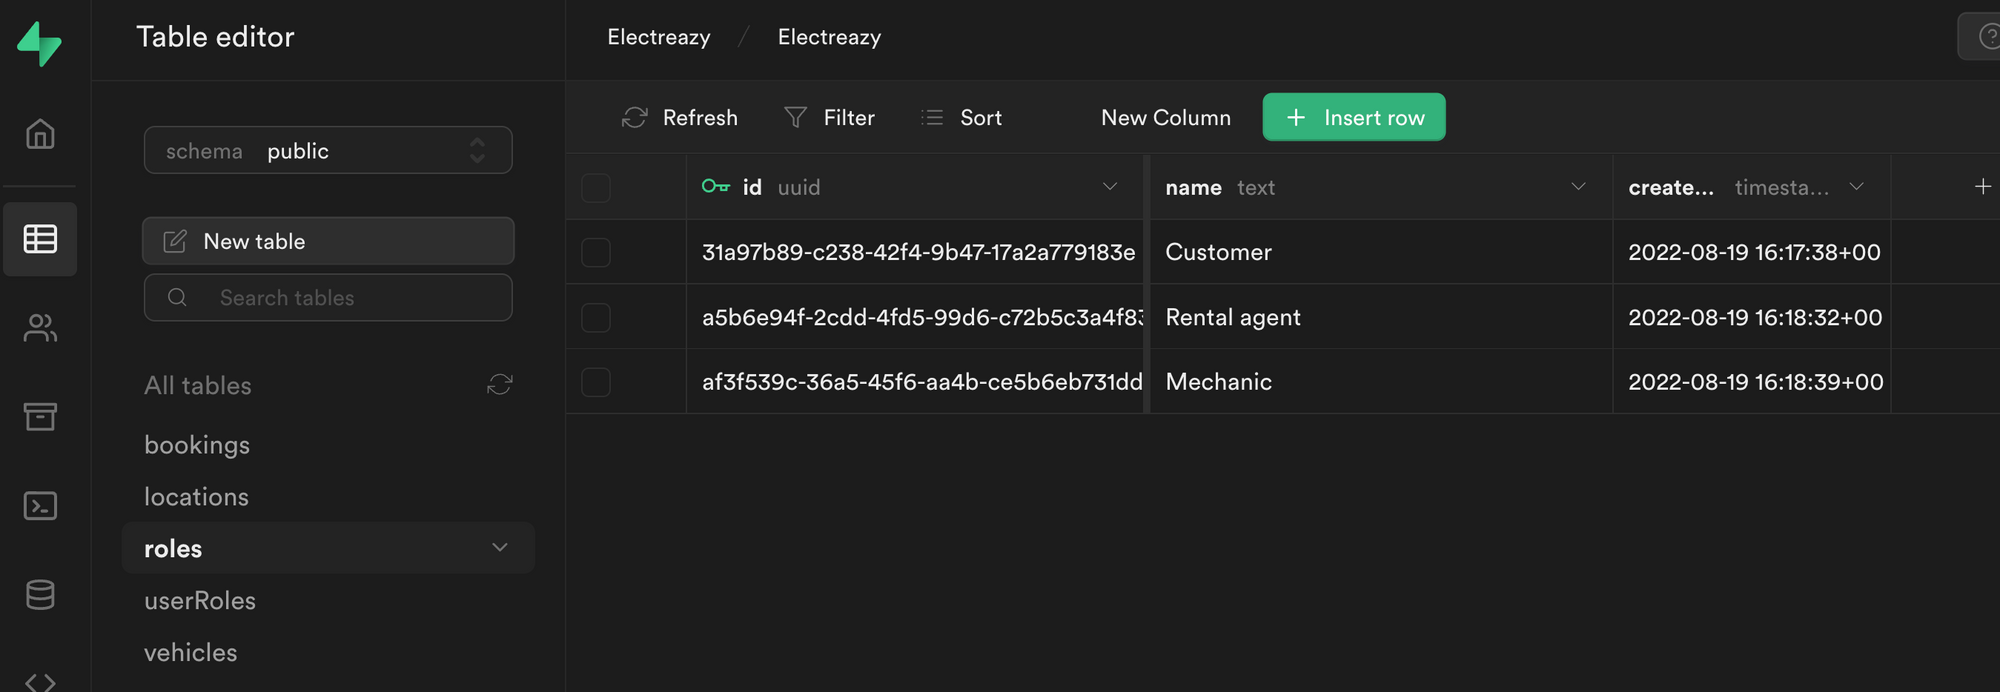
WARNING
In order for the integration to work with the Users tab in WeWeb, it is crucial that the role title is a text field named name.
2. Join roles and users in Supabase
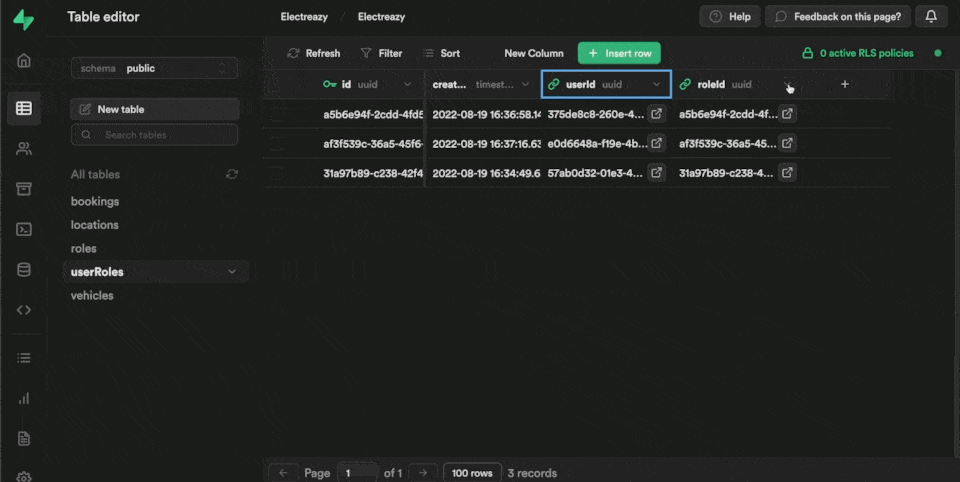
Second, let's create a userRoles join table:
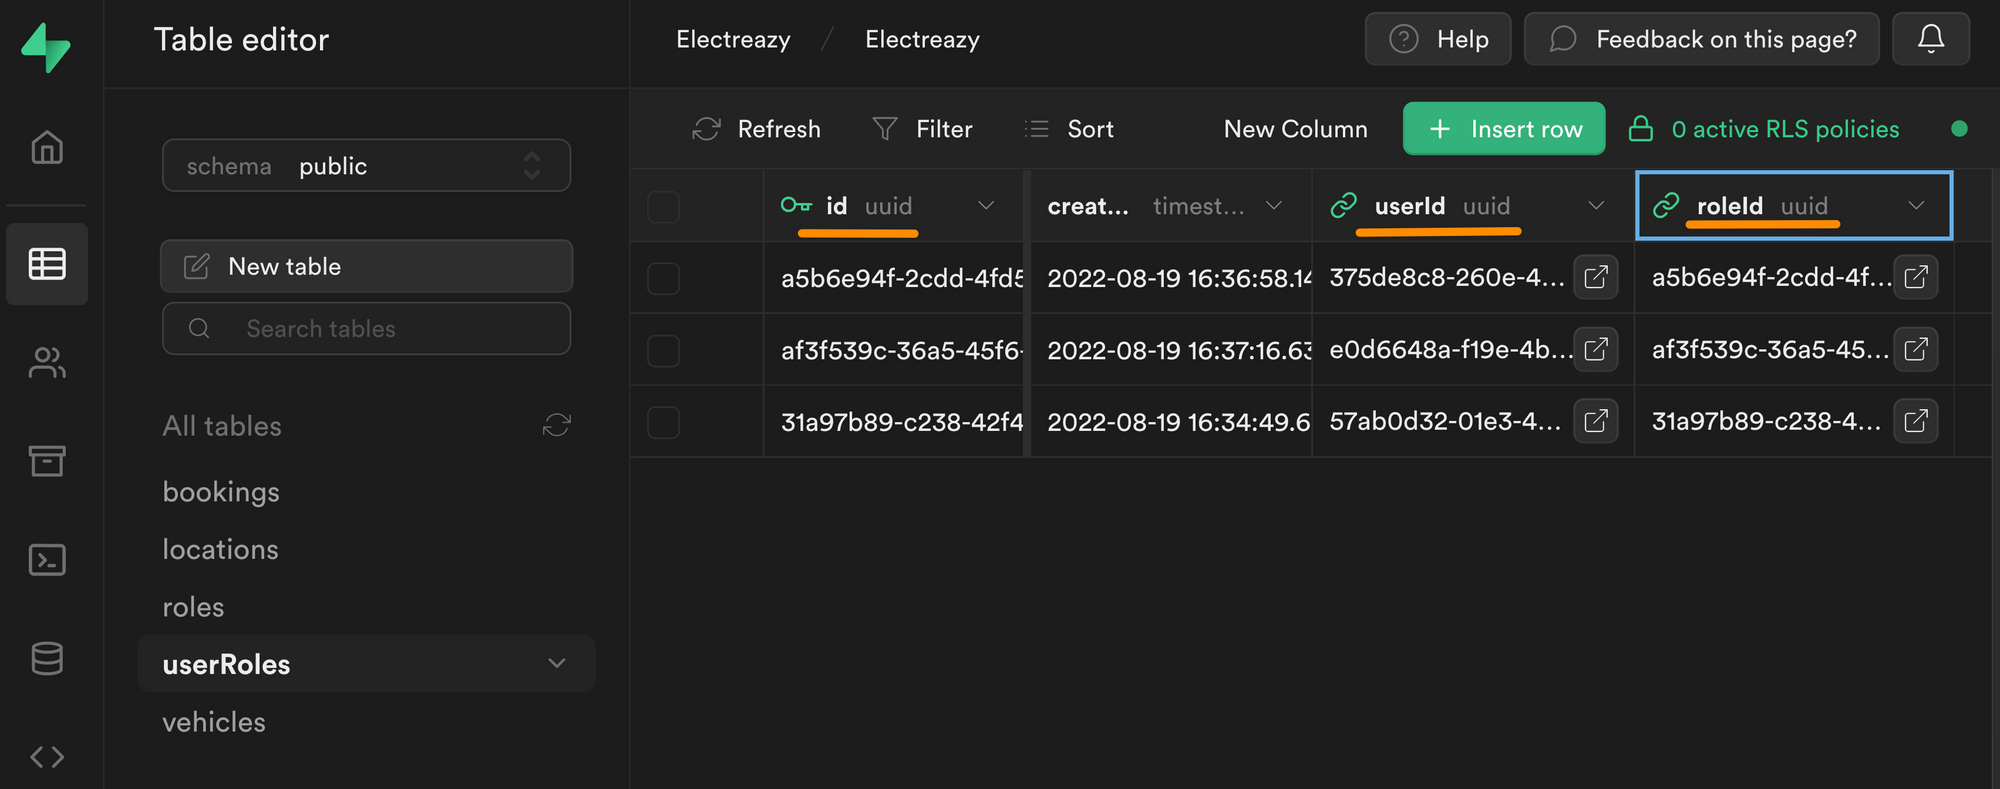
In the join table above, you can see we have an id field that is uniquely identifiable thanks to a UUID.
This unique id is linked to a userId, which is also a UUID. More specifically, it is the UUID we find in the id field of the users table in the auth schema:
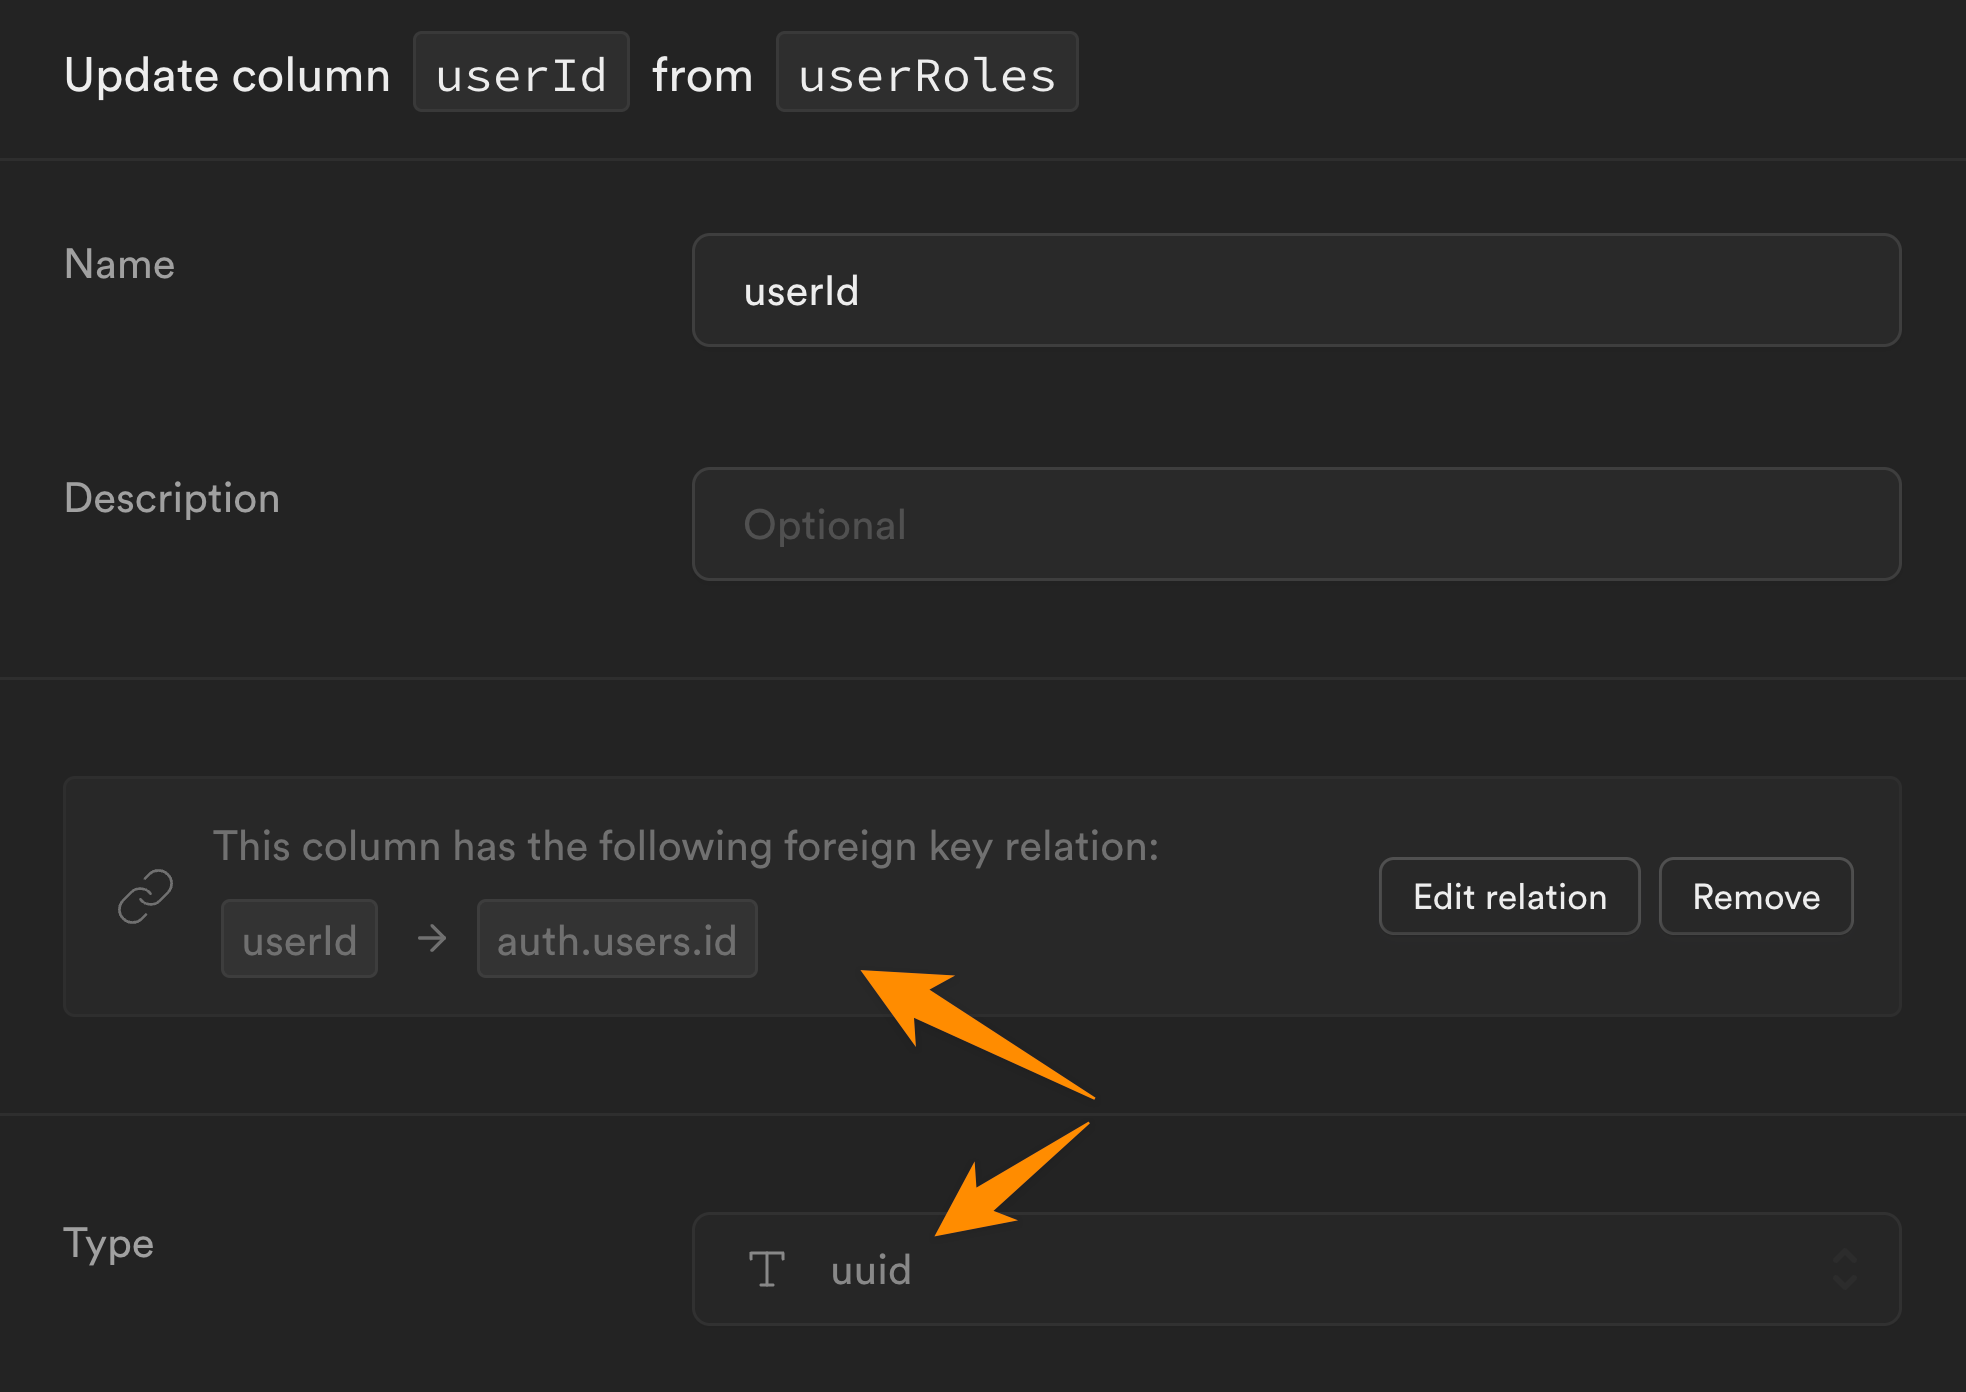
Each row in our userRoles table is also linked to a roleId which is the UUID we find in the id field of the roles table in the public schema:
3. Link users in WeWeb to roles and users in Supabase
Once we've added our list of roles in Supabase and created an empty join table to link our roles with users, it's time to go to WeWeb.
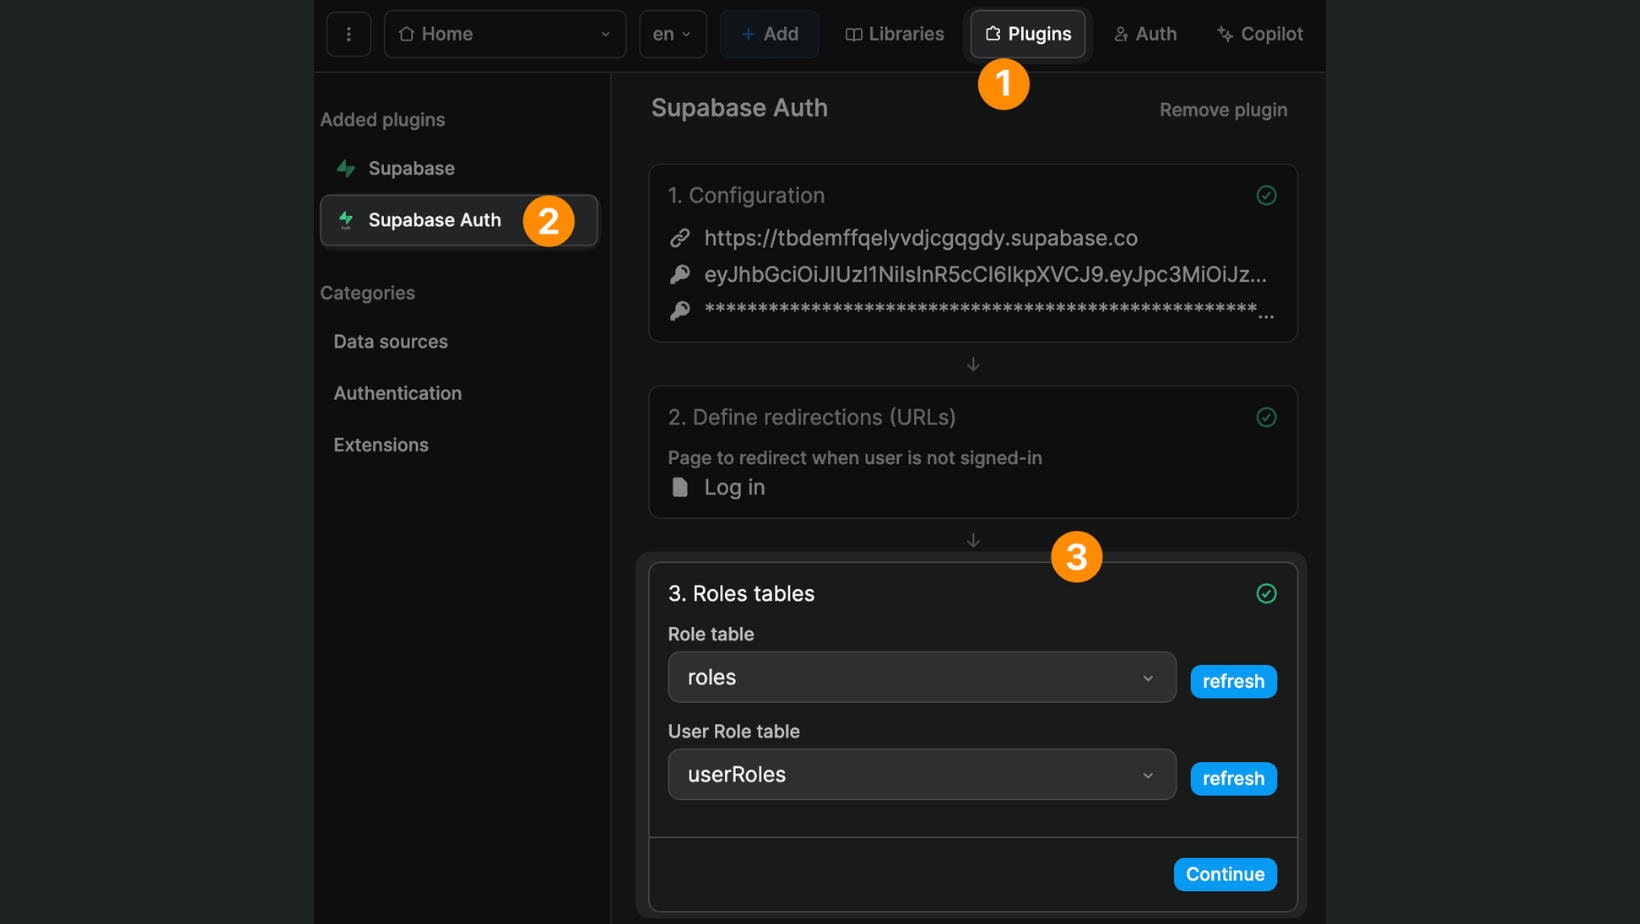
In Plugins > Supabase Auth > 3. Roles table, we'll click refresh and select the relevant Supabase tables we just created:
Once you've told WeWeb where to find the roles and the join table in Supabase, you'll be able to easily view and maintain user roles in the Users tab in WeWeb:
When you make a change to a user in WeWeb, it will automatically be updated in Supabase.
Users vs Profiles
So far, we've showed you how to work with the default users table that Supabase generates in the auth schema when you create a new project.
Note that, for security purposes, the information in that users table is not exposed on the auto-generated API.
How does this affect your project in WeWeb?
Let users update their information
Let's say you want to let authenticated users update their own information, then you don't need to set up anything else in Supabase.
You could simply create a user profile page in WeWeb and display their information when they sign in, based on the data you have in the user variable:
Display other users' information
In some use cases, you might want to display other users' information.
For example, if you're building an HR portal in WeWeb, you might want HR employees to have access to a list of applicants and their user profiles.
You wouldn't be able to do that with the users table in the auth schema because each user's information is only available to them.
For such a use case, Supabase recommends creating a profiles table in the public schema to store user data that you want to access via the API.
In WeWeb, you would then be able to create a Collection to get data from the profiles table.
Learn more about managing user data in Supabase: