

Appearance
Build a task manager from scratch
Build a complete app in WeWeb, from an empty project to a published task manager.
In this guide, you build a small app where your users sign in, add tasks, check them off and delete them. Each user only sees their own tasks. Along the way, you use the main parts of WeWeb: sign-in for your users, a table to store data, API endpoints to change it safely, a view to read it, a page to show it, and workflows to make the page react.
You build everything by hand, without AI, so you see how each piece fits with the others. Most steps link to the WeWeb 101 page that explains the feature in more detail.
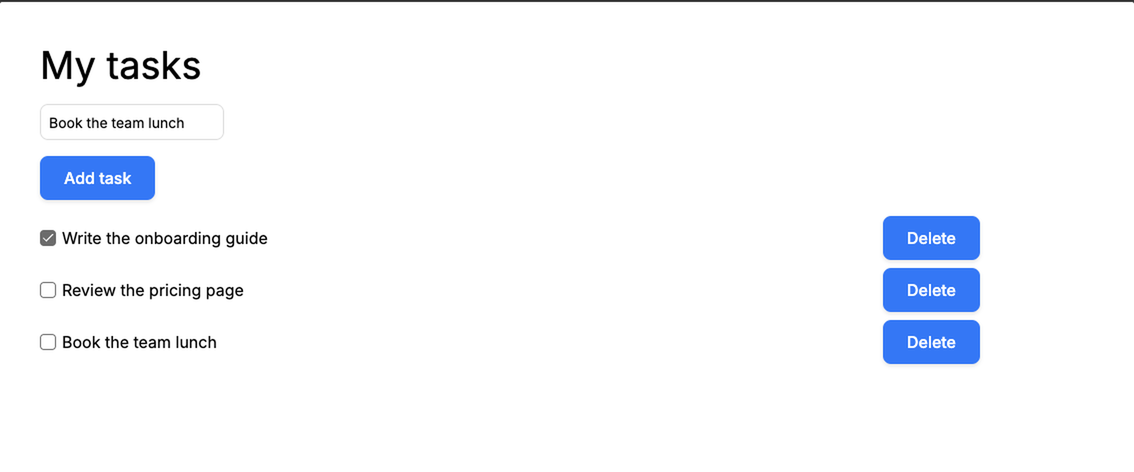
What you'll build
- A
Login,SignupandForgot passwordpage, created for you by WeWeb. - A
taskstable, where each task stores its name, whether it's done, and the user who owns it. - Three API endpoints to add, update and delete a task, which only work for the signed-in user's own tasks.
- A
My tasksview that only returns the signed-in user's tasks. - A
Homepage that lists the tasks, with workflows to add, check off and delete them.
Create the project
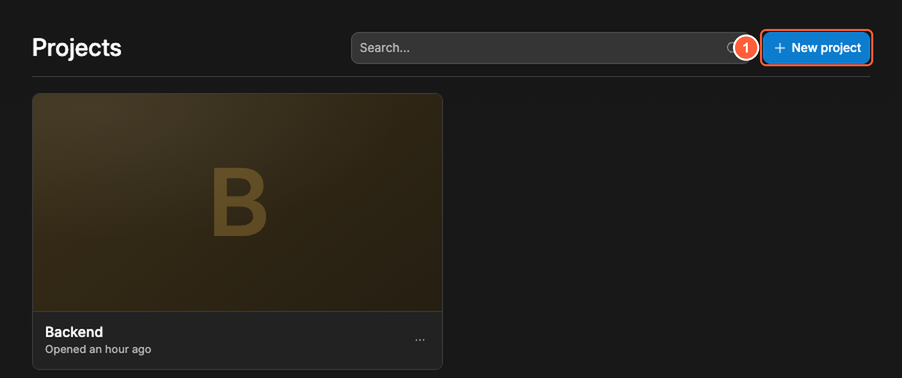
- In the WeWeb dashboard, click
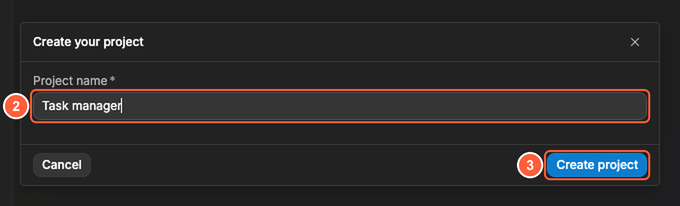
New project. - Type a
Project name, for exampleTask manager. - Click
Create project.
The editor first asks What would you like to build?, so WeWeb AI can build a first version for you. In this guide, you build the app yourself:
- Click
Go to Editor (skip)at the top right.

The editor opens on an empty page called Home.
Learn more about creating a project →
Add sign-in for your users
Your users need an account so the app knows whose tasks to show. WeWeb Auth handles sign-up, sign-in and passwords for you.
WeWeb sets up your server and database the first time you add authentication or a table. Since sign-in comes first in this guide, that happens now.
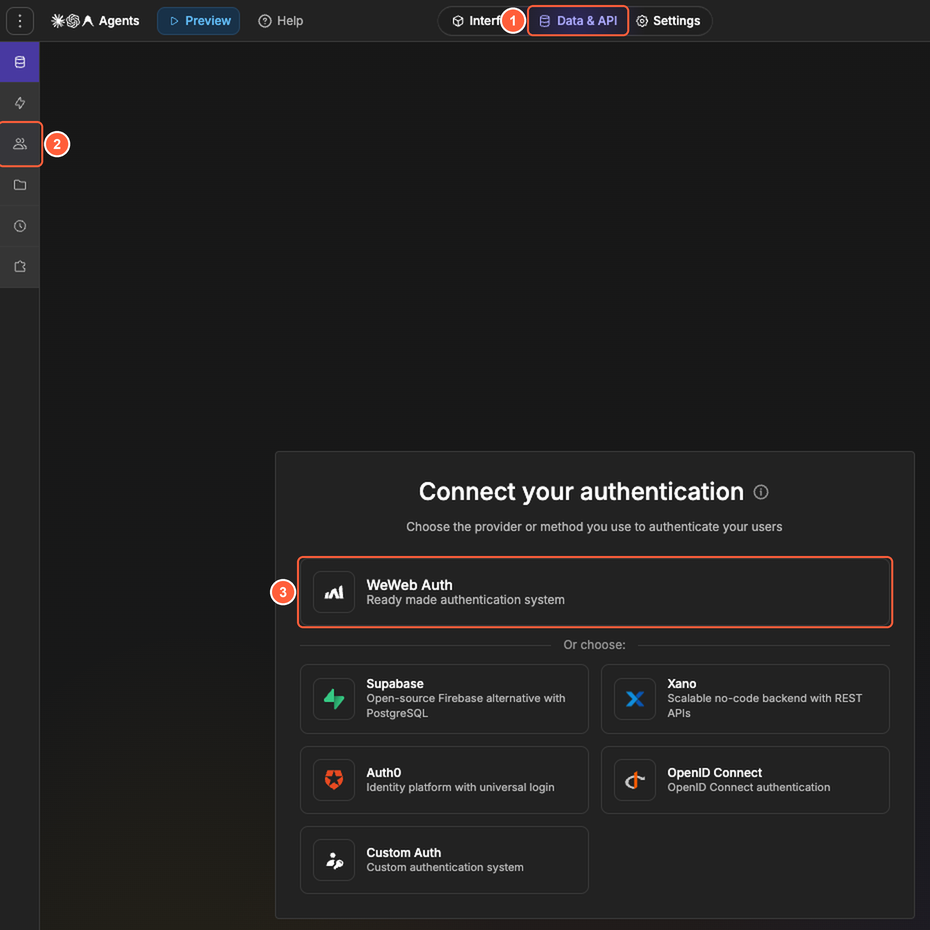
- Open the
Data & APItab at the top of the editor. - In the left bar, click the
Authenticationicon. - Choose
WeWeb Auth.
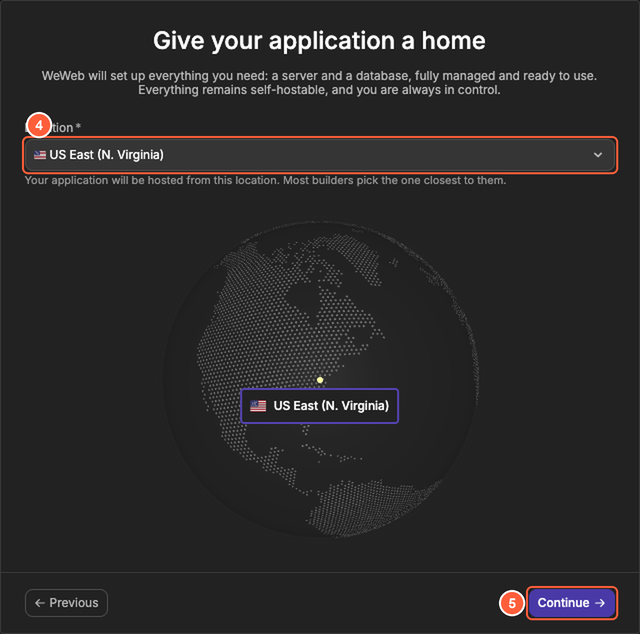
- In
Location, choose where your app and its data are hosted. Most builders pick the one closest to them, or to their users. - Click
Continue.
- In
Auth pages, chooseSetup automatically.
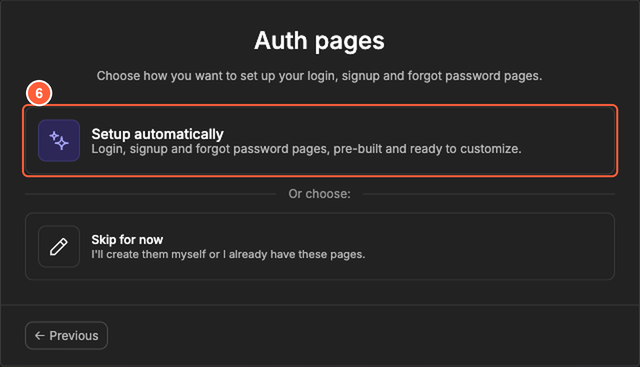
WeWeb then creates the database, sets up sign-in, starts the server and adds a few test users. It can take a few minutes. It also adds a Login, a Signup and a Forgot password page to your project, in an Auth folder.
Learn more about securing your application →
Create the tasks table
A table stores your data in rows and columns, like a spreadsheet. Each row of the tasks table is one task.
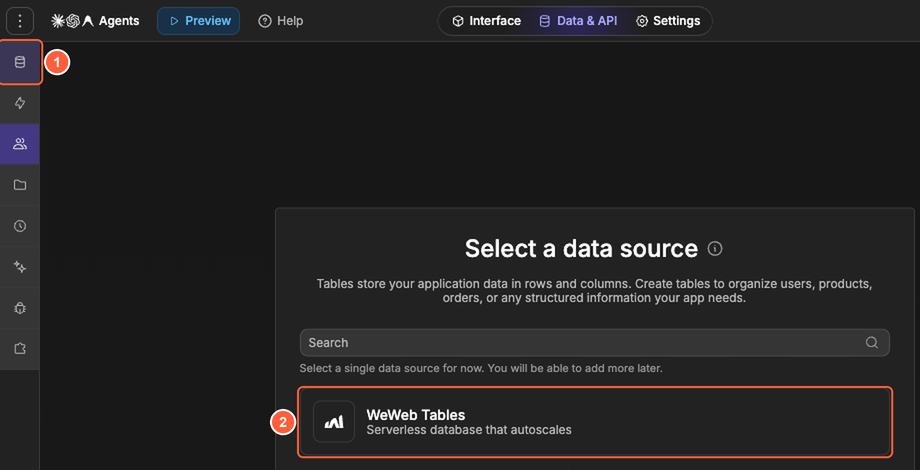
- In the
Data & APItab, click theTablesicon in the left bar. - Choose
WeWeb Tables.
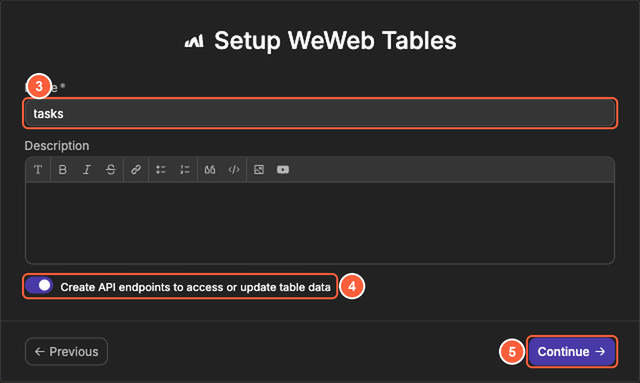
- In
Name, typetasks. - Leave
Create API endpoints to access or update table dataon. WeWeb then creates the endpoints your app needs to add, update and delete tasks. - Click
Continue.
The table already has an id, a name, a createdAt and an updatedAt column. The name column holds the text of each task. Add a column to know whether a task is done:
- Click
+at the end of the column headers. - In
Column Name, typedone. - In
Column Type, chooseTrue/False. - In
Default Value, chooseFalse, so new tasks start unchecked. - Click
Add Column.
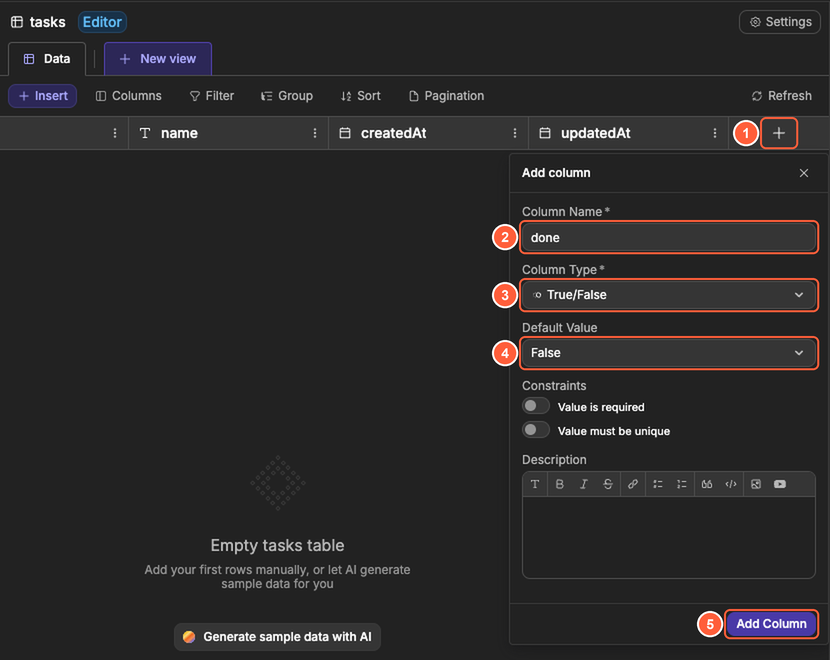
Then add a column to know who owns each task. Click + again, and:
- In
Column Name, typeowner. - In
Column Type, chooseLink to Users. This links each task to one of your app's users. - Turn on
Default to current user, so a new task belongs to the user who creates it. - Click
Add Column.
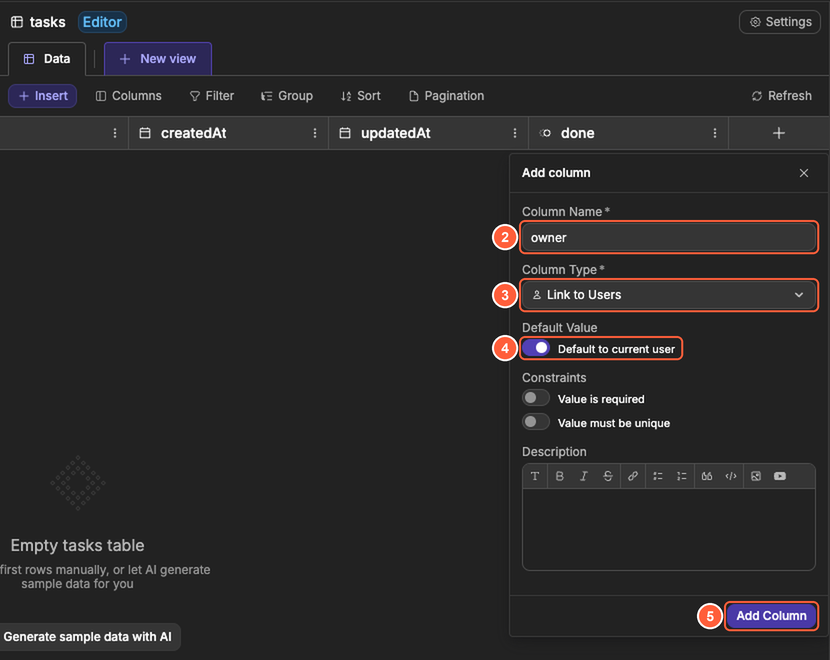
Learn more about working with data →
Secure the API endpoints
An API endpoint is a link your app calls to create, change or delete data on the server. When you created the table, WeWeb added four endpoints under Table: tasks: Add Row, Delete Row, Get Row and Update Row. They all start as Public, which means anyone who has the link can use them, even without an account. In this step, you make sure only signed-in users can use them, and only on their own tasks.
Delete the endpoint you don't need
Your app reads tasks through a view (you create it in the next step), so it doesn't need Get Row. An endpoint you don't use is one more way into your data, so delete it:
- In the
Data & APItab, click theBackend Workflowsicon in the left bar, thenAPI Endpoints. HoverGet Rowand click its⋮menu. - Click
Delete, then confirm.
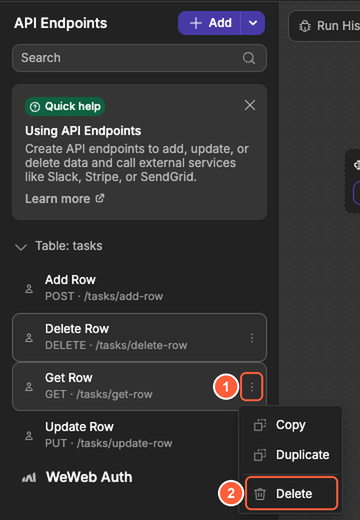
Only allow signed-in users
- Click
Add Rowin the list. - Under the endpoint name, click
Public. - Choose
Authenticated.
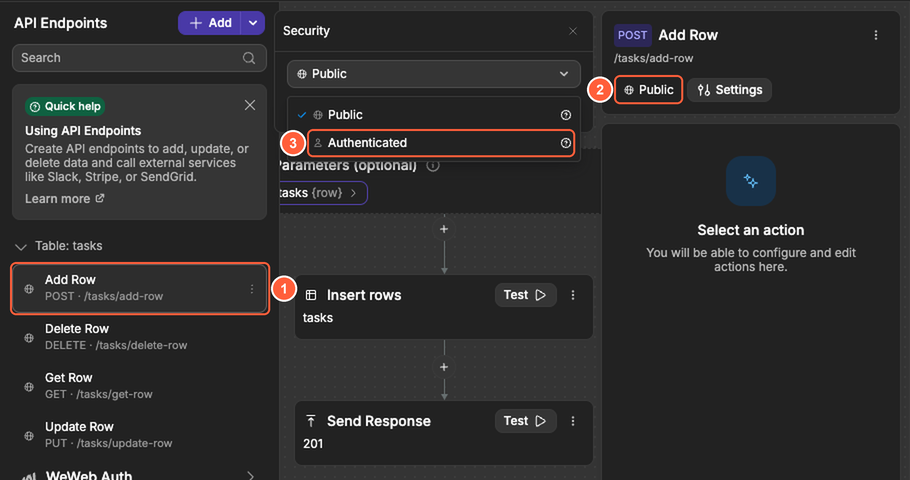
Do the same for Delete Row and Update Row.
Make each new task belong to the signed-in user
Your app sends the data of the new task to Add Row. To be sure nobody can create a task for someone else, set the owner on the server instead:
- In
Add Row, click theInsert rowsaction. - In
Data, click the bind icon next toowner, thenEdit formula. - In the formula window, open the user tab.
- Open
userand clickid.
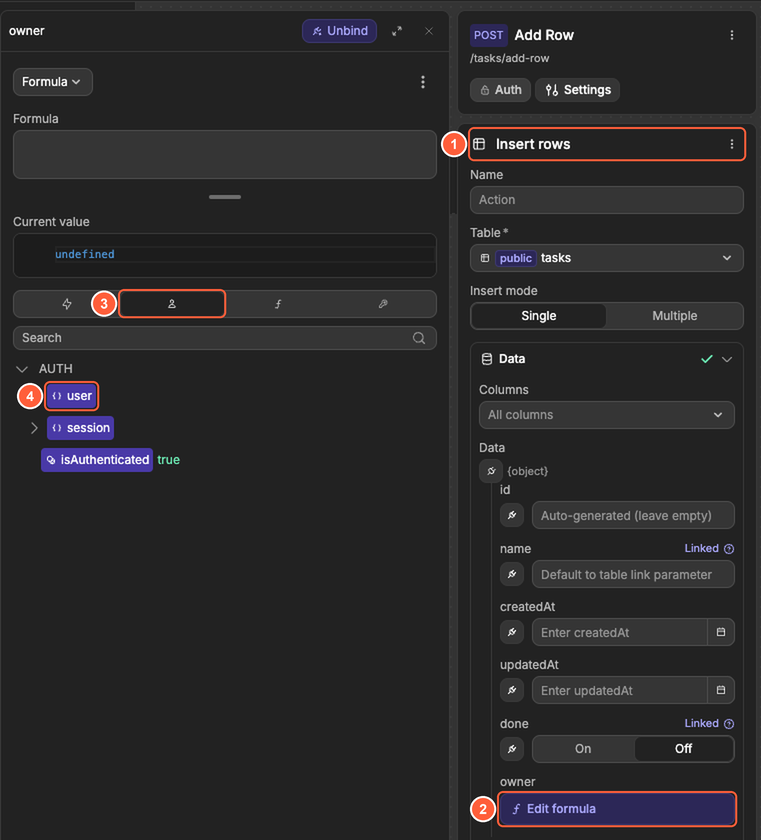
The owner field now shows Auth['user'].id: the ID of the user who calls the endpoint. Set owner the same way in the Update rows action of Update Row, so nobody can give a task to another user.
Only change the signed-in user's own tasks
By default, Update Row and Delete Row change the task whose ID they receive, whoever it belongs to. Add a filter so they only change it when it belongs to the signed-in user:
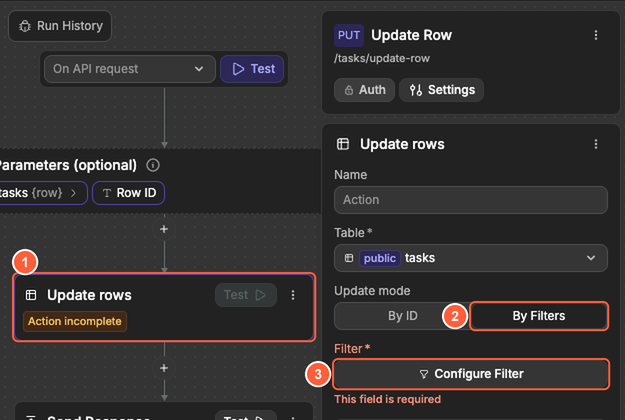
- In
Update Row, click theUpdate rowsaction. - In
Update mode, chooseBy Filters. - Click
Configure Filter.
- Set the first condition to
WhereidIs, and bind its value to theRow IDparameter of the endpoint. - Click
Add conditionand set it toAndownerIs, then bind its value to the user'sid, as you did forAdd Row.

Do the same in the Delete rows action of Delete Row: choose By Filters in Delete mode, and add the same two conditions.
Learn more about creating secure logic →
Create a view of the user's tasks
A view is a saved way to read a table: which rows, which columns, and who can read them. Your page uses it to list the tasks.
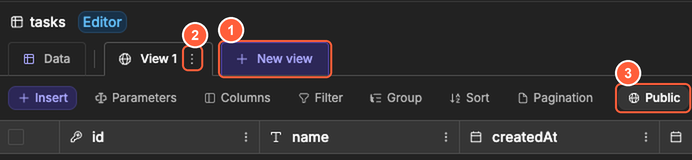
- In the
Data & APItab, open thetaskstable and clickNew view. - Click the
⋮menu of the new view, rename itMy tasks, and clickSave. - Click
Publicin the view toolbar and chooseAuthenticated, so only signed-in users can read it.
- Click
Filter, thenAdd condition, and set it toWhereownerIs. Bind its value to the user'sid, as you did for the endpoints. - Click
Save.
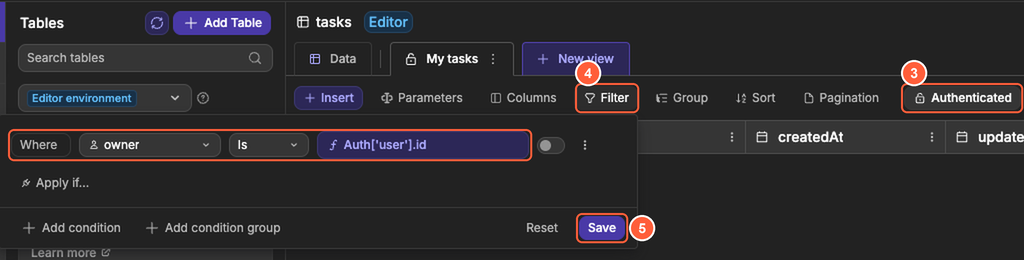
The view now only returns the tasks of the user who asks for them.
Build the page
Open the Interface tab. You build the page on Home.
Add the elements
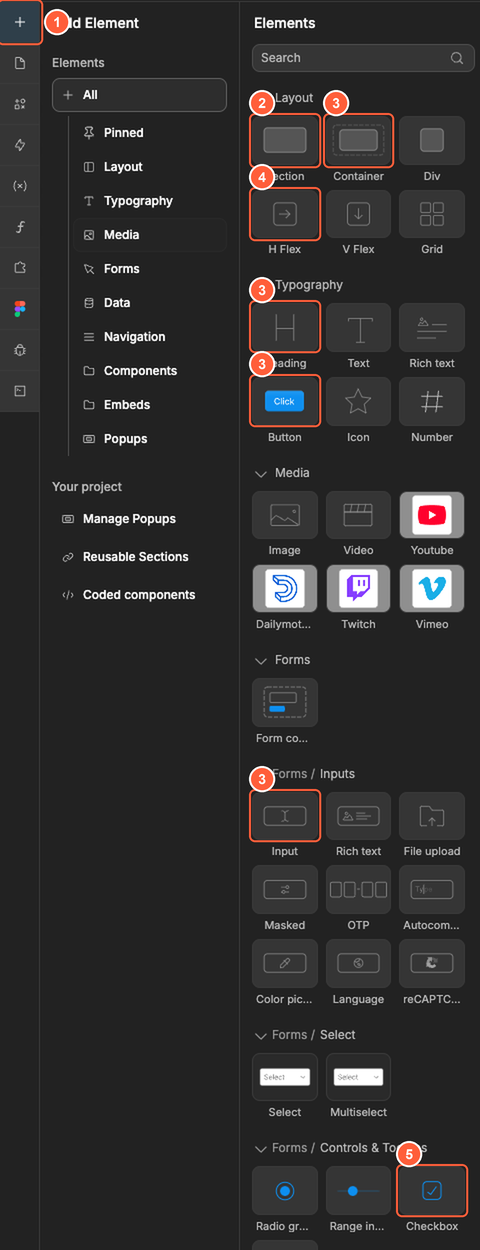
- Click the
+icon at the top of the left bar to open theAddpanel. - Drag a
Sectiononto the page. - Drag a
Heading, anInput, aButtonand aContainerinto the section, in this order. - Drag an
H Flexinto the container. - Drag a
Checkboxand anotherButtoninto theH Flex.
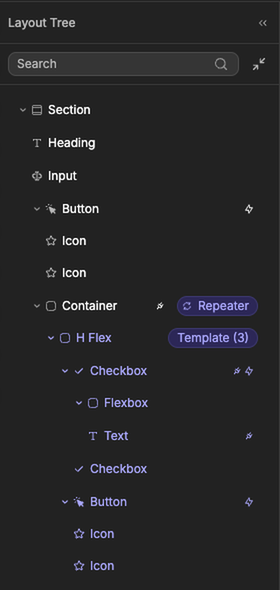
Double-click the texts to change them: My tasks for the heading, Add task for the first button, and Delete for the second one. To place an element in the right spot, you can also drag it in the Layout panel, which shows the page as a tree:
OPTIONAL STYLING
Select the H Flex and, in Layout, change Justify so the Delete button sits at the right end of each row.
Learn more about adding elements to the page →
Show one row per task
The container repeats its content once for each task of the view.
- Select the
Container. InSpecific, turnRepeat Itemson. WeWeb shows three example rows until you bind the data. - Click
Itemsto bind it. - In the formula window, open the data tab.
- Open
tasks - My tasksand clickdata.
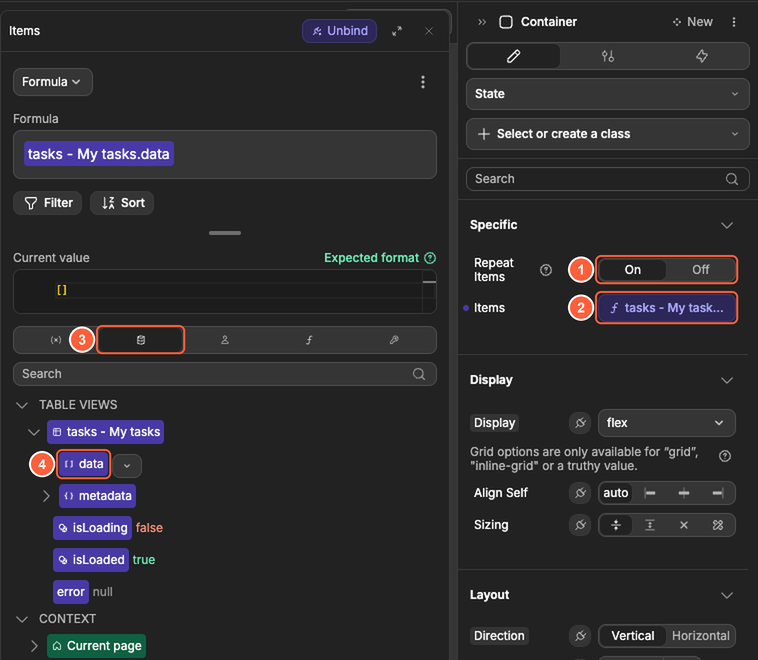
The list now shows one row per task. In the Layout panel, the H Flex shows a Template label: it's the row that WeWeb repeats.
Show the task in each row
The text of the checkbox shows the task name.
- In the
Layoutpanel, open theCheckboxand select theTextinside it. ClickEdit formulanext to its text. - Under
item.data, clickname.itemis the task of the row.
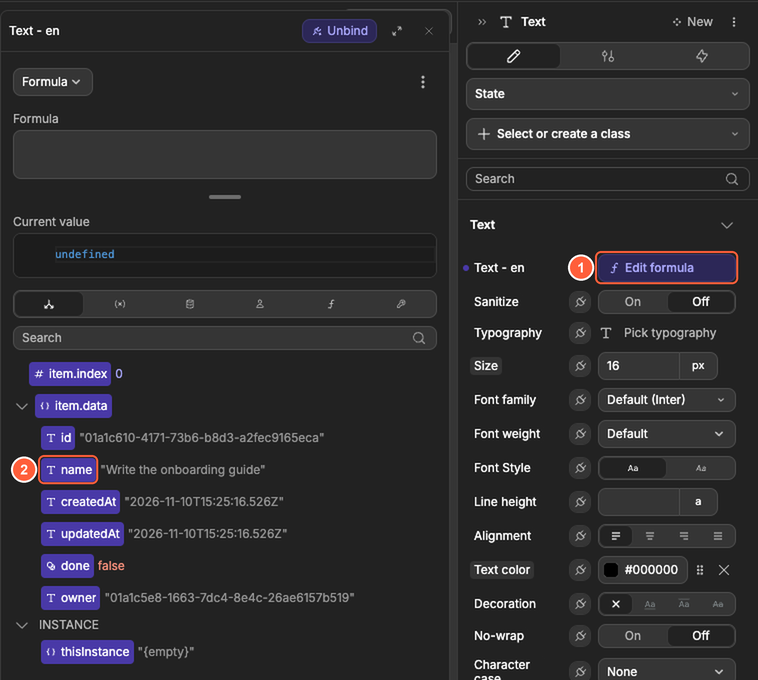
Then check the box when the task is done:
- Select the
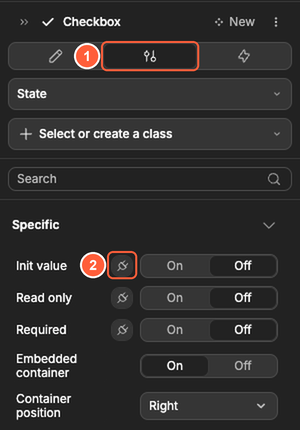
Checkboxitself and open itsSettingstab. - In
Specific, click the bind icon next toInit value, and bind it toitem.data.done.
Add a task
A workflow is a list of actions that runs when something happens on the page, here a click on the Add task button.
- Select the
Add taskbutton and open itsWorkflowstab. - Click
New.
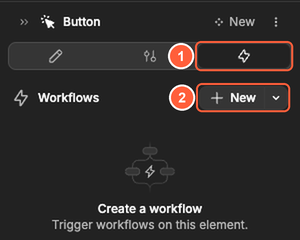
- Choose
On click.
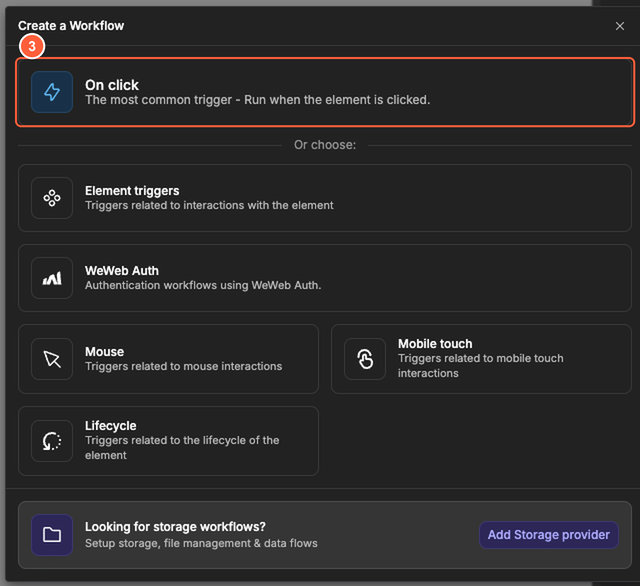
- Name the workflow
Add taskand clickContinue.
Then add the action that calls your Add Row endpoint:
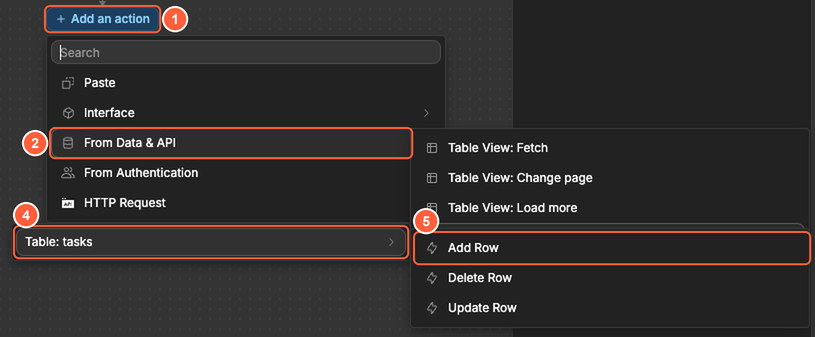
- Click
Add an action. - Choose
From Data & API. - Choose
API. - Choose
Table: tasks. - Choose
Add Row.
In the Add Row action:
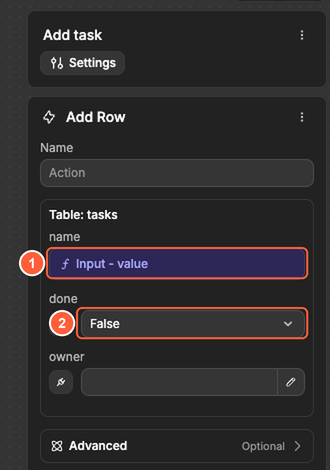
- Bind
nameto the value of the field: in the formula window, under the components of the page, clickInput - value. - Set
donetoFalse.
Leave owner empty: the endpoint sets it to the signed-in user.
Last, refresh the list so the new task shows up:
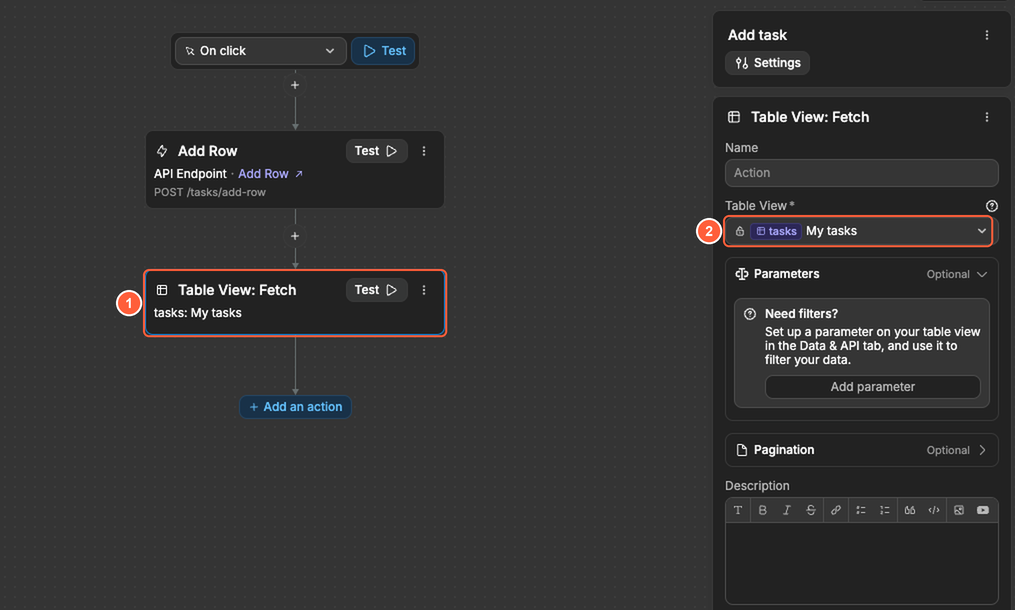
- Click
Add an actionunderAdd Row, chooseFrom Data & API, thenTable View: Fetch. - In
Table View, chooseMy tasks.
Learn more about adding interactivity →
Check off a task
When a user checks or unchecks a task, save it in the table.
- Select the
Checkbox, open itsWorkflowstab and clickNew. - Choose
On change, name the workflowToggle taskand clickContinue. - Add an action:
From Data & API, thenAPI,Table: tasksandUpdate Row.
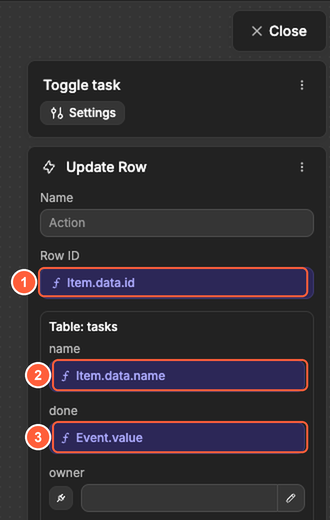
In the Update Row action:
- Bind
Row IDtoitem.data.id, the ID of the task of the row. - Bind
nametoitem.data.name, to keep the name as it is. - Bind
doneto the new value of the checkbox: in the formula window, open the event tab and clickvalueunderEvent.
Delete a task
- Select the
Deletebutton, open itsWorkflowstab and clickNew. - Choose
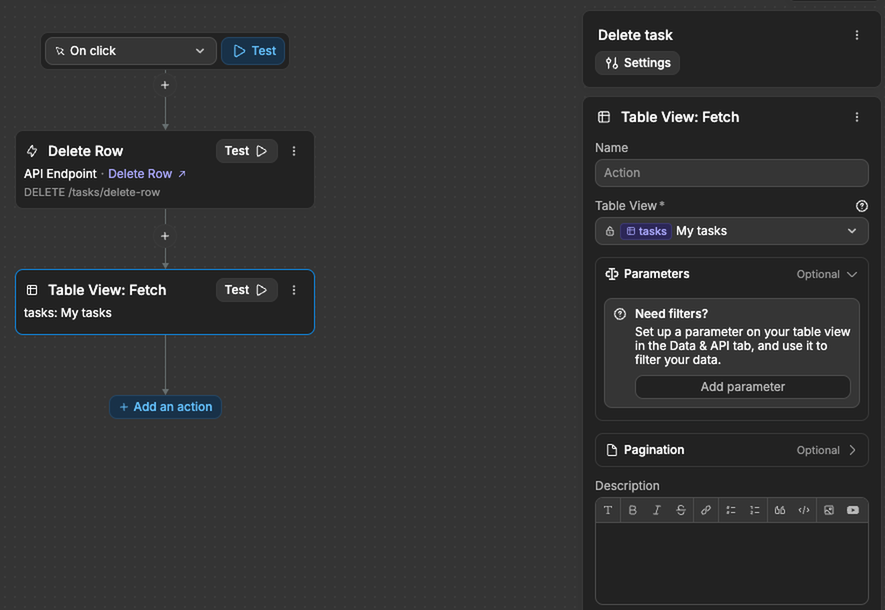
On click, name the workflowDelete taskand clickContinue. - Add an action:
From Data & API, thenAPI,Table: tasksandDelete Row. Bind itsRow IDtoitem.data.id. - Add a second action:
From Data & API, thenTable View: Fetch, and chooseMy tasks.
Make the page private
Your data is already safe: the view and the endpoints only work for signed-in users. Now send visitors who aren't signed in to the Login page, instead of showing them an empty list.
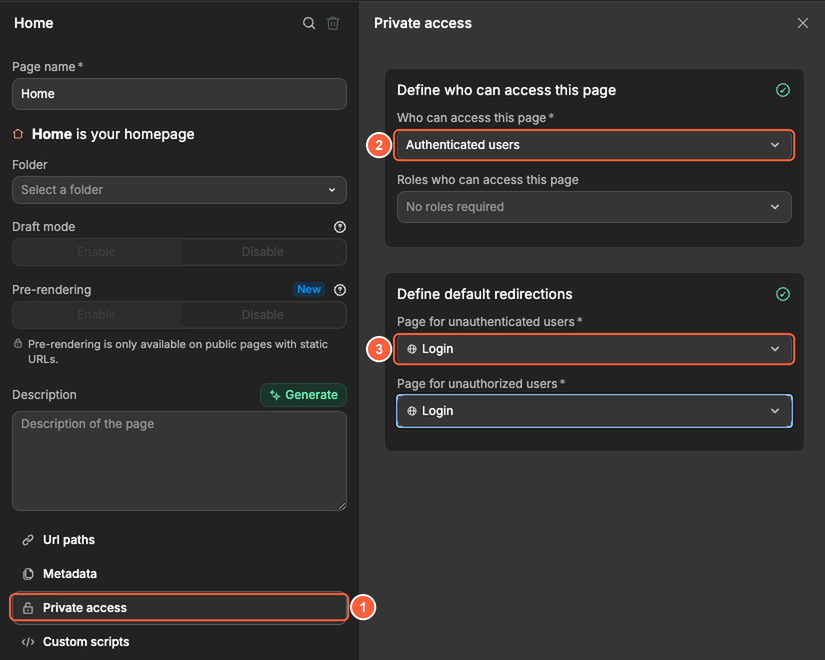
- Click the gear icon next to
Homeat the top of the page, thenPrivate access. - In
Who can access this page, chooseAuthenticated users. - In
Page for unauthenticated users, chooseLogin. InPage for unauthorized users, chooseLogintoo.
Learn more about private pages →
Test and publish your app
Click Preview at the top of the editor and try your app: add a task, check it off, and delete it.
When everything works, publish your app to put it online:
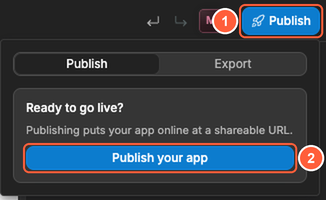
- Click
Publishat the top right of the editor. - Click
Publish your app.
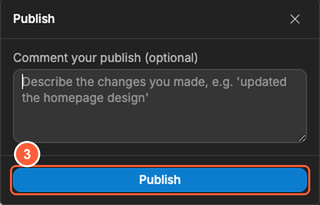
- Add a comment if you want, then click
Publish.
Since your app uses the WeWeb database, WeWeb then asks what to do with your data. On the first publish, it copies your editor data to the live app. When it's done, open your app: since Home is private, you land on the Login page first.
Learn more about publishing your application →
CONTINUE LEARNING
Now that your first app is live, see more examples of what you can build with tables, API endpoints and backend workflows: