

Appearance
Return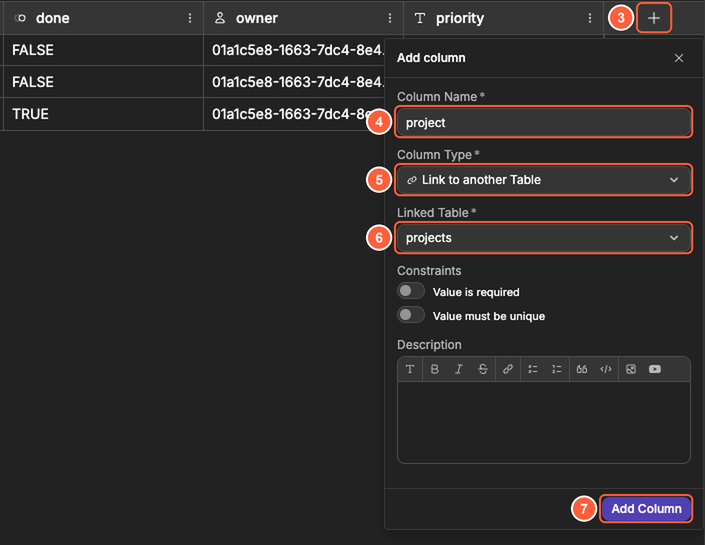

Link records from different tables
Create relationships between tables and use linked records in your interface and APIs.
Steps at a glance
- Decide what you want to link (one-to-one, one-to-many, or many-to-many).
- Create a relationship column between your tables.
- Create records and link them together.
- Retrieve linked records in your interface (or from an API).
1) Decide what you want to link
Before you add a relationship, clarify how the data should connect:
- One-to-one — One record links to one record (for example,
User→Profile). Add the link column, then turn onValue must be uniqueso each record can only be linked once. - One-to-many — One record links to many records (for example,
Customer→Orders). Add the link column in the "many" table (Orders). - Many-to-many — Many records link to many records (for example,
Students↔Courses). Create a third table (for exampleEnrollments) with one link column to each table.
2) Create a relationship between two tables
Example: Customers and Orders (one customer can have many orders).
- Open the
Data & APItab, then open theTablessubtab. - Open the table you want to edit (for example
Orders). - Click the
+at the end of the column headers to add a column. - Enter a
Column Name(for examplecustomer). - Choose
Link to another Tableas theColumn Type. - In
Linked Table, select the table you want to link to (for exampleCustomers). - Click
Add Column.
3) Create and link records
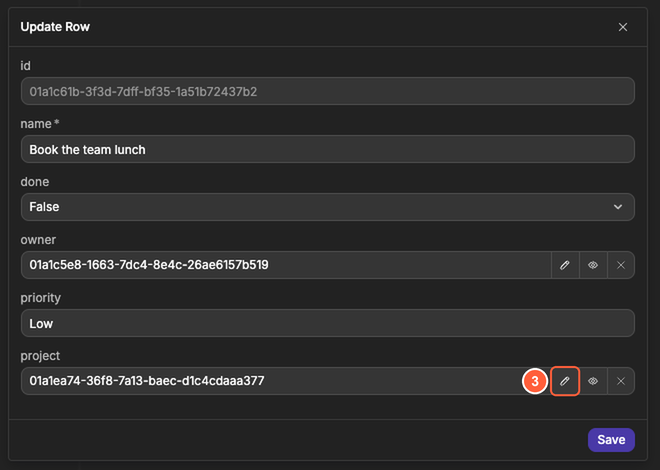
- Create a
Customerrecord. - Create an
Orderrecord. - In the
Orderrecord, click the pencil icon of thecustomerfield, then click the customer you created in the list.
Now each order is linked to a specific customer.
4) Use linked records in your interface
There are two common ways to use linked records:
Option A: Retrieve records with a view
- Create a view for the table you want to show (for example
Orders). - Add any filters you need (for example “Only show orders for the current user’s customer record”).
- In your interface, retrieve the view and repeat items over the results.
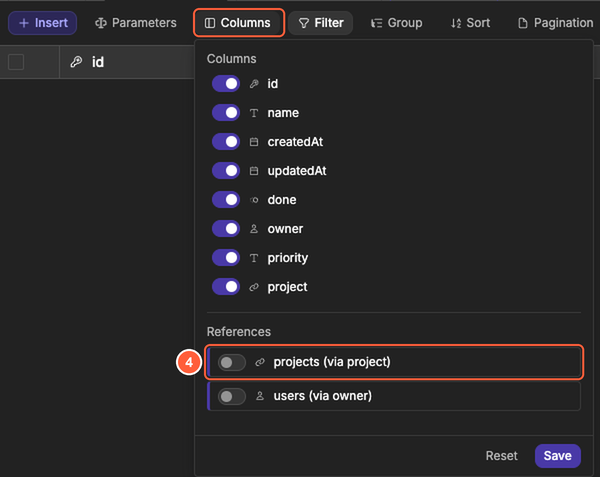
- Display fields from the linked record (for example show the order’s customer name). To include them in the view results, open the view's
Columnspanel and, underReferences, turn on the linked table (for examplecustomers (via customer)). Learn more →
Option B: Retrieve records from an API
Use an API when you need custom filtering, validation, or secure logic.
- Create an API from the
API Endpointstab in theBackend Workflowssubtab ofData & API(for exampleGET /orders). - Retrieve the records you need.
- Return the records to the interface and repeat items over the response.
Common pitfalls
The relationship field is empty
- Make sure you actually set the relationship field when creating or updating the record.
You chose the wrong relationship type
- If one customer should link to many orders, put the link column in the
Orderstable and make sureValue must be uniqueis turned off. Otherwise, each customer can only be linked to one order.
Records appear but the linked data is missing
- Check that the records are truly linked (open a record and confirm the relationship field has a value).
- If you are using a view, confirm the view includes the columns you need.