

Appearance
Return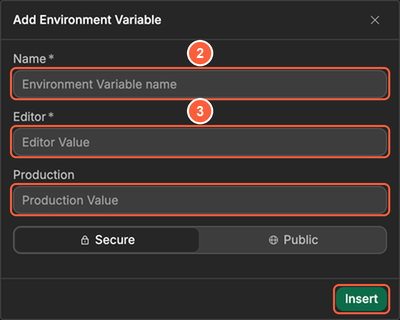
How to properly use multiple environments
Keep separate settings for development and production so you can test safely.
Steps at a glance
- Use the
Editorenvironment to build and test, andProductionfor your live app (plusStagingif your plan includes it). - Put different keys and URLs in each environment.
- Test in the editor (or on staging), then publish to production.
1) Decide what changes per environment
Common examples:
- Database or API base URLs
SSO Providerssettings- Email provider keys
2) Store environment-specific values
- Open the
Settingstab, then openEnvironment Variables. - In the
Customtab, clickInsertand enter aName(for examplePAYMENT_API_KEY). - Enter the value for
Editor(used while you build and preview) and the value forProduction, then clickInsert. If your project has a staging environment, you can also enter aStagingvalue.
Learn more about environment variables →
3) Test correctly
- Always test new changes in development first.
- When you click
Publish, check where you publish to. If your plan includes staging, usePublish to stagingfirst, thenPublish to productiononce the staging version works.
Common pitfalls
It works in development but not in production
- The production environment might be missing a value (key, URL, or allowed domain).